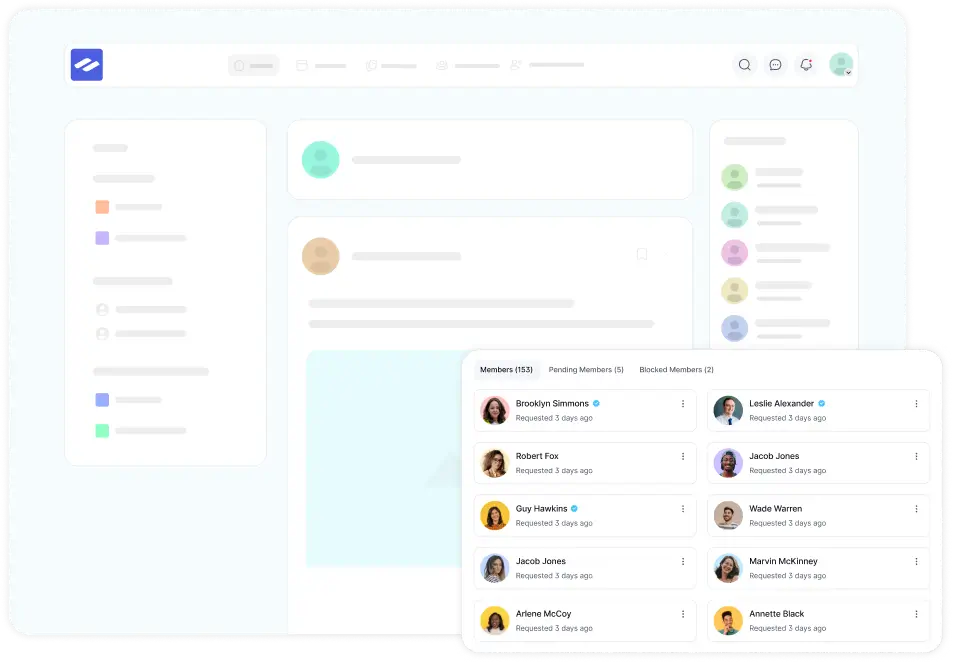
In FluentCommunity, both Admins and Members can edit their profiles, while certain settings are reserved for admins. This guide provides a walkthrough on how to view and edit your profile.
Accessing and Editing Your Profile #
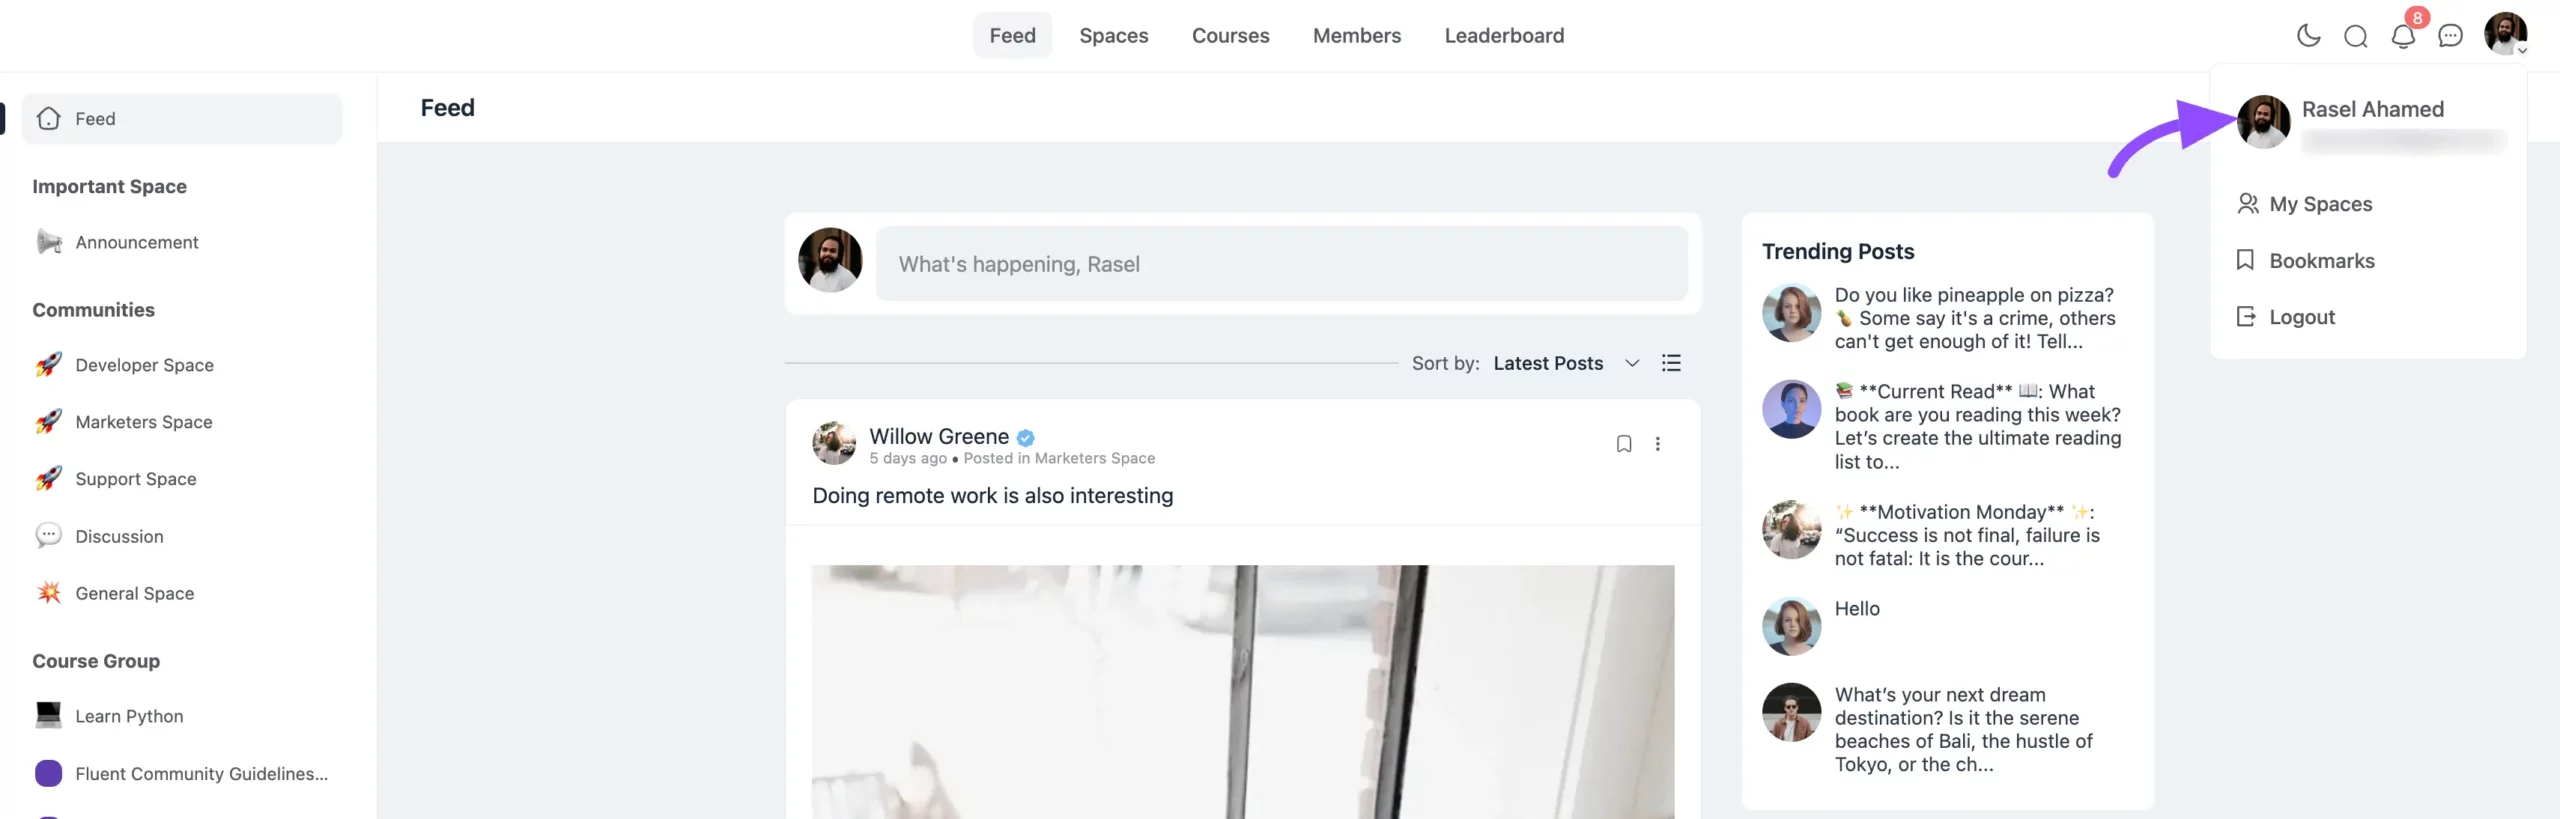
Log in to your FluentCommunity account, and click your profile dropdown in the top-right corner. Select your name to open the profile edit section.
Profile Sections Overview #
To edit your profile details, click the Edit Profile button at the top right.
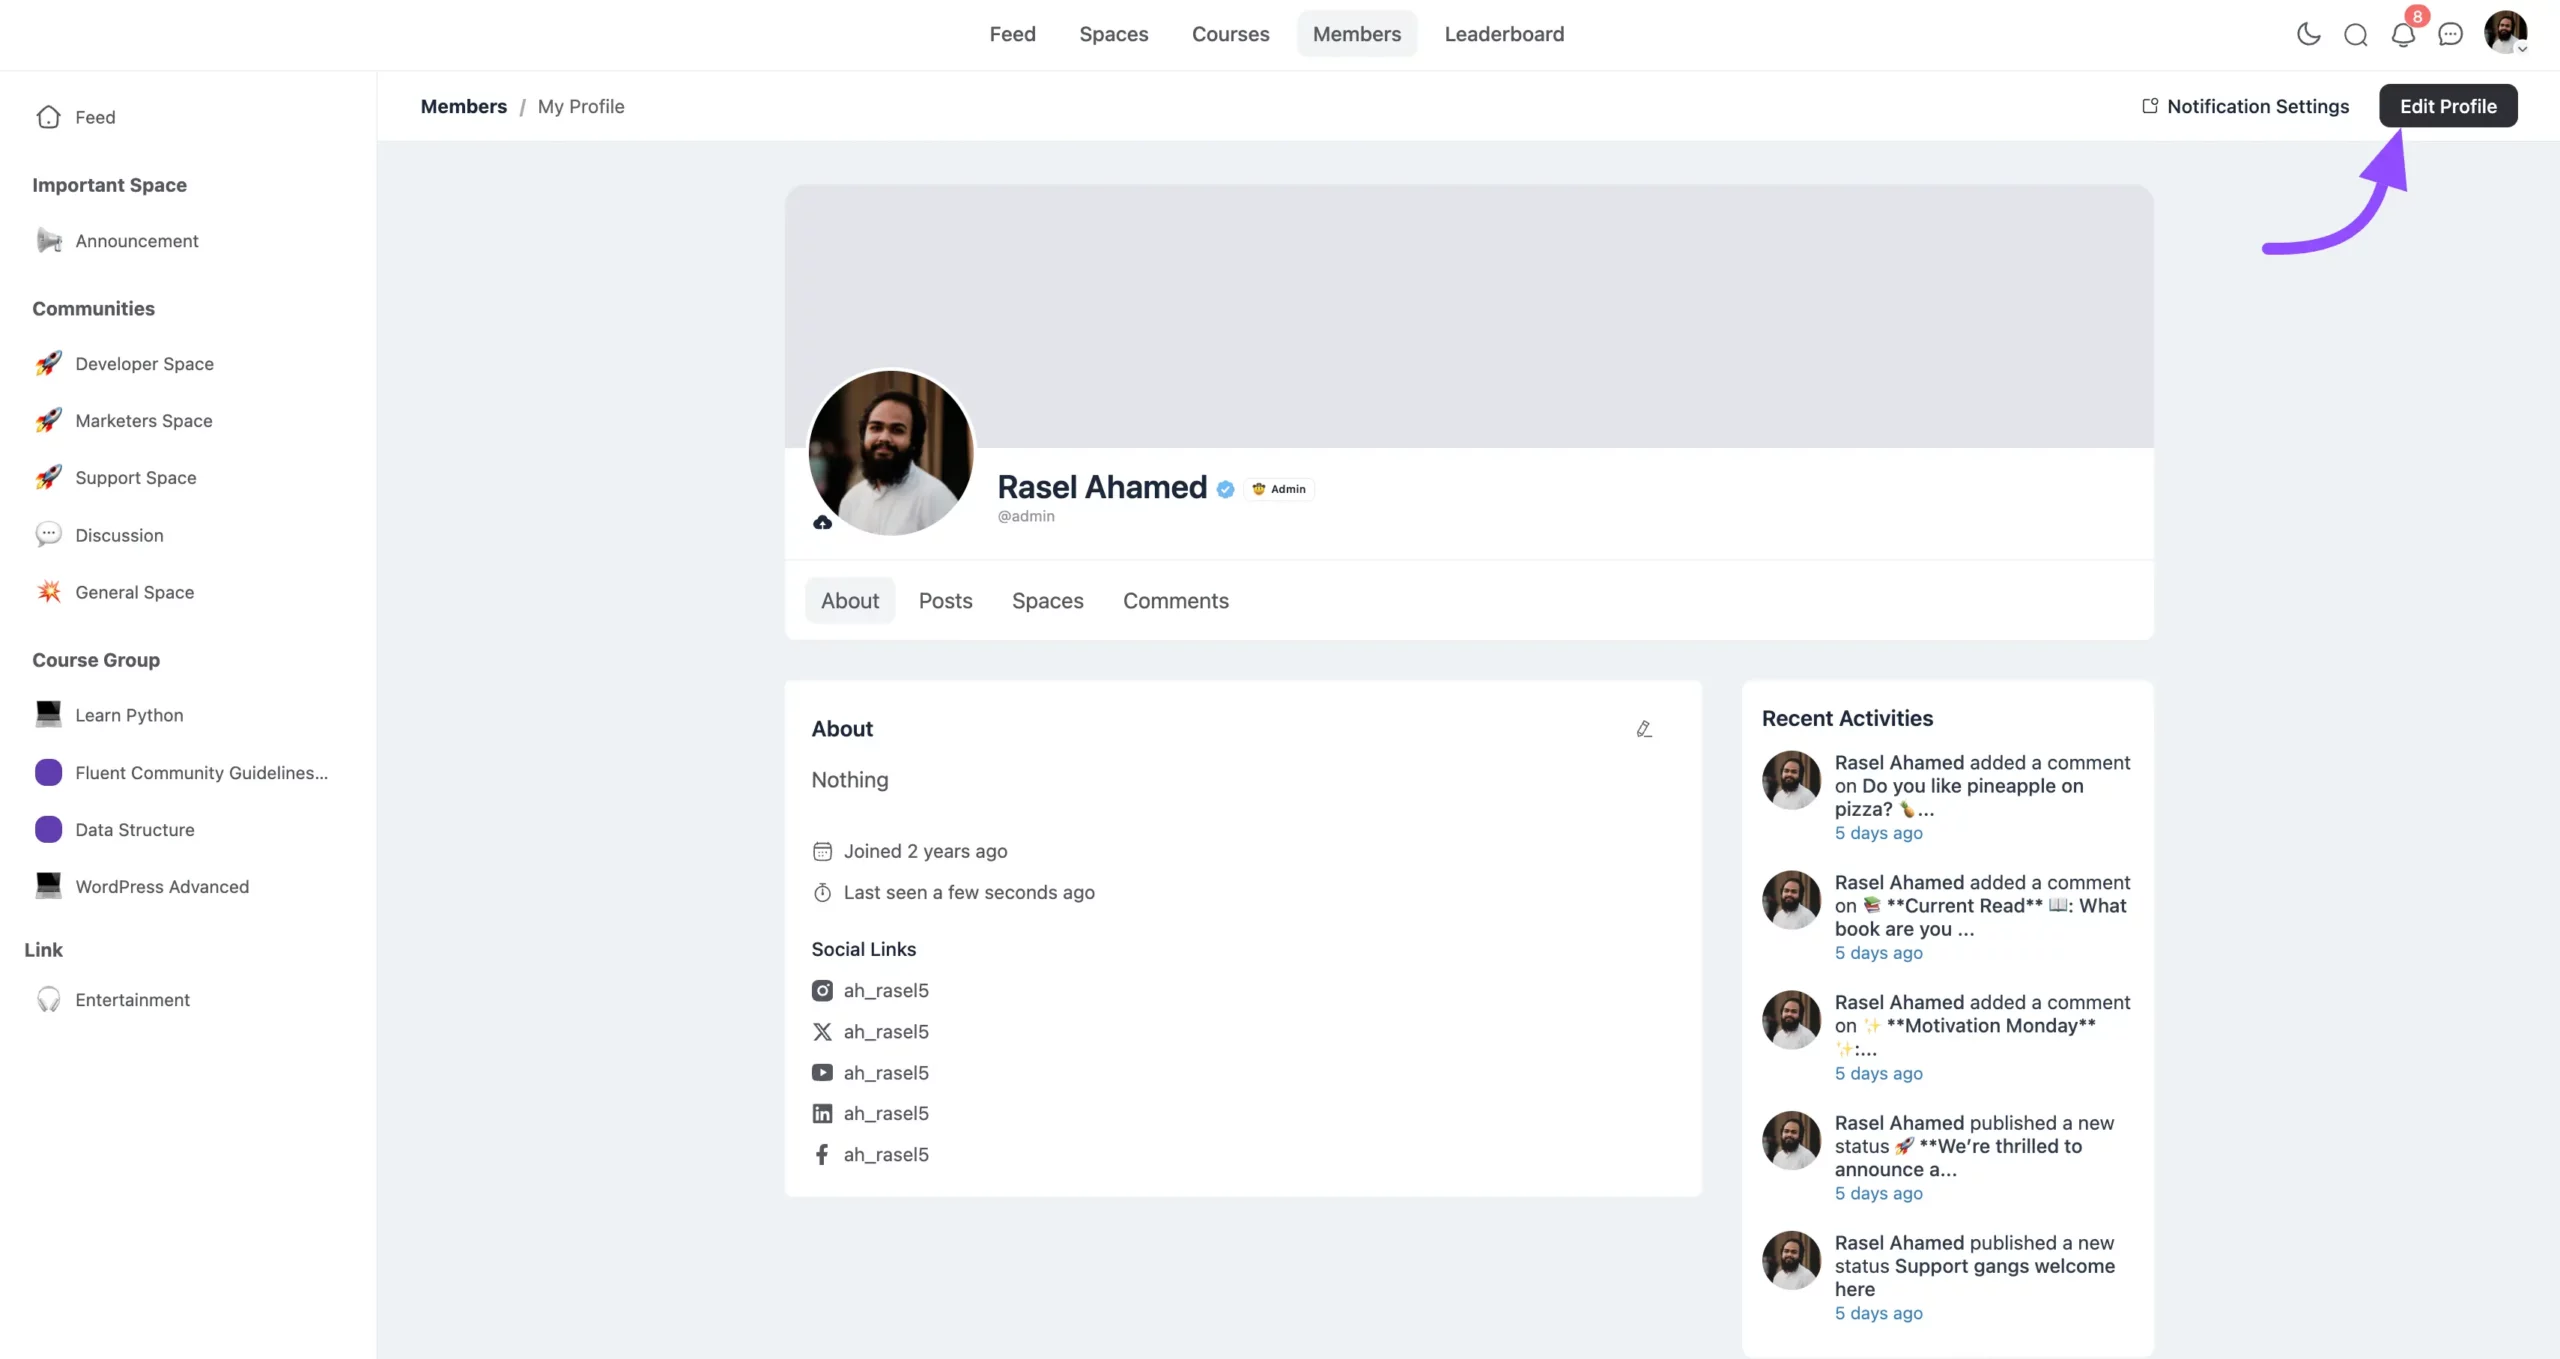
- Profile Photo: Click the cloud icon next to your current profile picture to upload or update your profile photo.
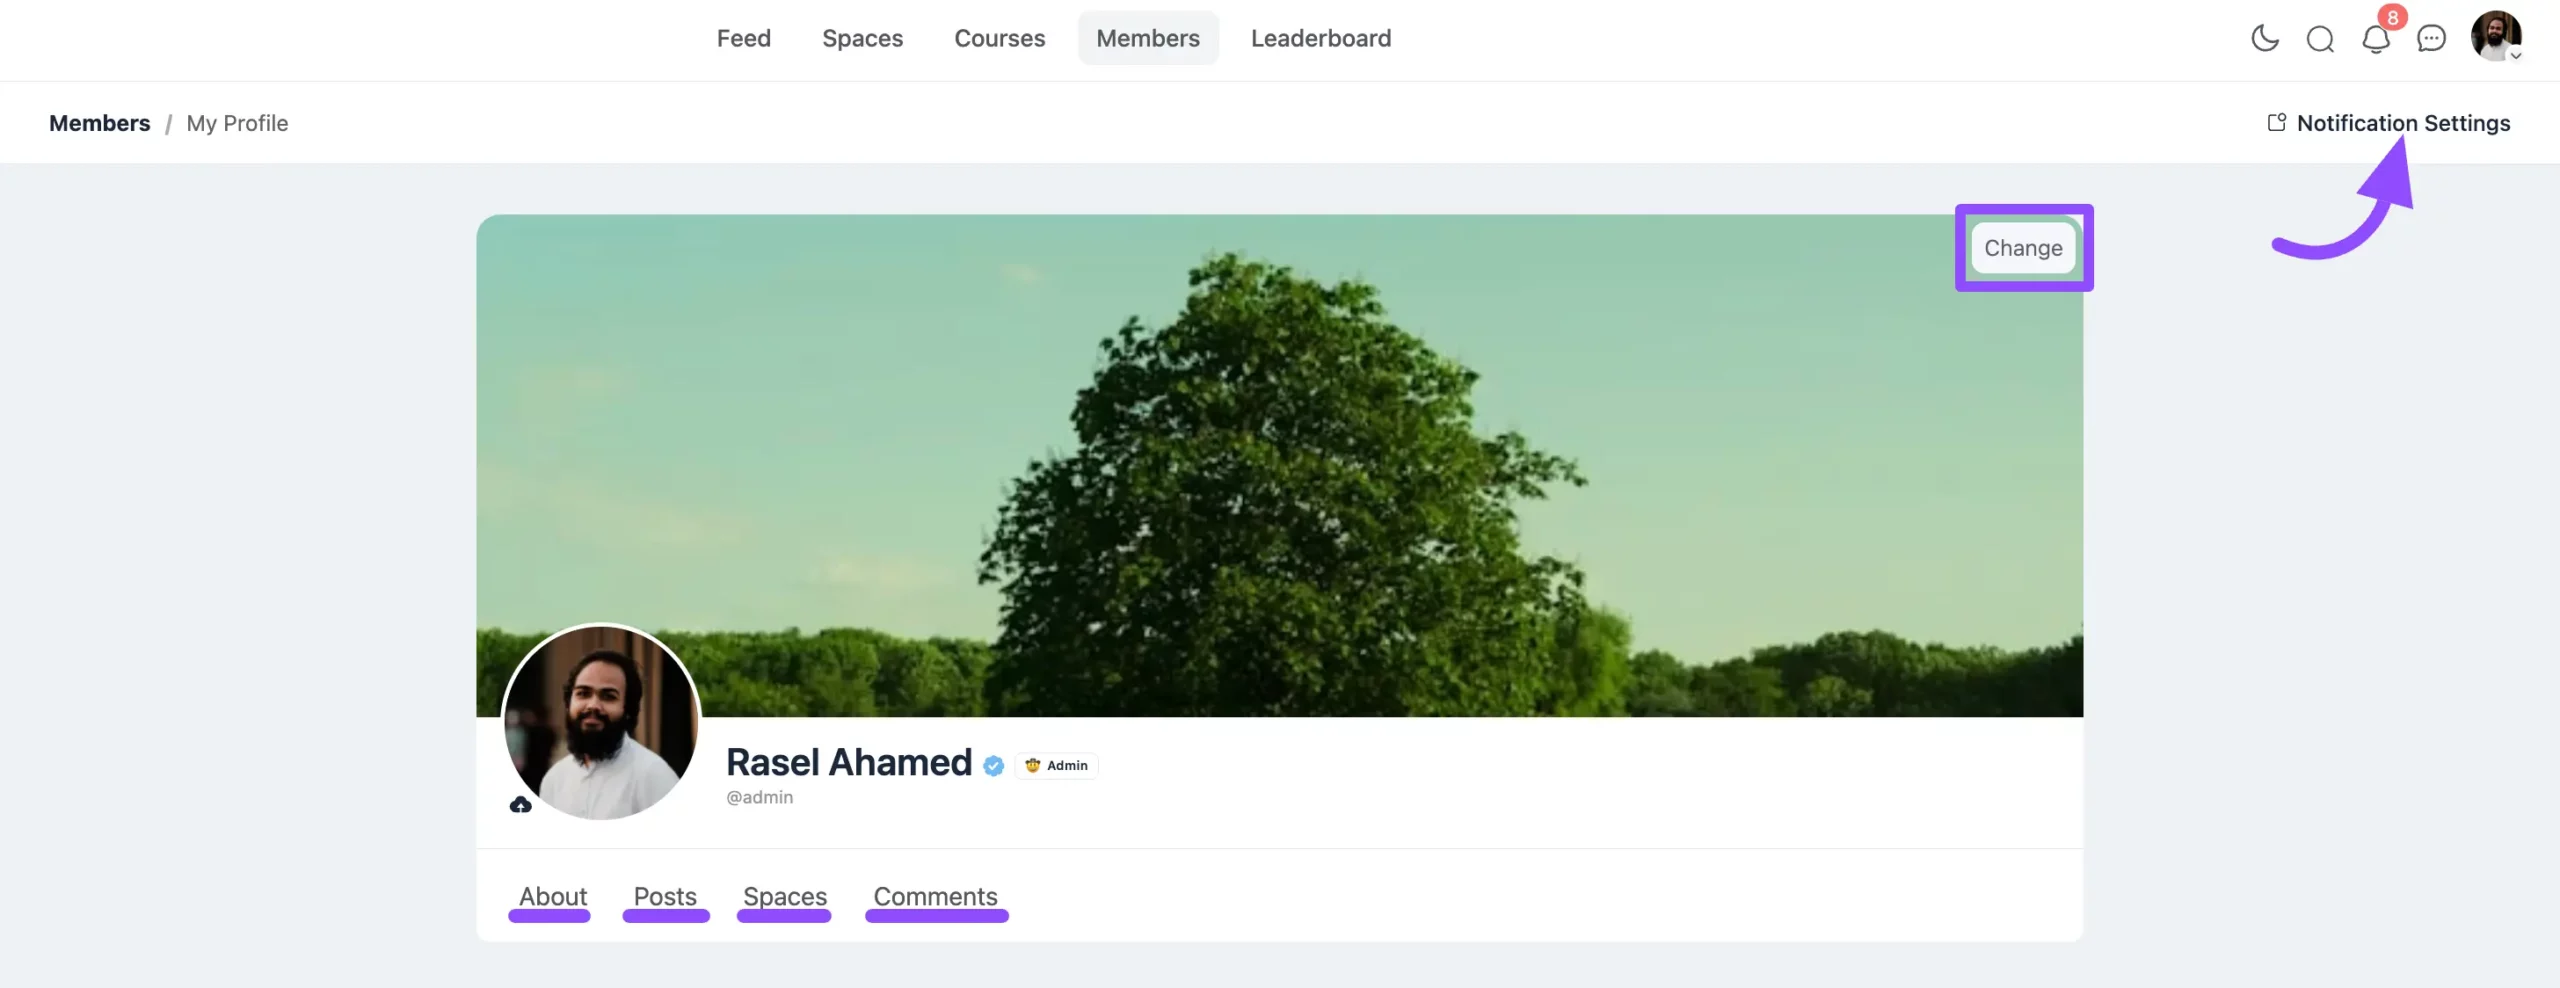
- Cover Photo: To change your cover image, click the Change button in the cover photo area.
- About: View or update your personal details by selecting About.
- Posts: See all your posts across different spaces by clicking on Posts.
- Spaces: View the spaces you’ve joined under the Spaces tab.
- Comments: Check all comments you’ve made by selecting Comments.
- Notification Settings: If you want to customize notifications for your profile click on the Notification Settings button.
Editing Your Profile Details #
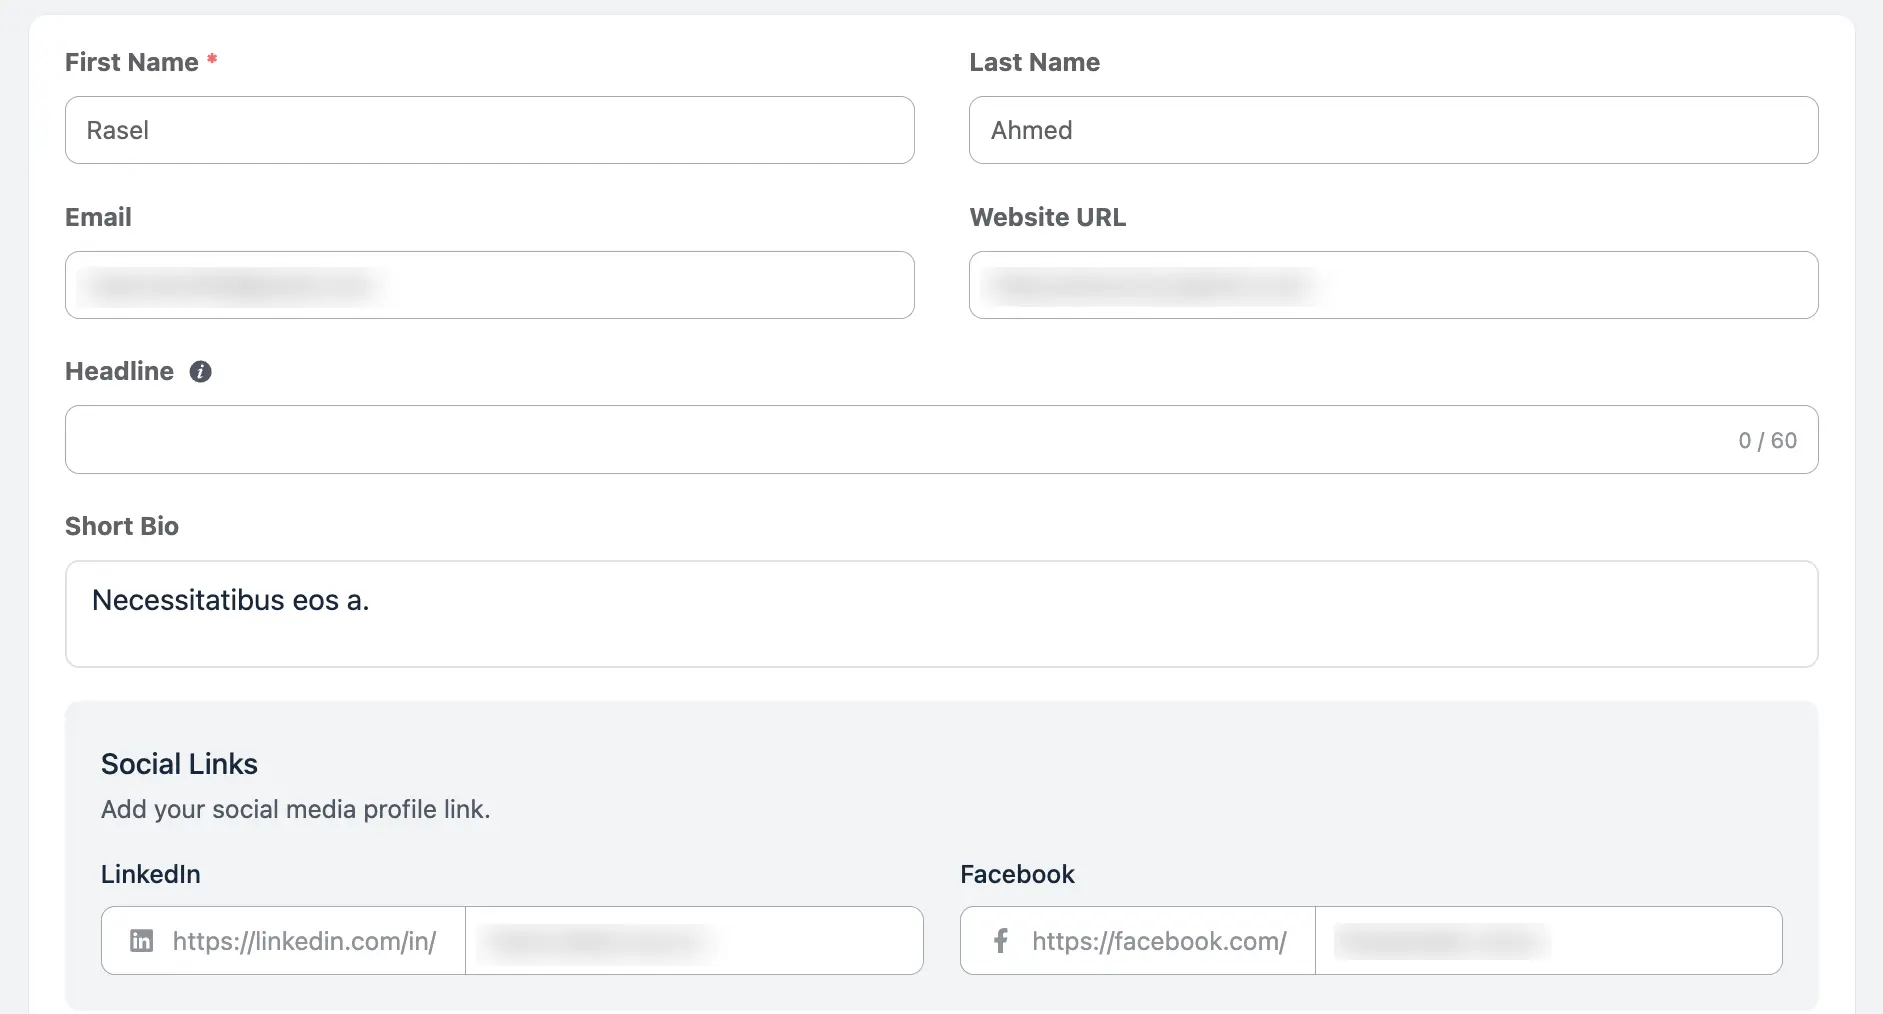
The first section lets you manage the core information shown on your profile. Fill in or update any of the fields below, then save your changes.
• First Name: Your first name. This is a required field and appears as part of your display name across the community.
• Last Name: Your last name, shown alongside your first name on your profile and posts.
• Email: The email address linked to your account. This is used for account-related communication and notifications.
• Website URL: Add a link to your personal website, portfolio, or blog so members can learn more about you.
• Headline: A short tagline that sums up who you are or what you do. It’s limited to 60 characters, so keep it brief and catchy — for example, “Community Manager & Coffee Enthusiast.”
• Short Bio: A brief description about yourself. Use this space to introduce yourself to the community and share a little about your interests or background.
Social Links
In the Social Links section, you can add your social media profile links so members can follow or connect with you on other platforms. Simply paste the last part of your profile URL after the pre-filled prefix for each network.
• LinkedIn: Add your LinkedIn profile by entering your username after https://linkedin.com/in/.
• Facebook: Add your Facebook profile by entering your username after https://facebook.com/.
Note: The available social networks may vary depending on how your community’s profile fields are configured by the admin.
Admin Actions (For Admins Only) #
If you’re an admin or moderator, you’ll see an additional Admin Actions section on a member’s profile. These tools let you verify accounts and manage member status to keep the community running smoothly.
Account Verification
Check the Mark this account as verified box to give the member a verified badge. This is a great way to confirm the identity of trusted members, team members, or well-known contributors within your community.
Moderate Posts and Comments
Enable Require approval for new posts and comments to place this specific member’s content under review before it goes live. Their new posts and comments will be flagged and hidden until an admin or moderator approves them.
Note: Admin or moderator accounts cannot be moderated, so this option will appear disabled on those profiles.
Access Status
Set the member’s account status to control their access to the community. You have three options:
• Active: The member has full, normal access to the community.
• Pending: The member’s account is awaiting approval and has limited access until activated.
• Blocked: The member is blocked and can no longer access the community.
Community Account Username
This field lets admins set or edit the @username displayed for the member across the community spaces. Type the desired username in the field and click the Change button to update it.
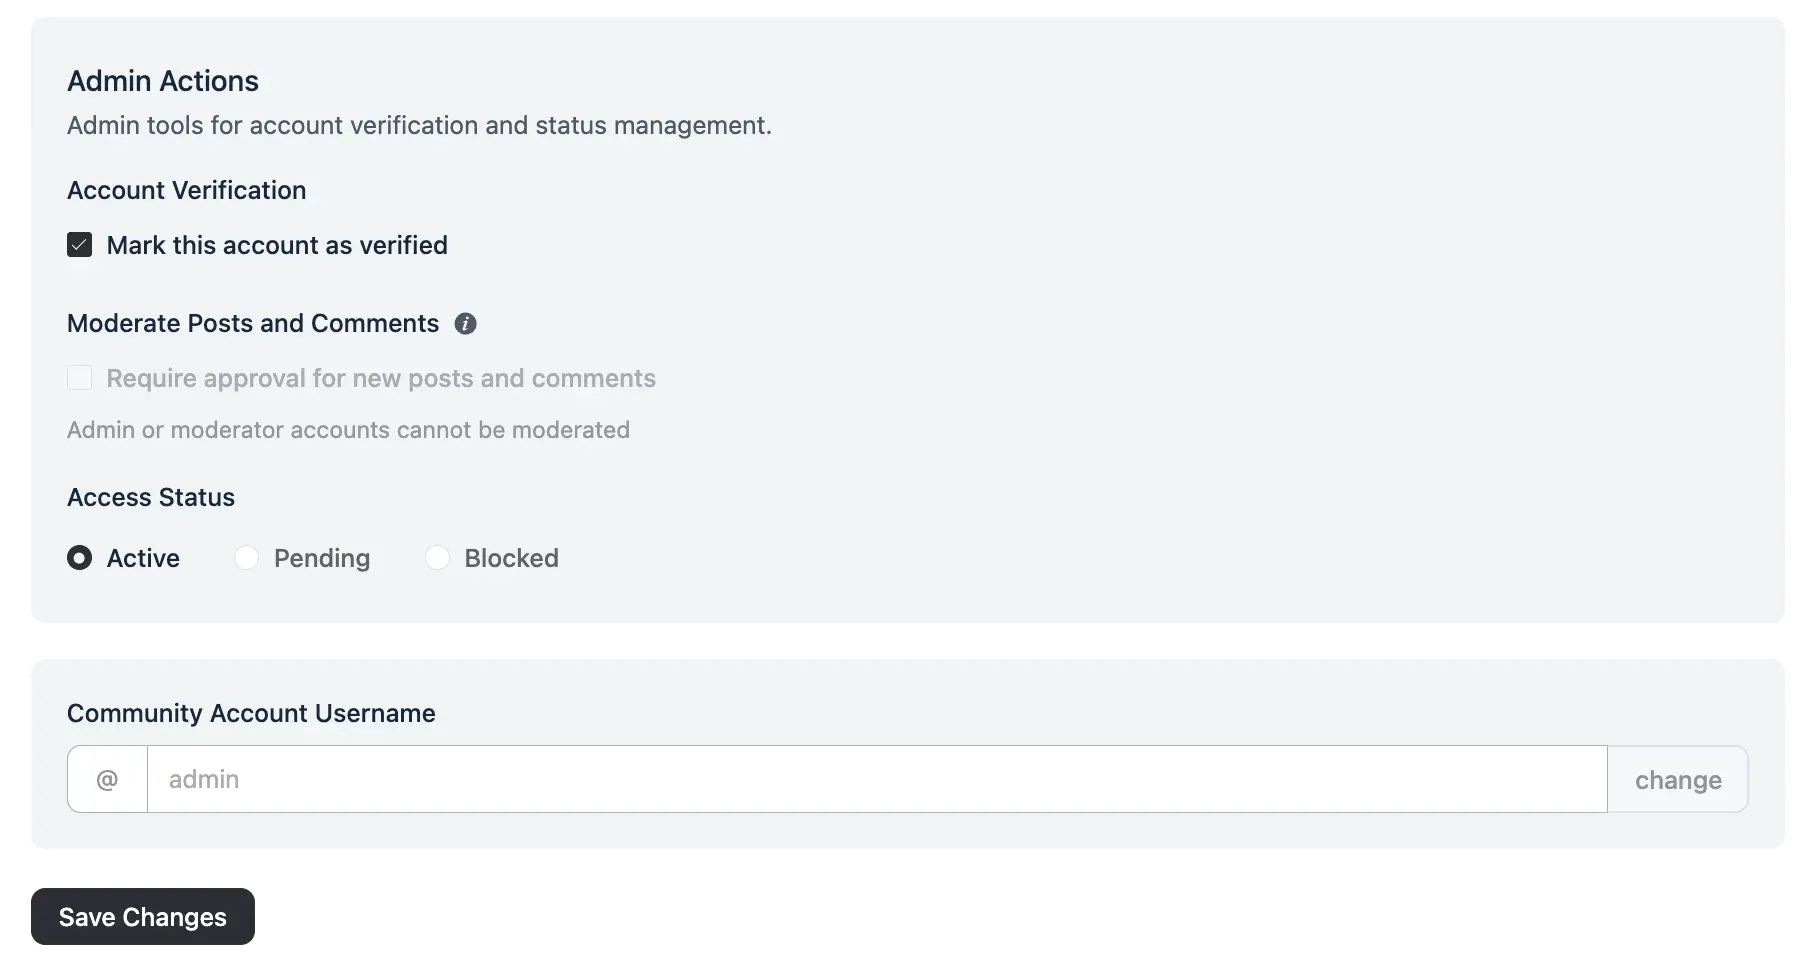
Once you’ve finished updating the profile — whether it’s your own details or an admin action — always click the Save Changes button at the bottom of the screen to make sure everything is applied.
Setting Up Custom Profile Fields (Admins Only) #
Do you need to collect more specific information from your members, such as their Age, Blood Group, or Profession? Admins can enable and build Custom Profile Fields to gather exactly what the community needs!
1. Enable the Feature
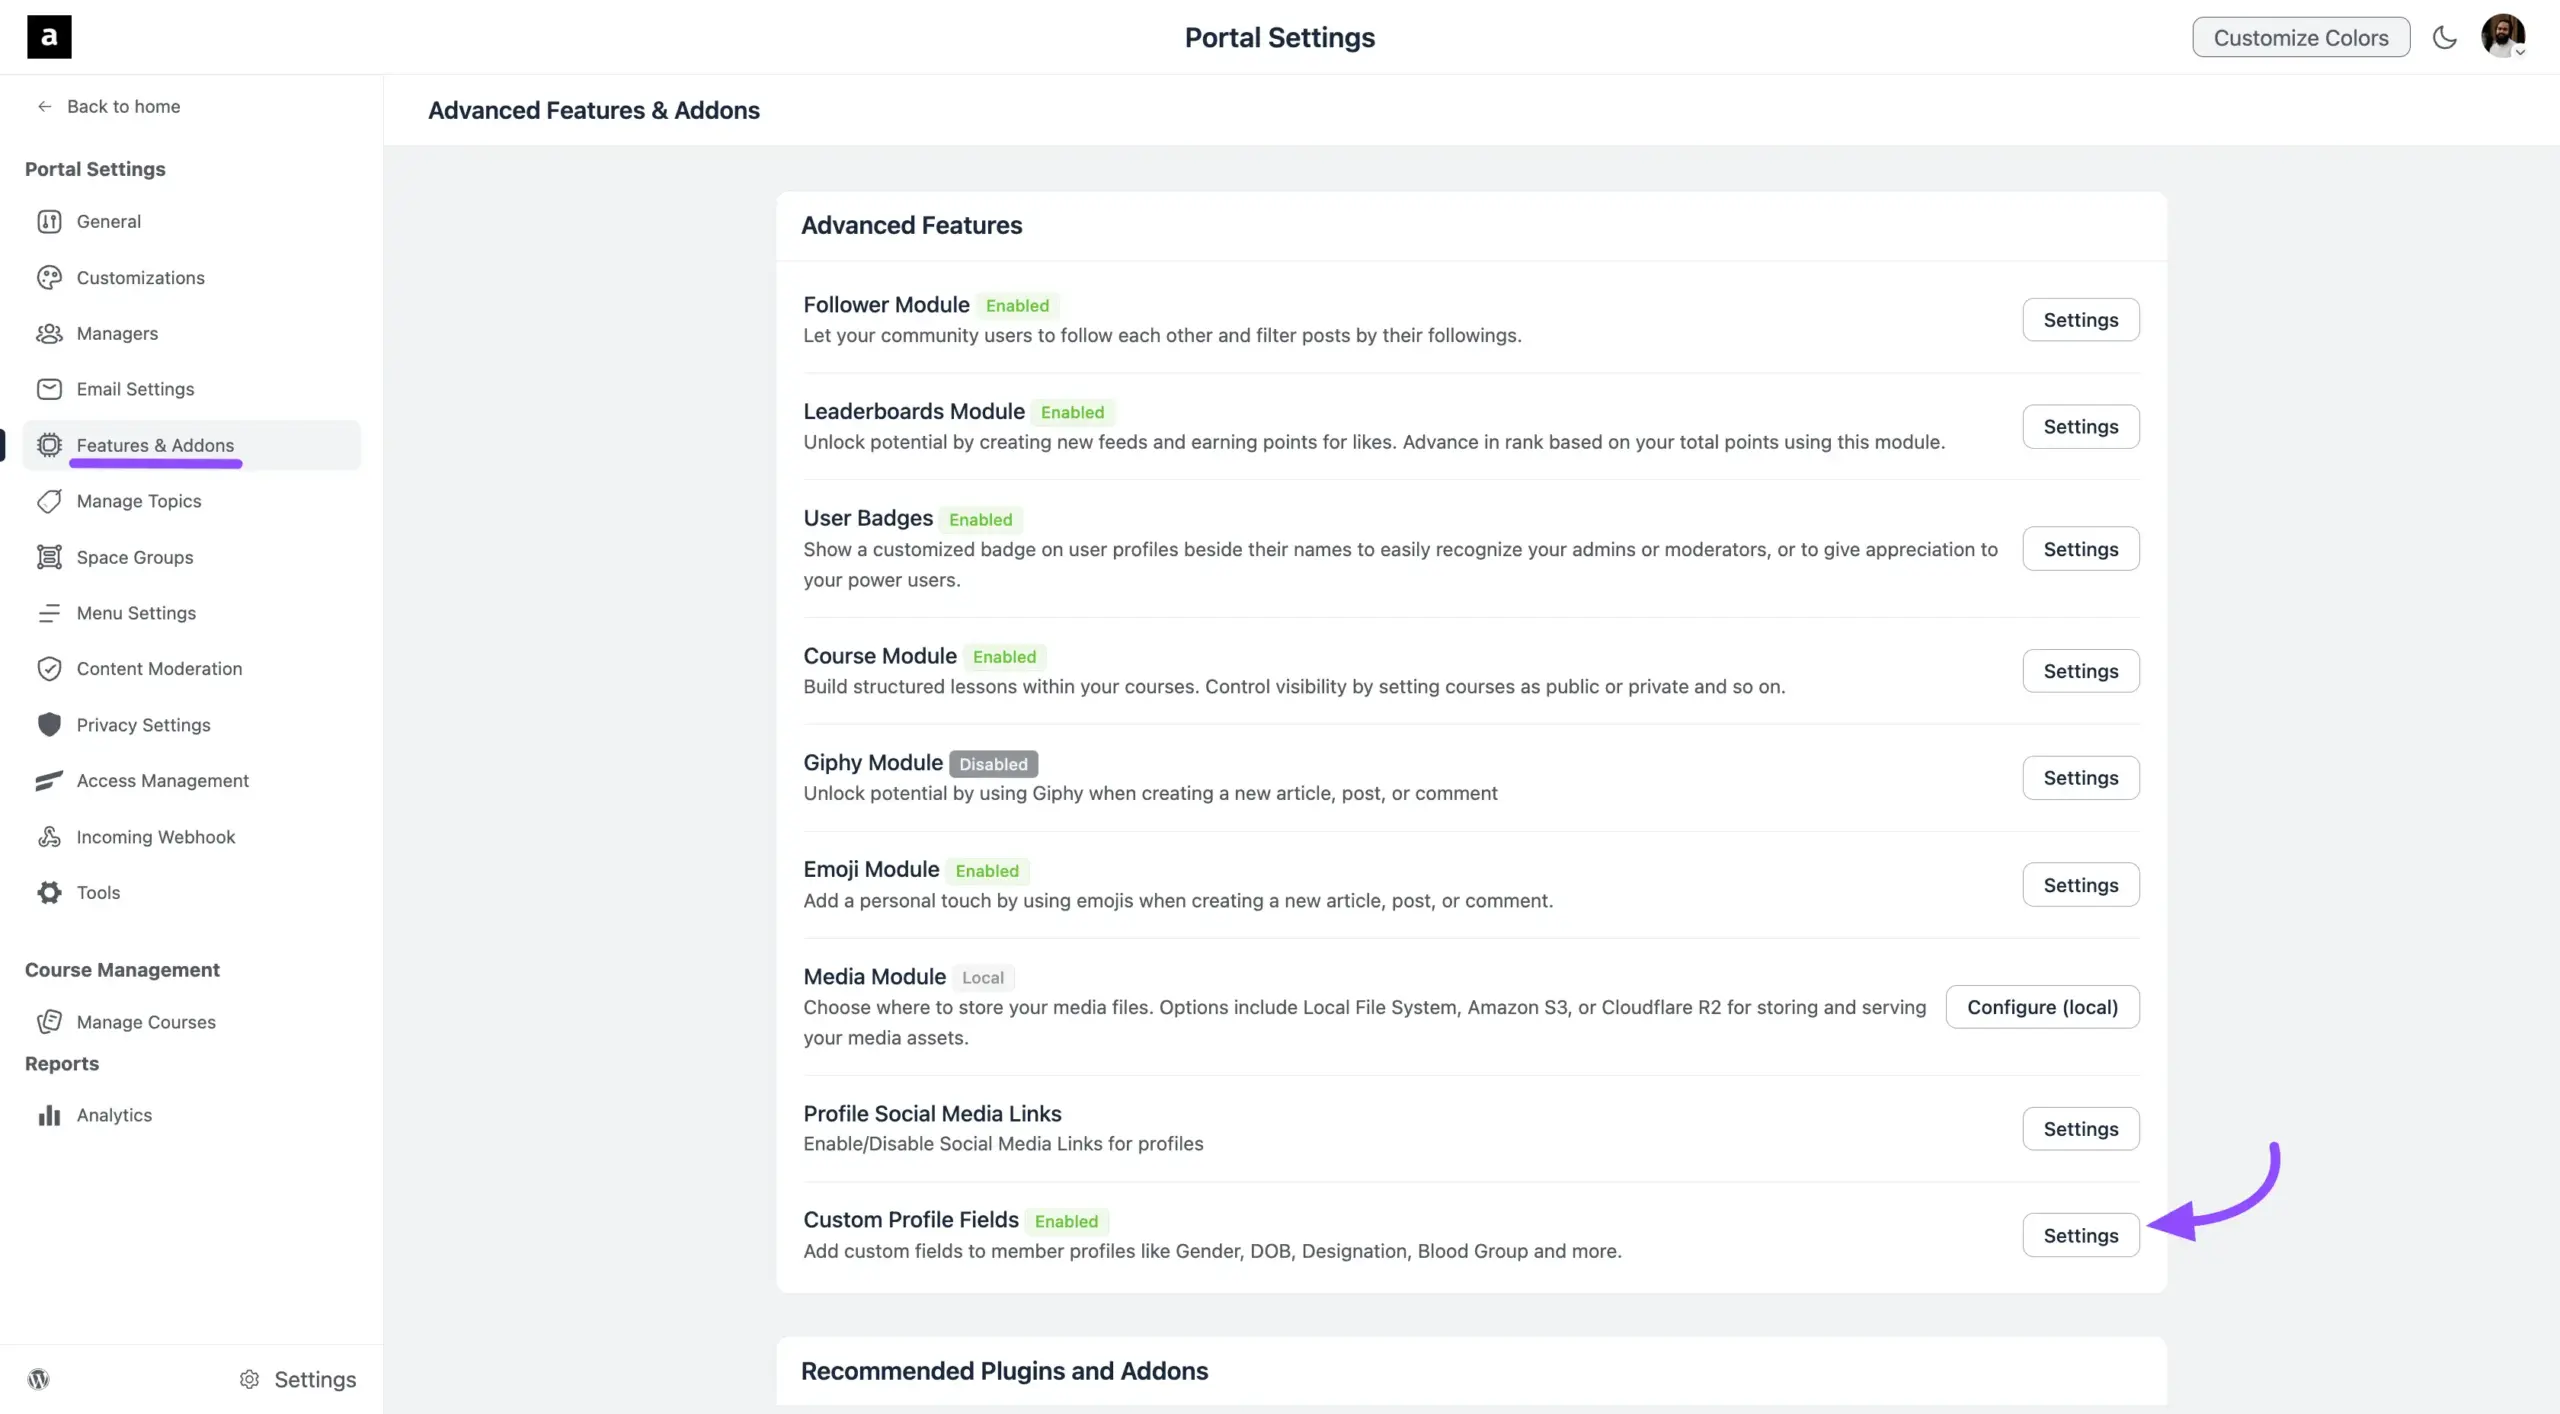
- Navigate to your WordPress Dashboard and go to FluentCommunity > Settings.
- Select Features & Addons from the left-hand menu and search for the Custom Profile Fields then click on the Settings button.
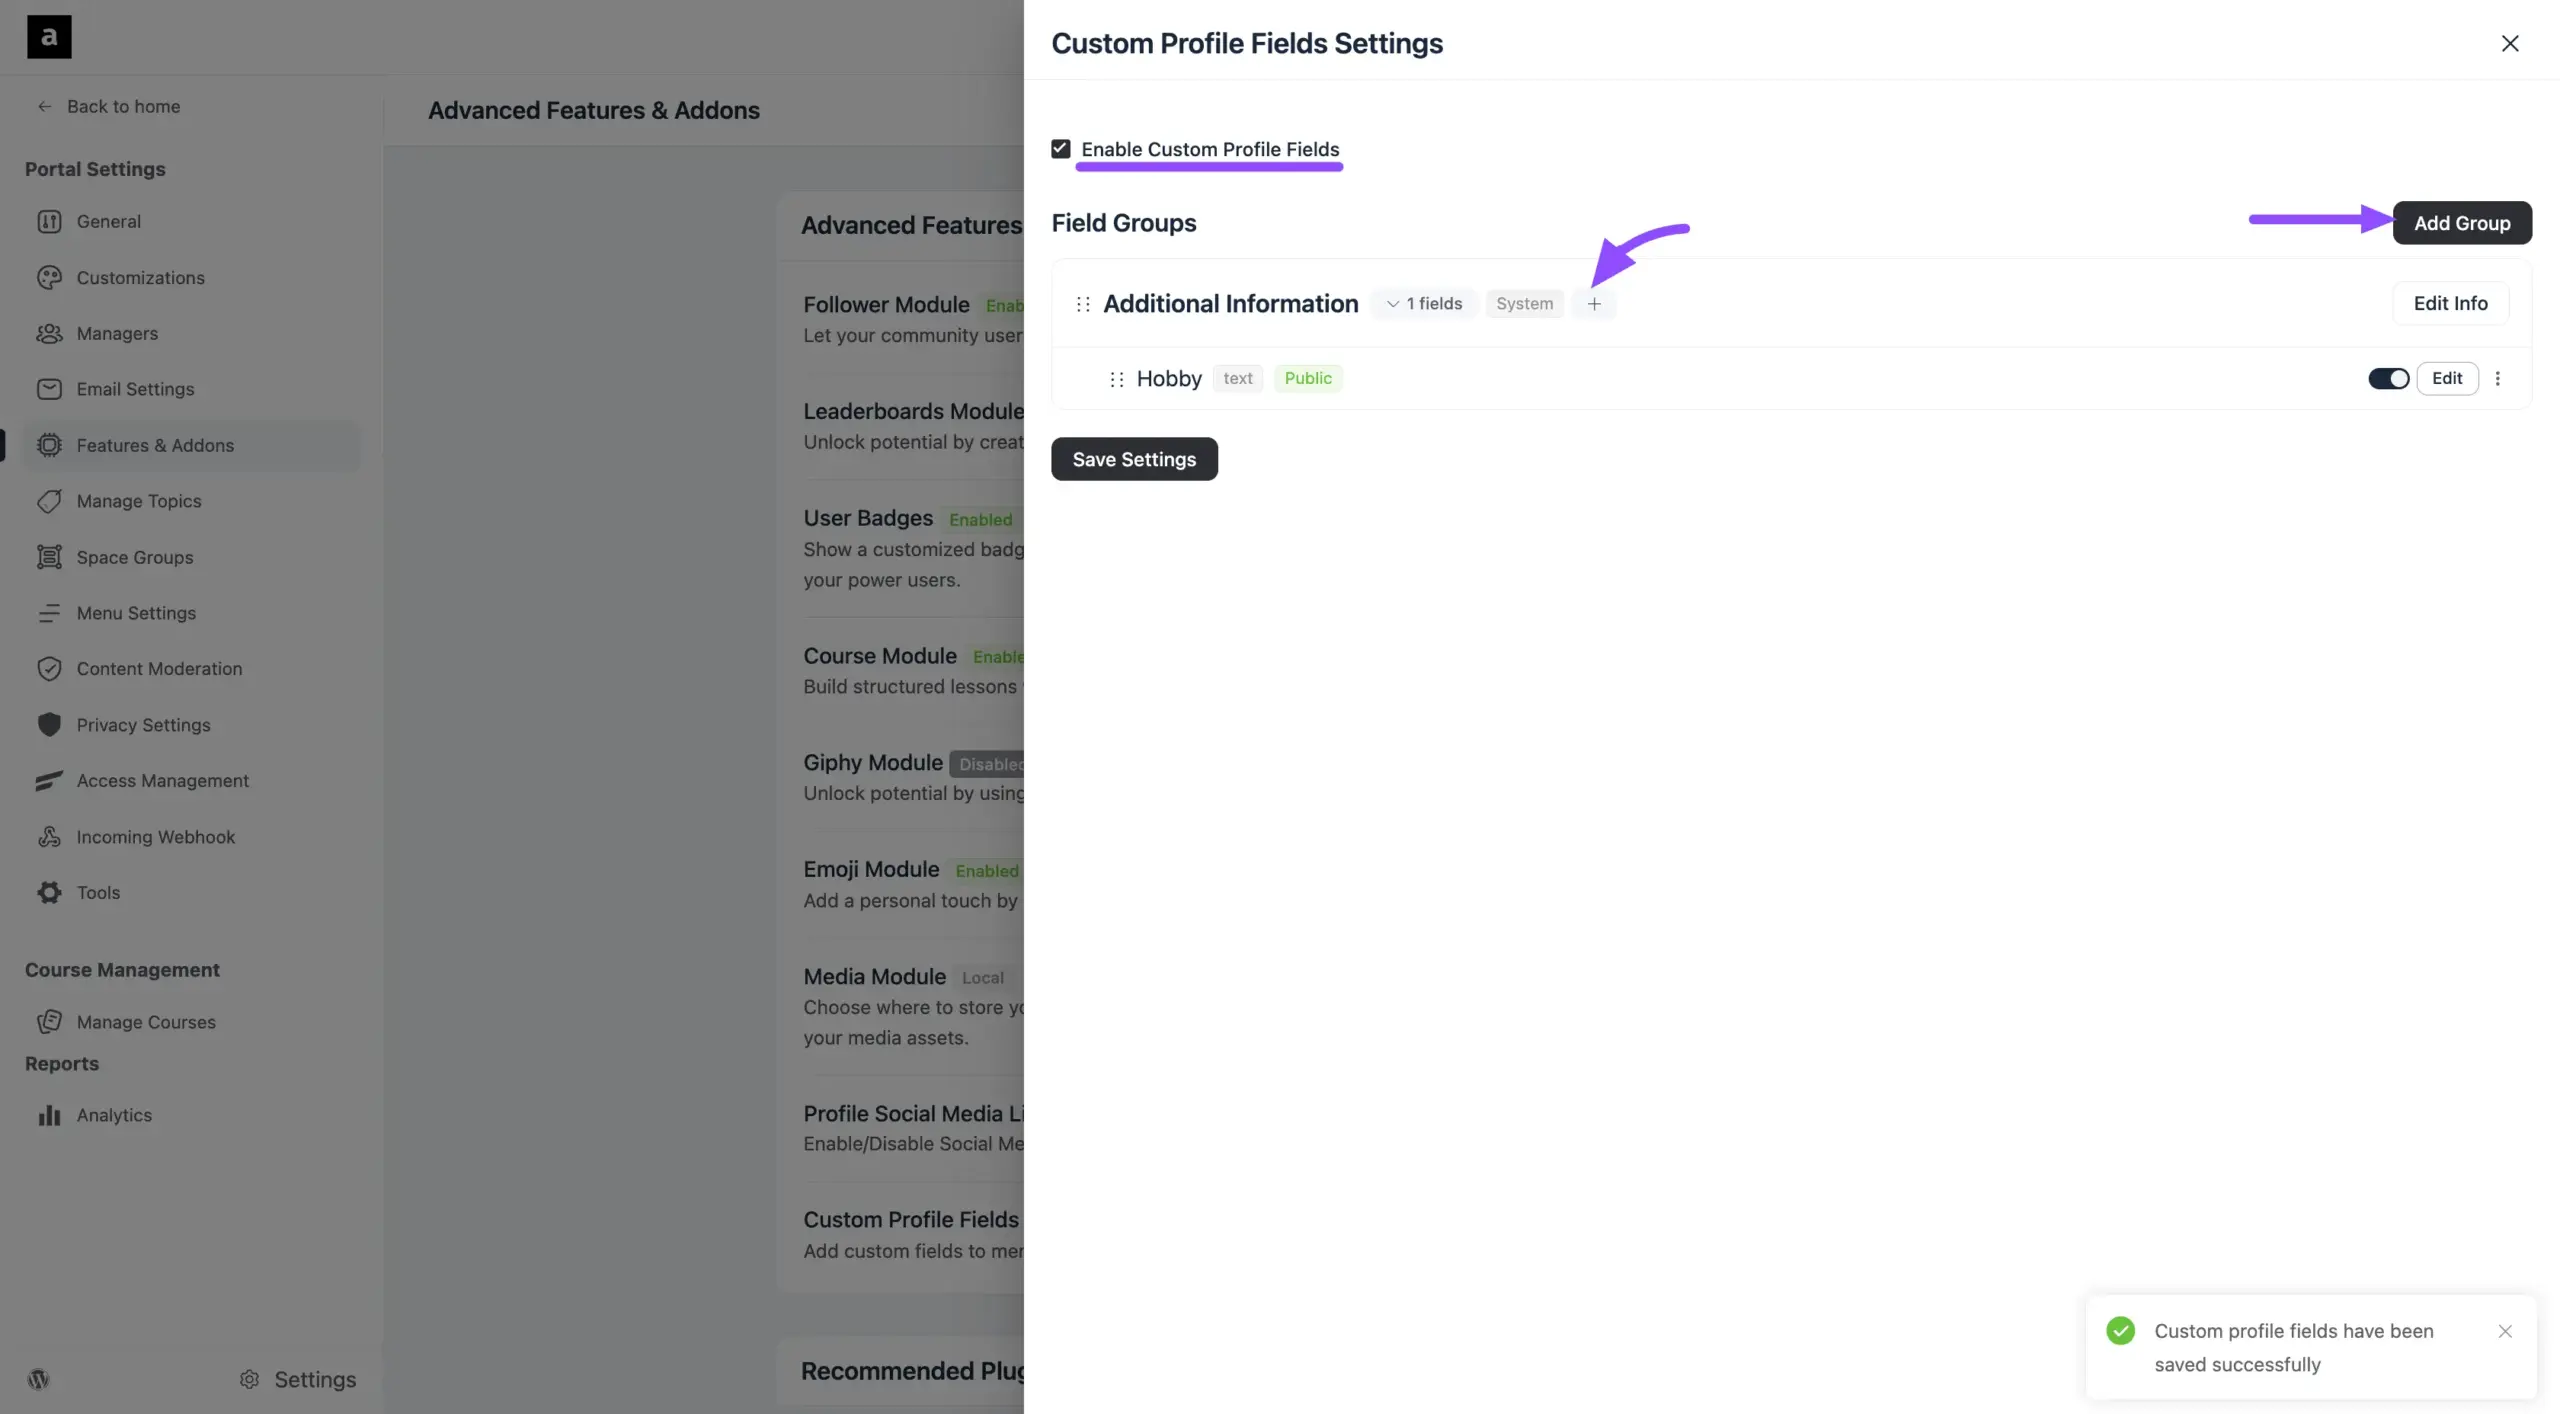
- Check the Enable Custom Profile Fields checkbox to enable the Custom Profile Filed feature.
2. Create a Field Group
- Click the Add Group button to add a custom group.
- Enter a Group Label (e.g., “Additional Info” or “Professional Details”) in the popup modal.
- Click Add to create the group.
3. Add Your Custom Fields
- Inside your newly created group, click the (+) icon button to Add New Field.
- Choose your desired field type (Text, Textarea, Select, Radio, Checkbox, etc.).
- Configure the field options (like field labels and choices) and save your settings.
- Then you will see that your custom field has been added, you can edit or modify it anytime by clicking on the Edit button along with the custom filed.
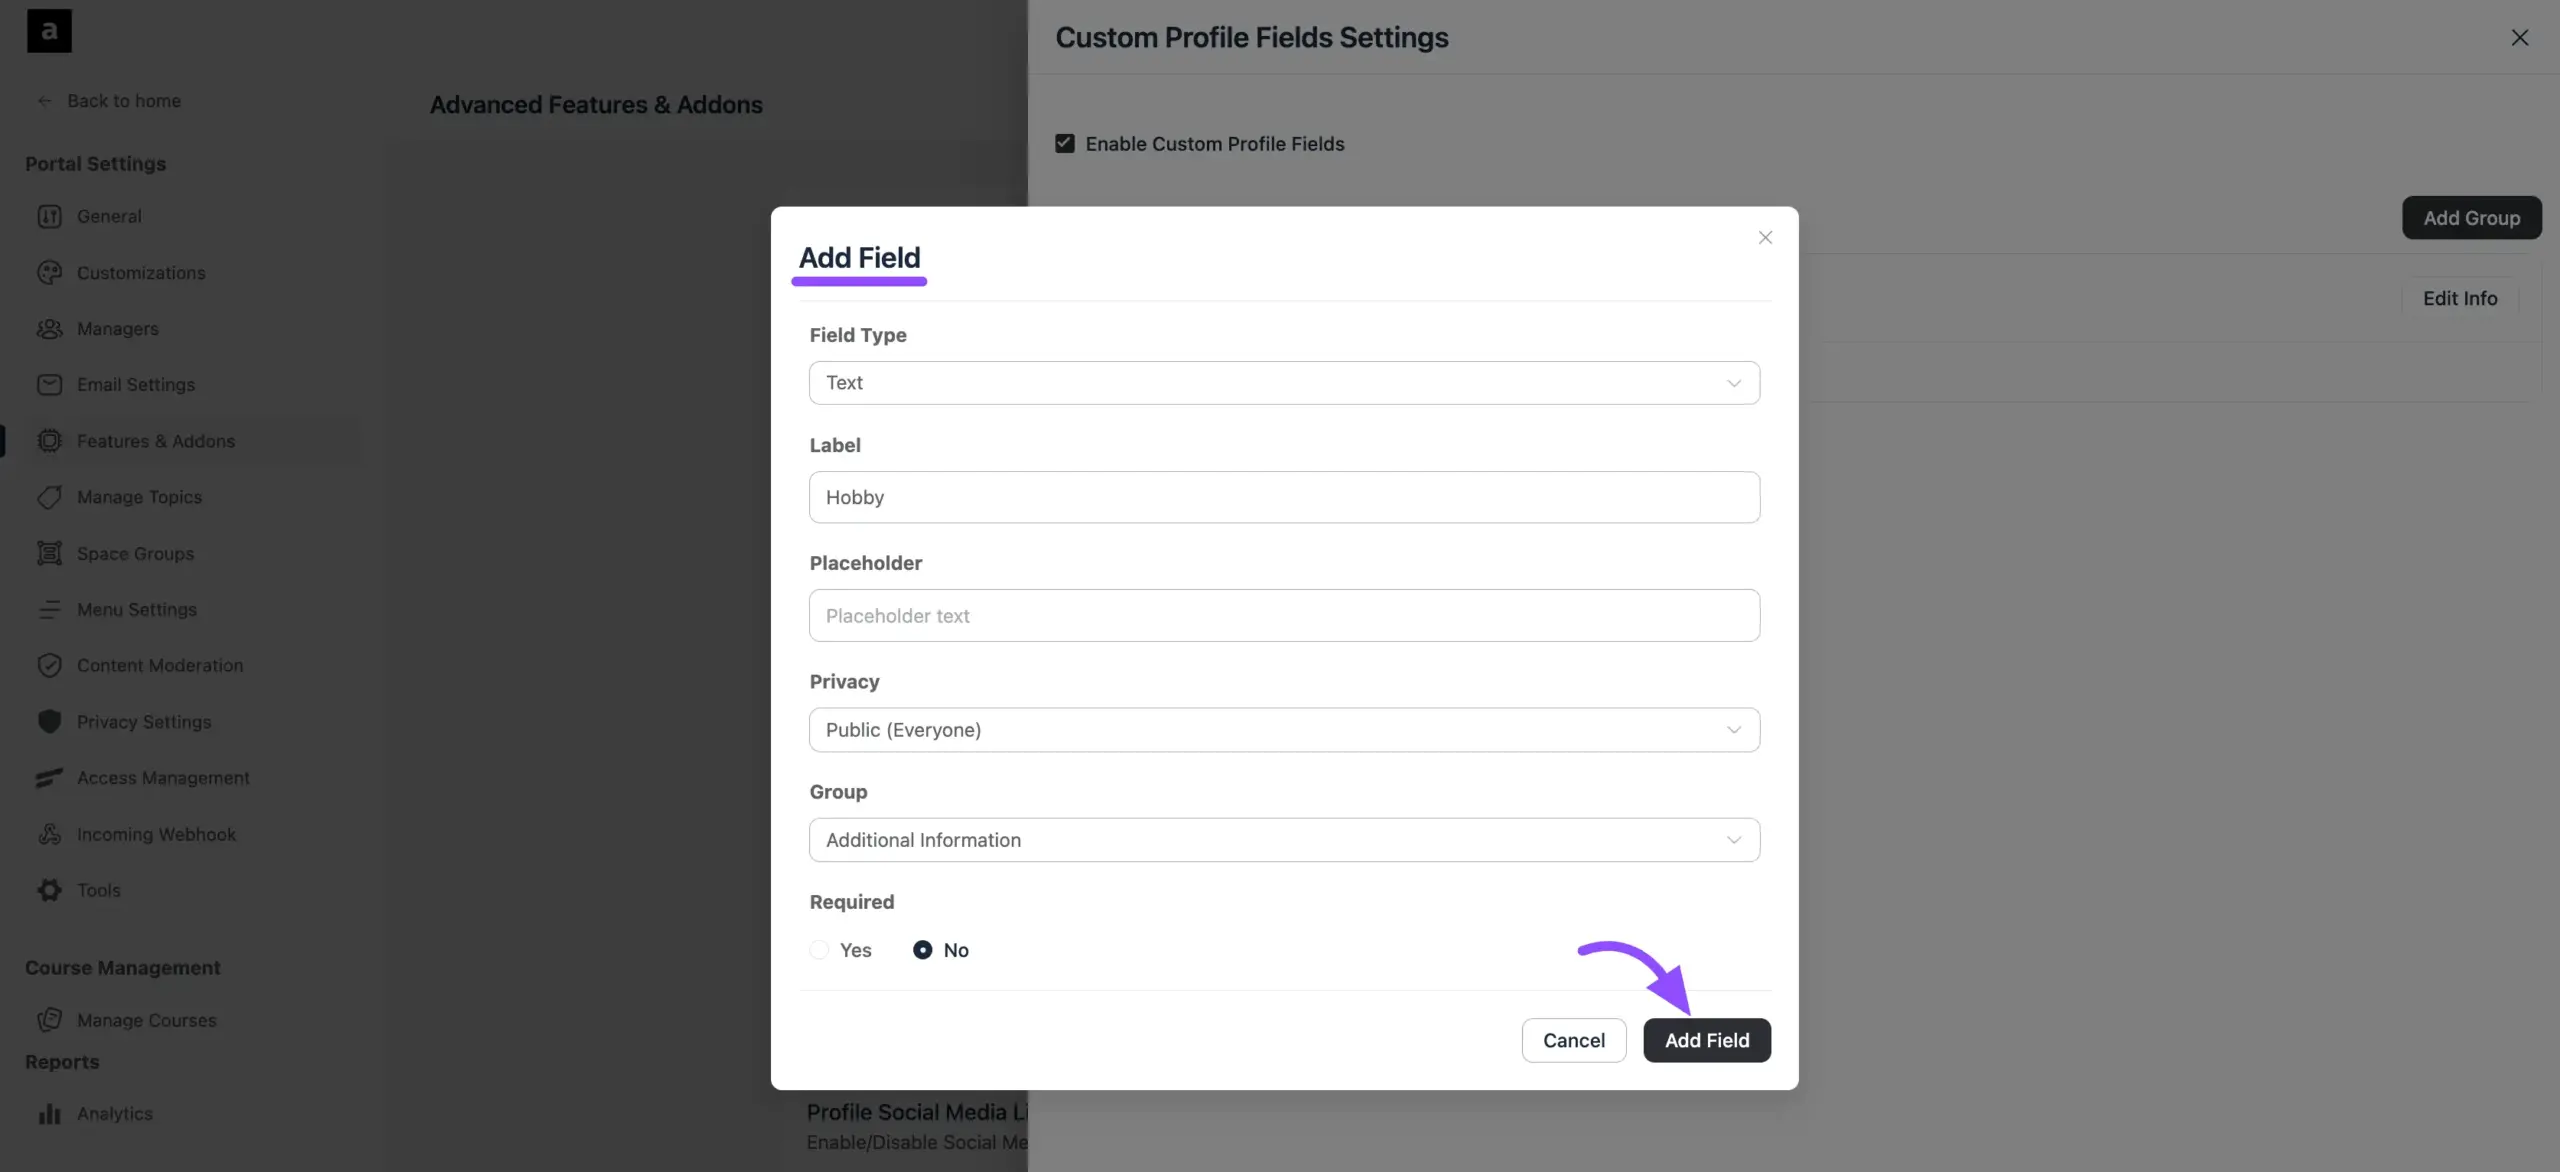
Note: Once saved, these custom fields will automatically become available on the profile edit screens for your members!
Filling Out Additional Information #
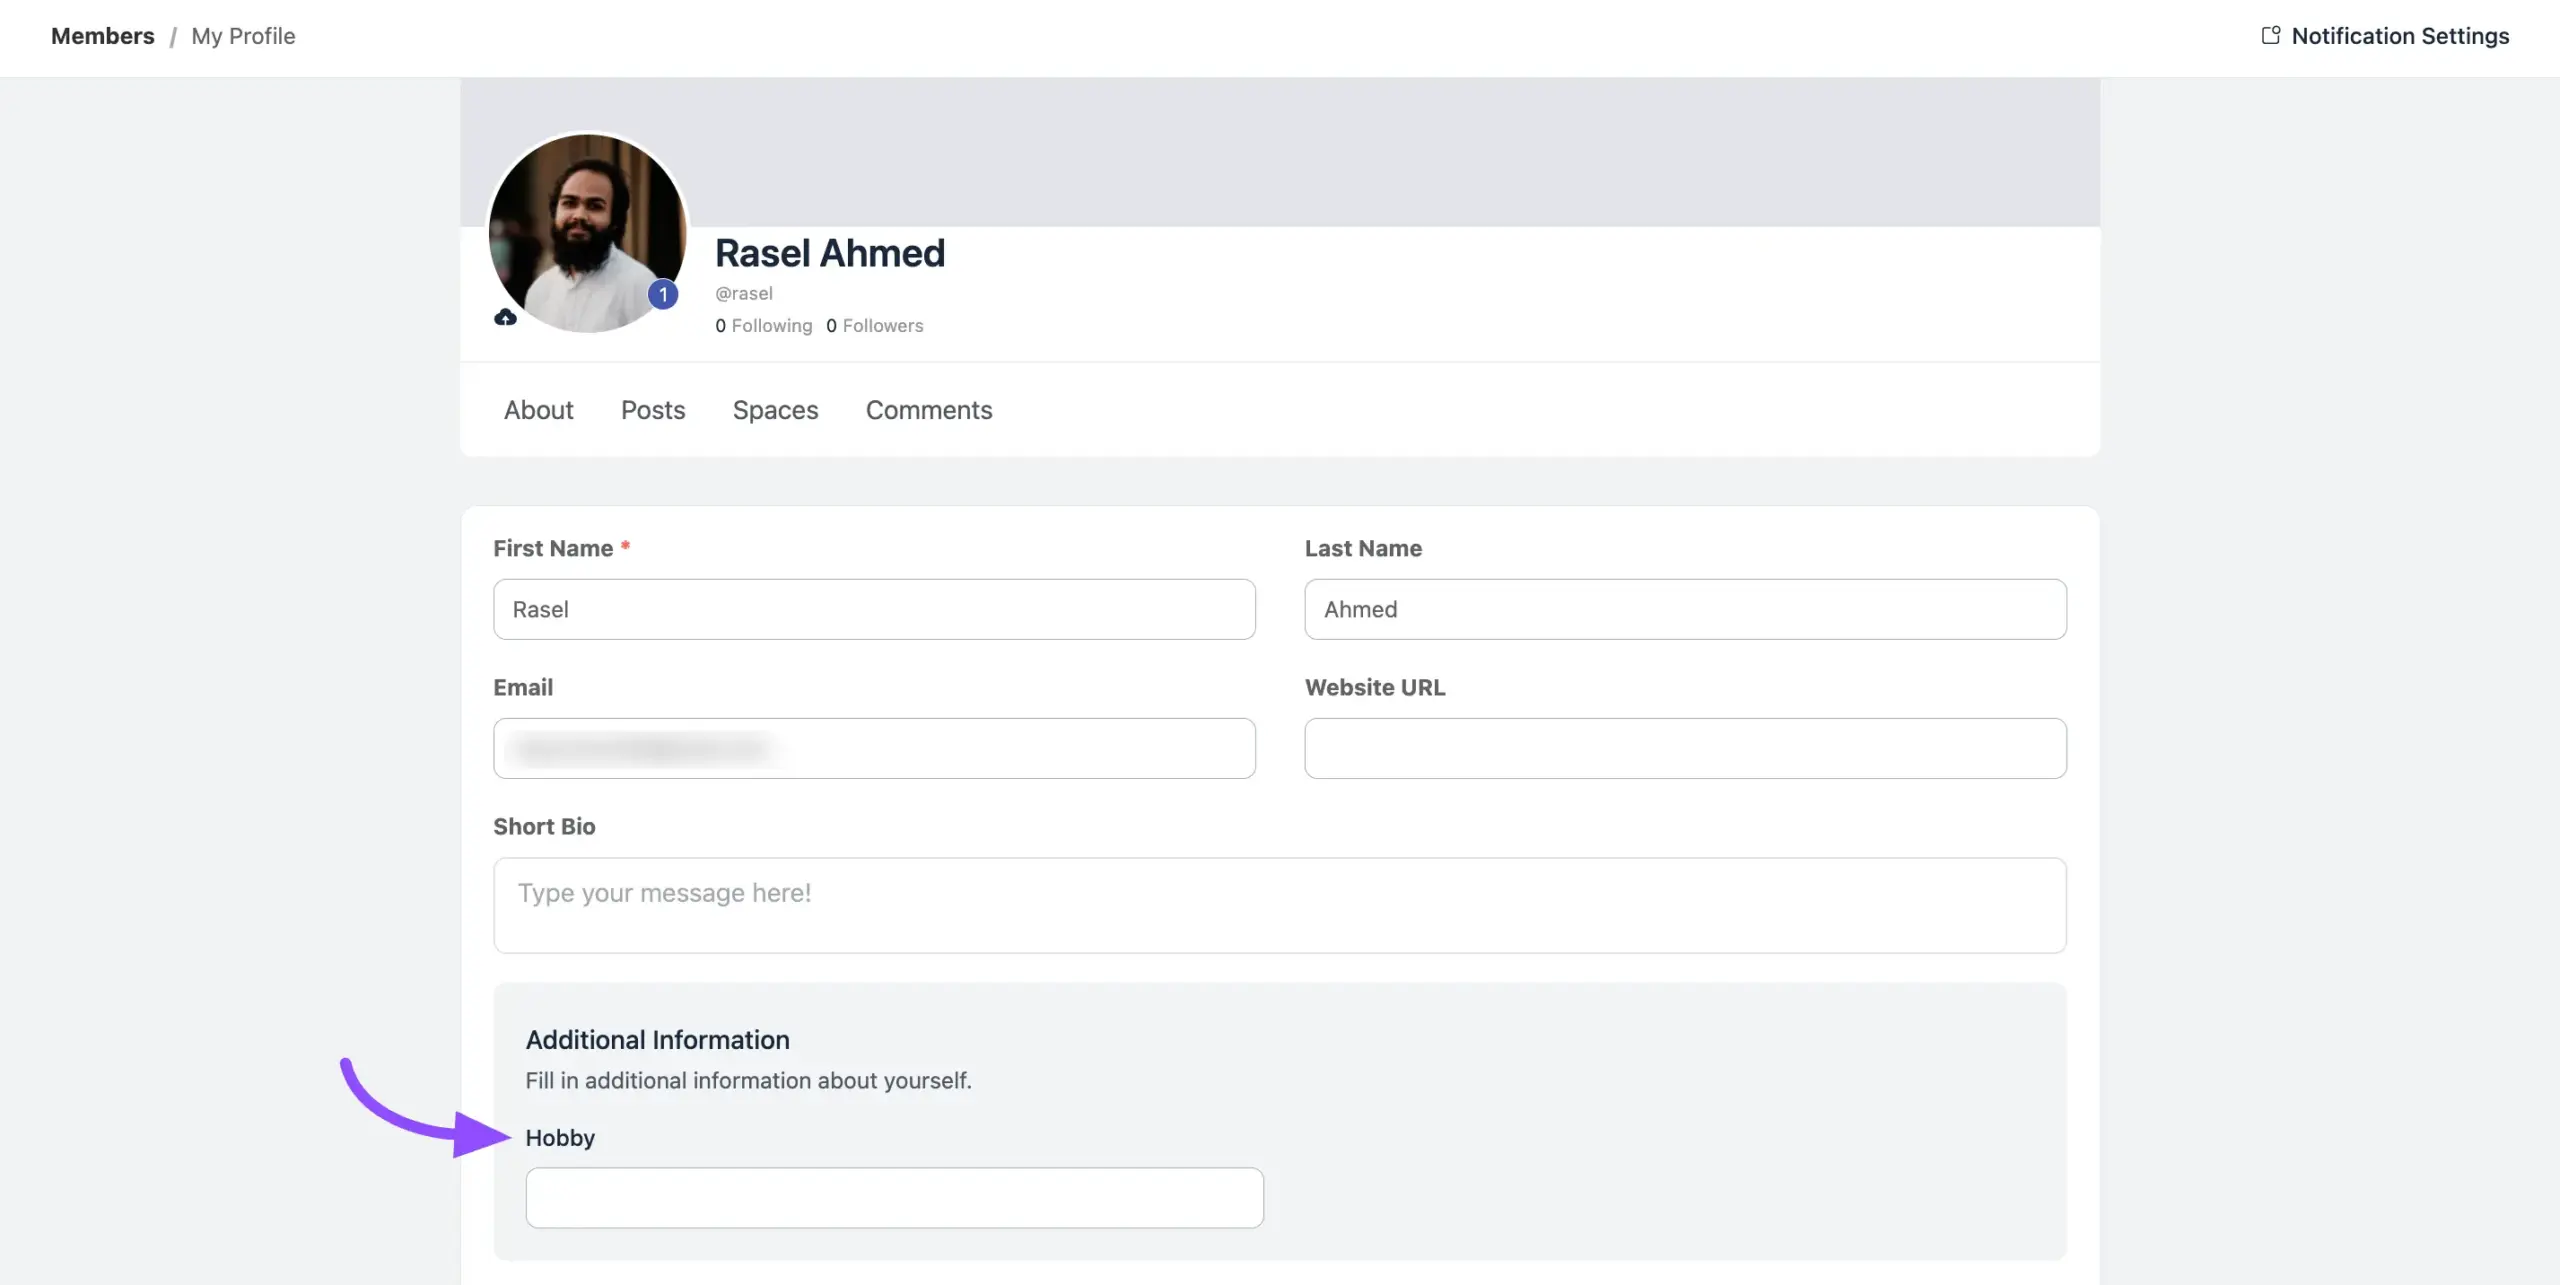
Once an Admin has configured Custom Fields, members can fill them out easily to complete their profile.
- Go to your profile and click Edit Profile.
- Scroll down past your standard information. You will see a new section titled with the Group Label the admin created (e.g., Additional Info).
- Fill in the custom fields (such as Hobby, Date of Birth, Age, or Blood Group).
- Click Save to update your profile with these new details.
These settings help keep profiles consistent and verified within the community.
If you have further questions, please don’t hesitate to contact us for assistance.