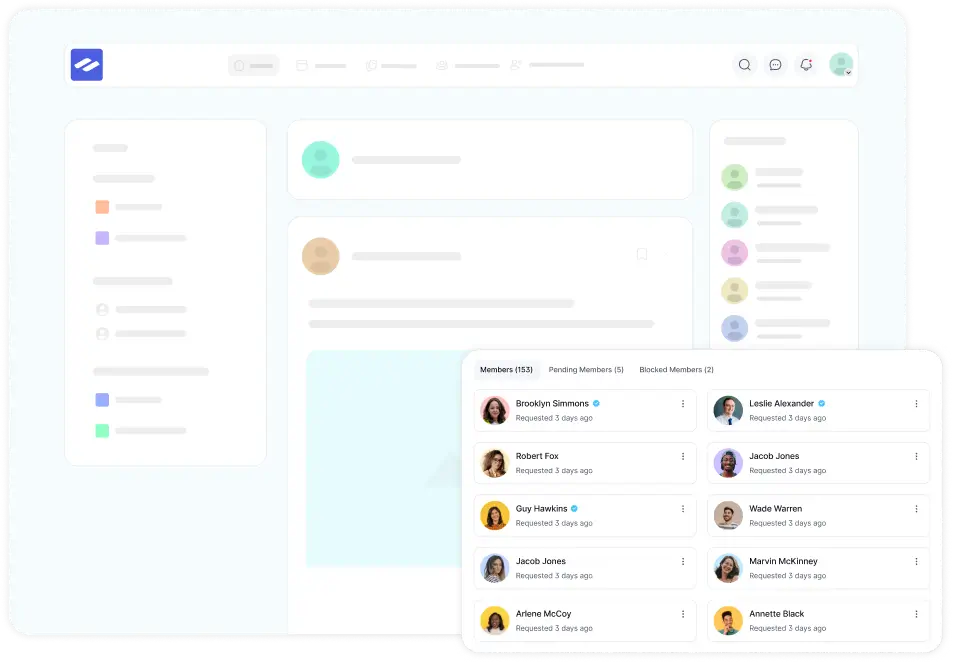
Integrating Fluent Support with FluentCommunity brings your community and your support desk together into one smooth experience. Once the two plugins are connected, you can:
• Automatically route support tickets based on the course a member is taking.
• Give your support agents instant community and course context inside every ticket.
• Embed the Fluent Support portal directly inside your FluentCommunity space, so members never have to leave.
In short: your members get help without leaving the community, and your agents get the full picture of who they’re helping all in one place.
A Real-World Example
Imagine a student enrolled in your “Advanced SEO” course runs into a problem. They submit a support ticket and simply pick their course from a dropdown menu.
Behind the scenes, a workflow rule automatically assigns that ticket to your SEO specialist. When the agent opens it, a FluentCommunity widget instantly shows that the student is on “Lesson 5: Link Building.” The agent now has full context to solve the problem quickly no back-and-forth needed.
Before You Begin
To use this integration, make sure the following are in place:
• FluentCommunity is installed and active on your WordPress site.
• Fluent Support is installed and active on the same site.
• You have administrator access to your WordPress dashboard.
Good to know: The FluentCommunity options described below only appear inside Fluent Support when FluentCommunity is installed and active. If you don’t see them, double-check that both plugins are enabled.
Embed Fluent Support Inside FluentCommunity #
If your support space lives inside FluentCommunity, you can make Fluent Support reachable right there. Once set up, the ticket links in your email notifications will send members into FluentCommunity instead of a separate, standalone portal page.
Step 1: Set FluentCommunity as the Portal Destination
1. Go to Fluent Support from your WordPress dashboard.
2. Open Settings and click Global Settings in the left sidebar.
3. In the Customer Portal section, select FluentCommunity Portal.
4. A FluentCommunity Portal URL will appear below the option. Click Copy to copy it — you’ll add it to your FluentCommunity menu in the next step.
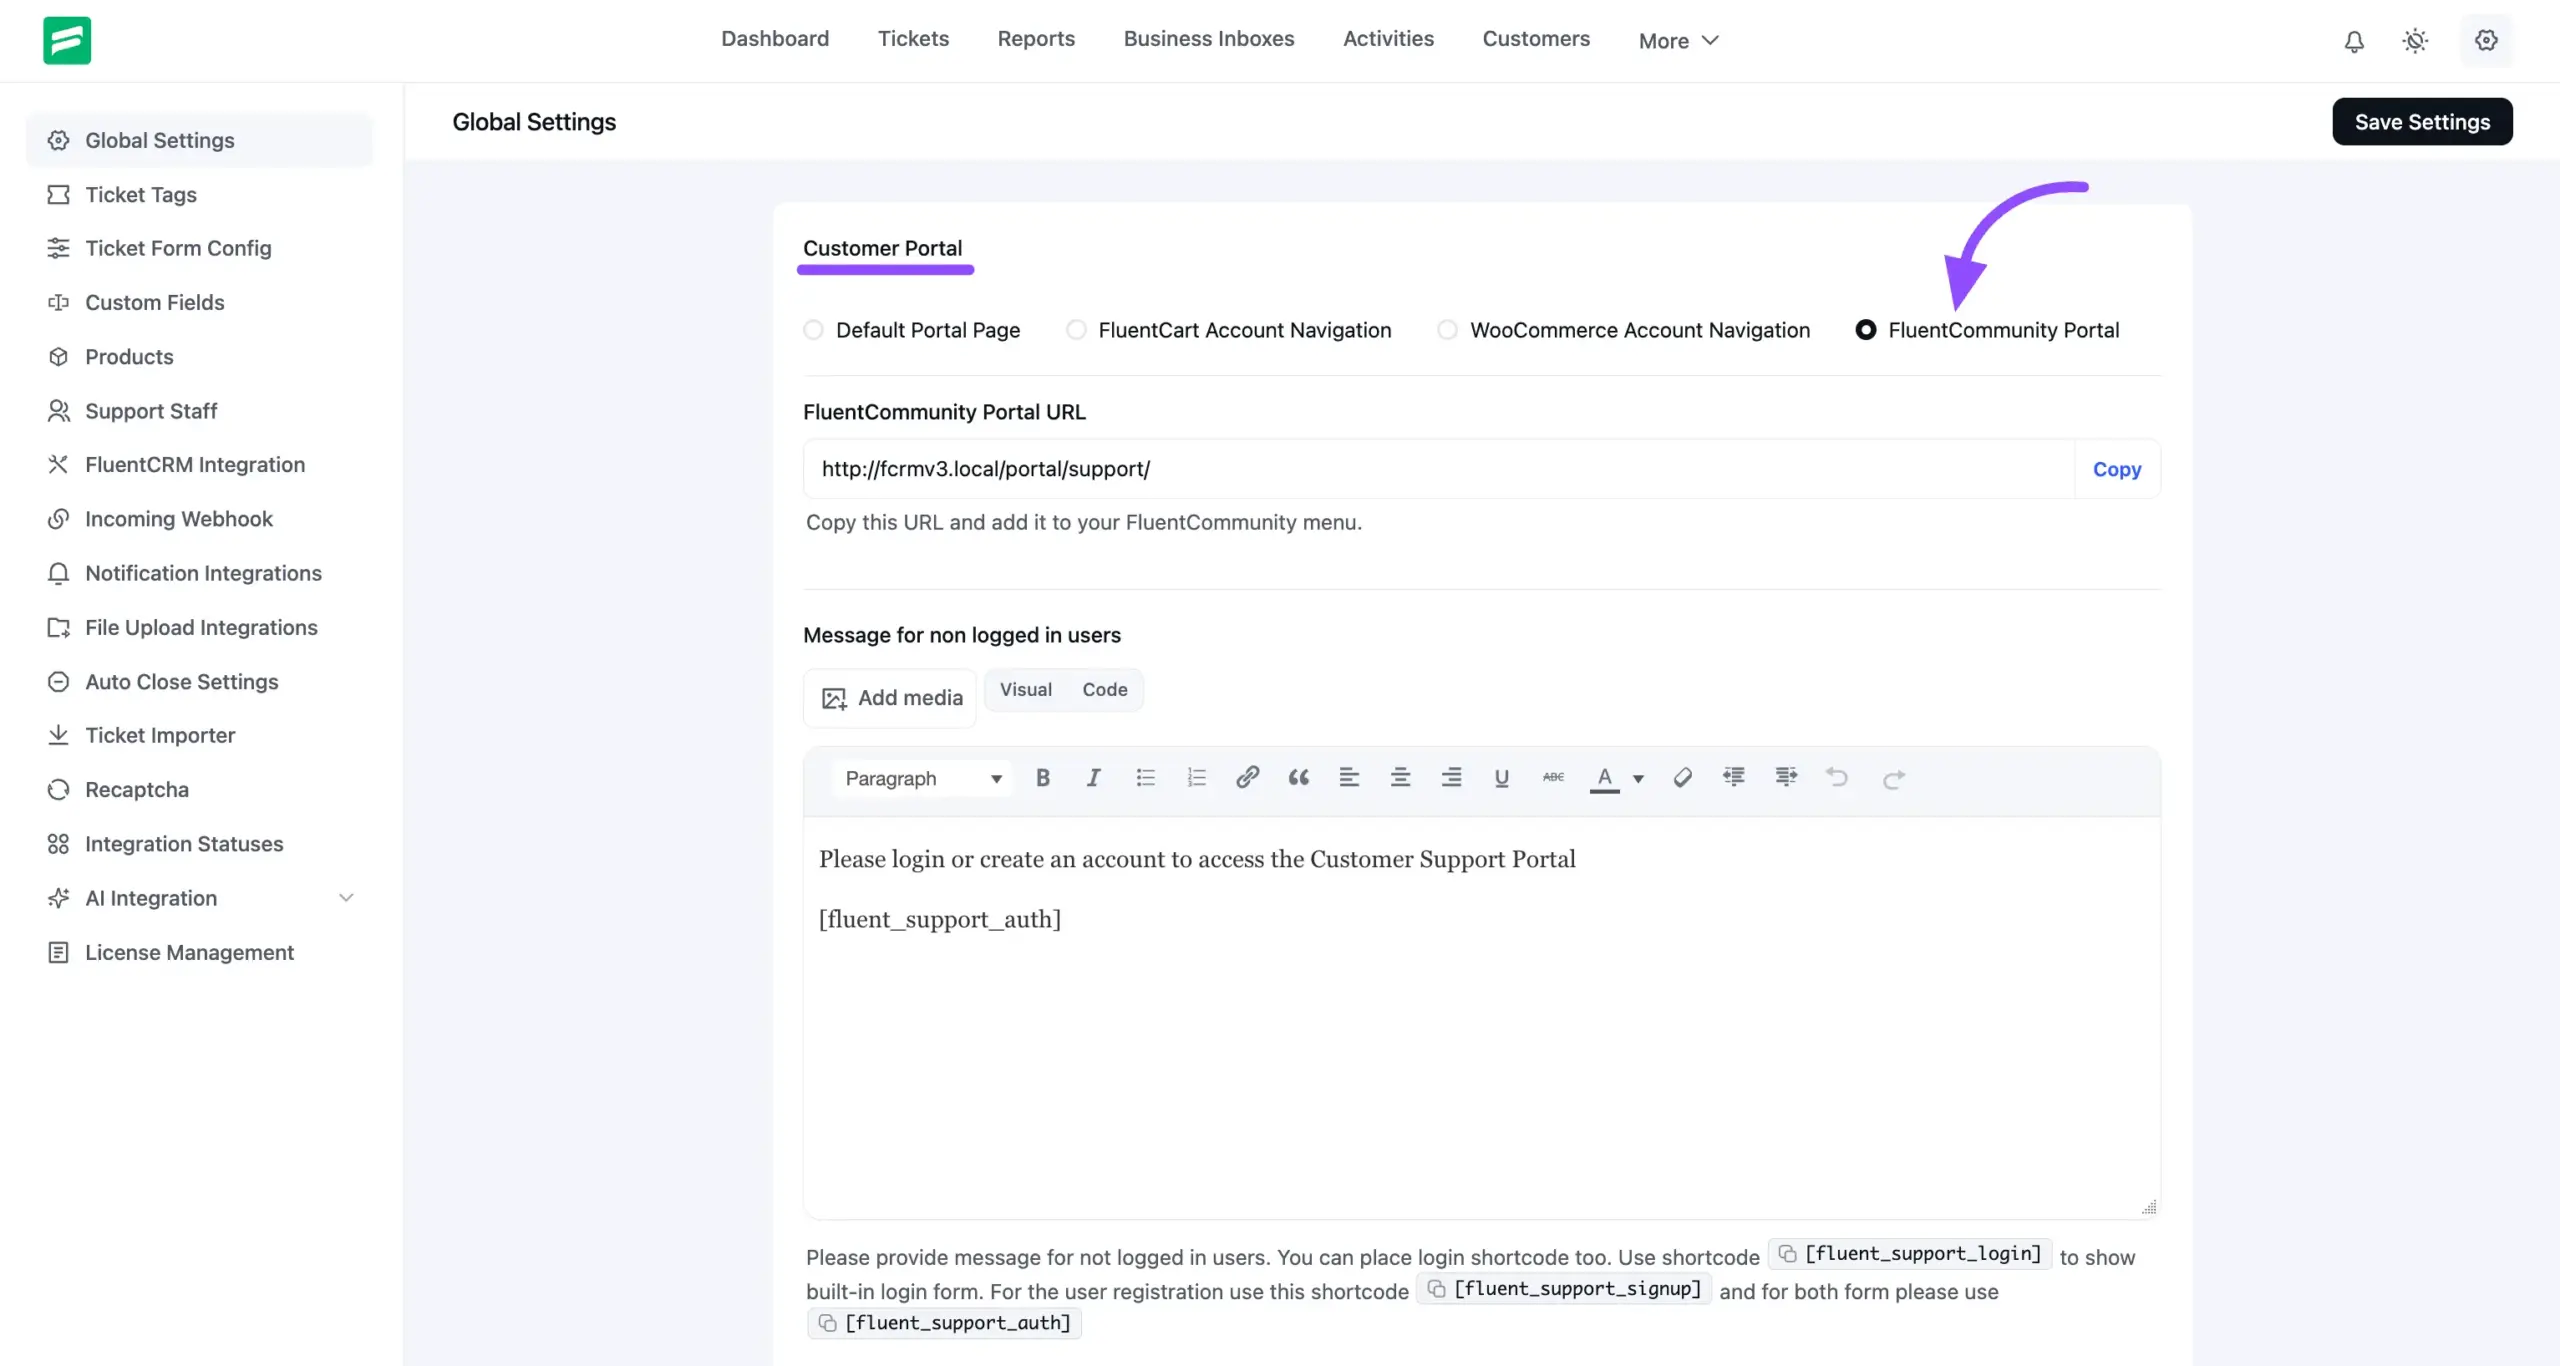
6. Click Save Settings.
Note: The FluentCommunity Portal option only appears when FluentCommunity is installed and active on your site.
Step 2: Add the Portal URL to Your FluentCommunity Navigation
Now that you’ve copied the portal URL, add it to your community menu:
7. Go to your FluentCommunity settings.
8. Open the navigation or menu settings for your community space.
9. Add a new menu item and paste the Fluent Support portal URL as the link.
10. Save the FluentCommunity menu.
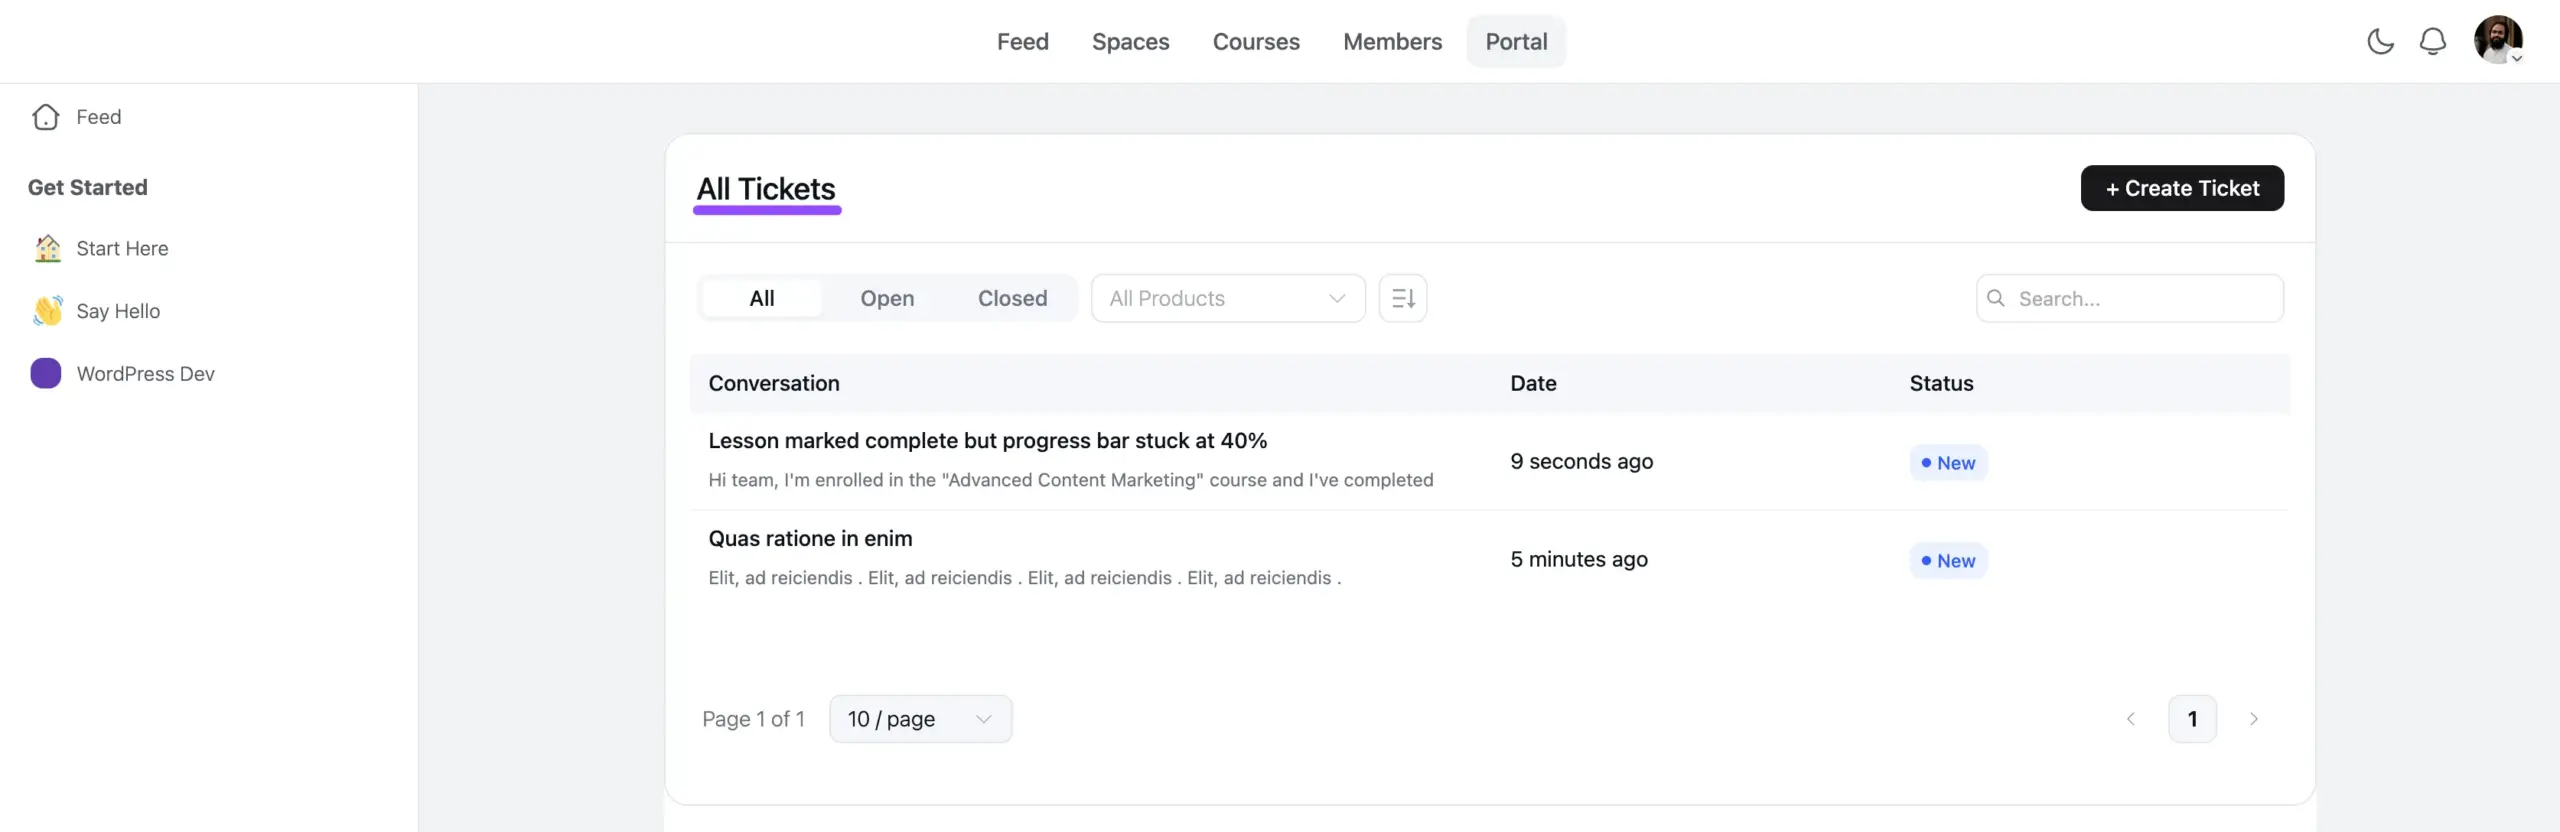
Result: A Portal tab now appears in your community navigation. From there, members can create new tickets and track all of their existing ones without ever leaving FluentCommunity.
Let Members Pick Their Course on a Ticket #
This step adds a special field to your support portal so customers can select the exact FluentCommunity course they need help with when they submit a ticket.
Step 1: Open Custom Ticket Fields
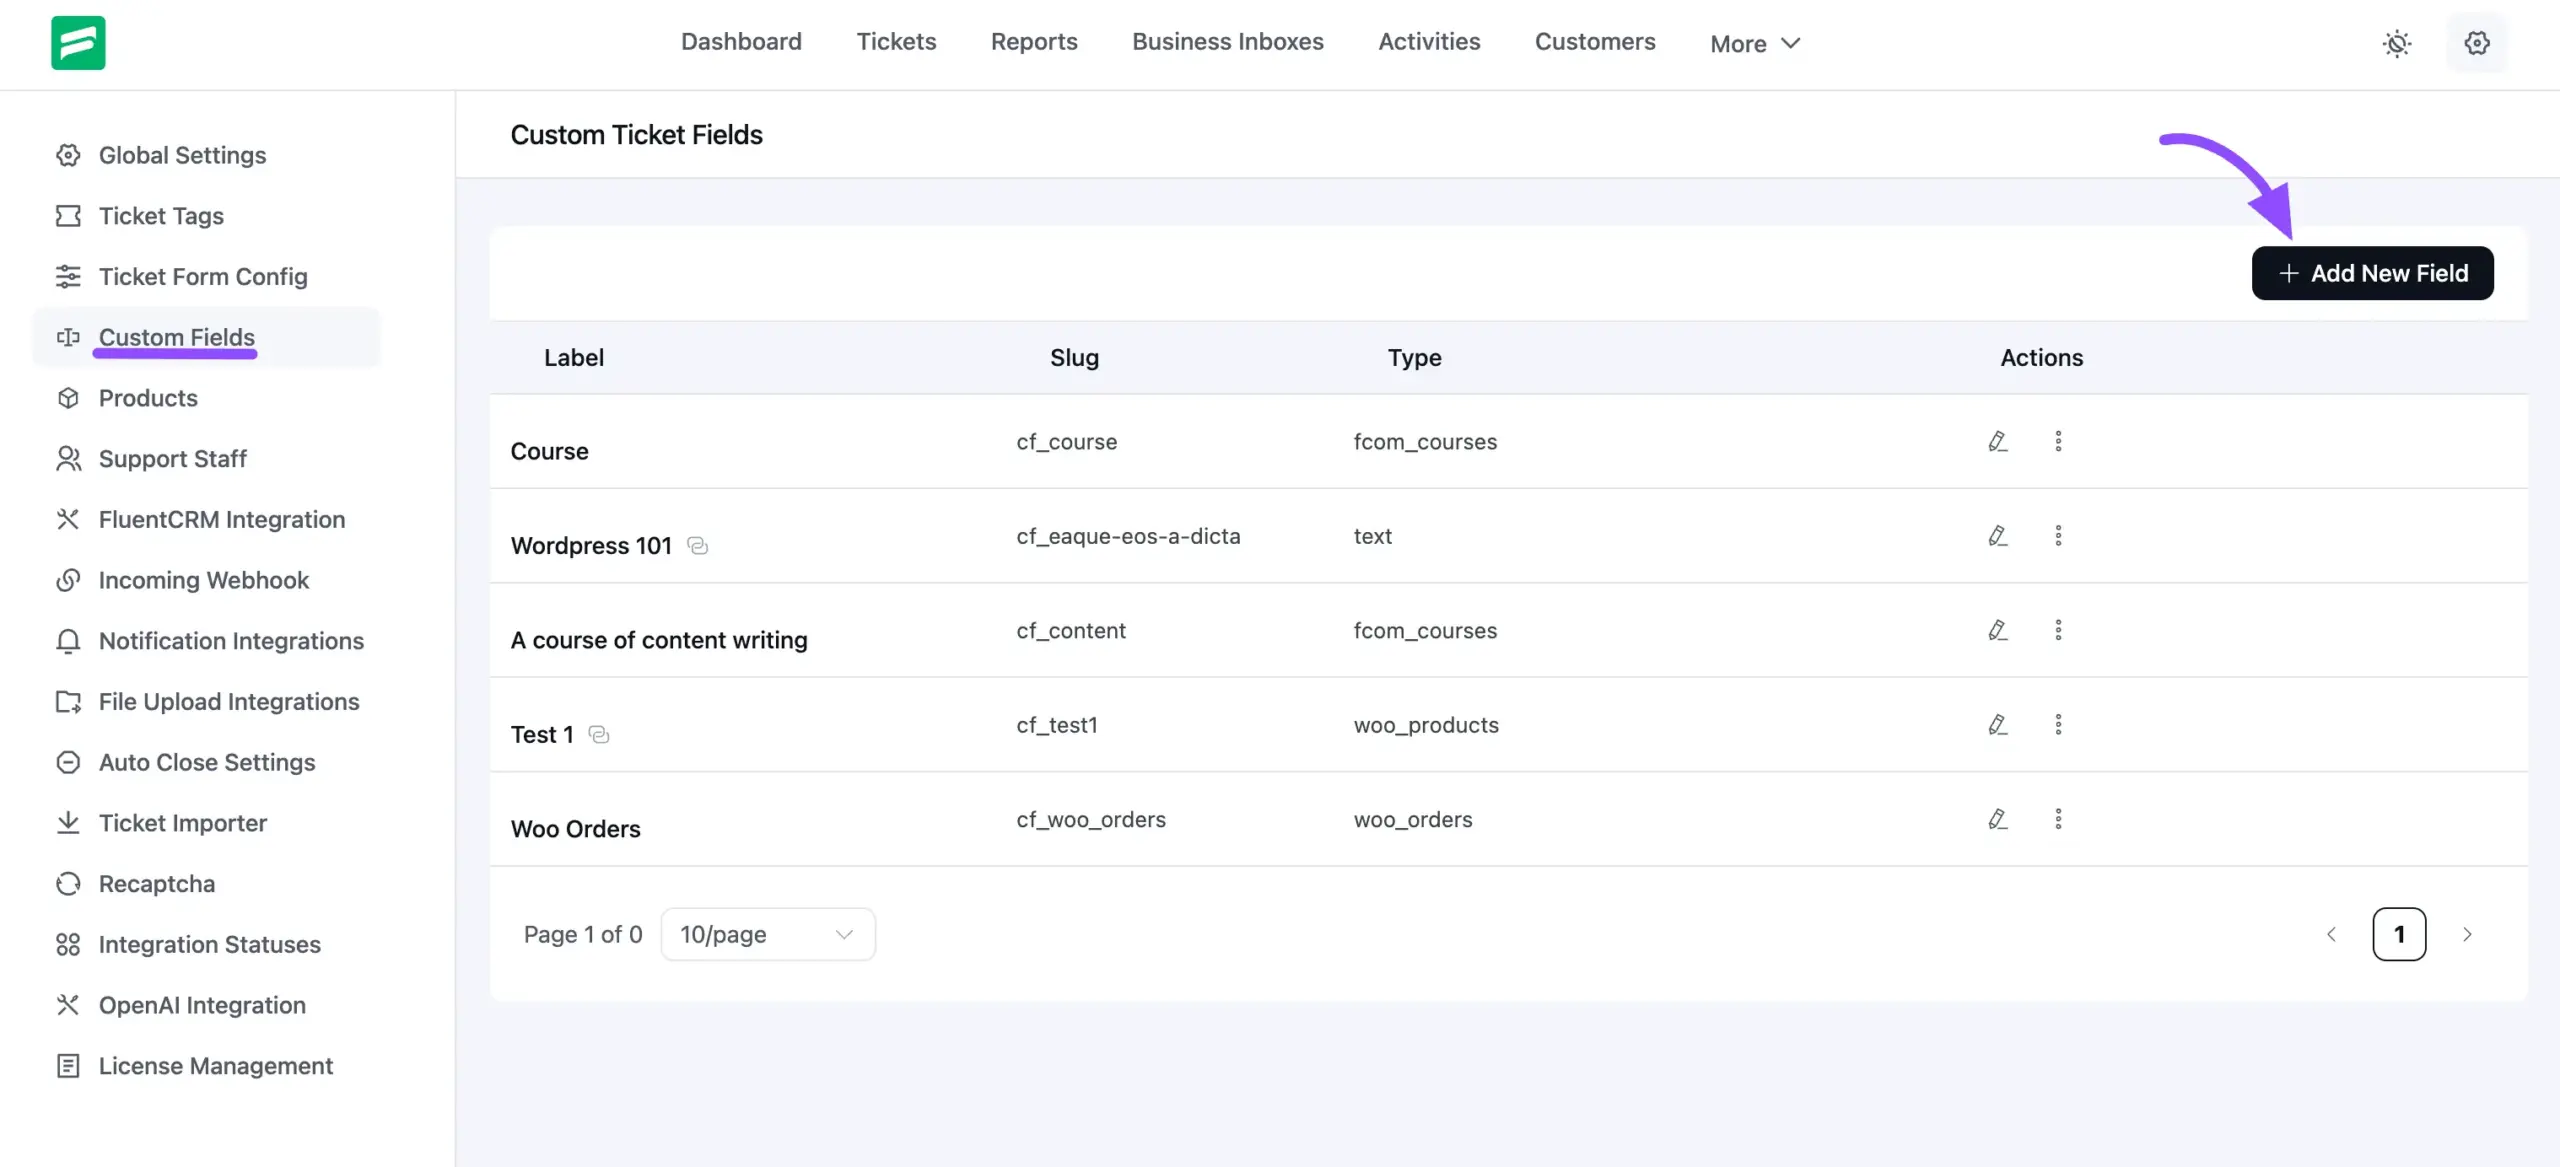
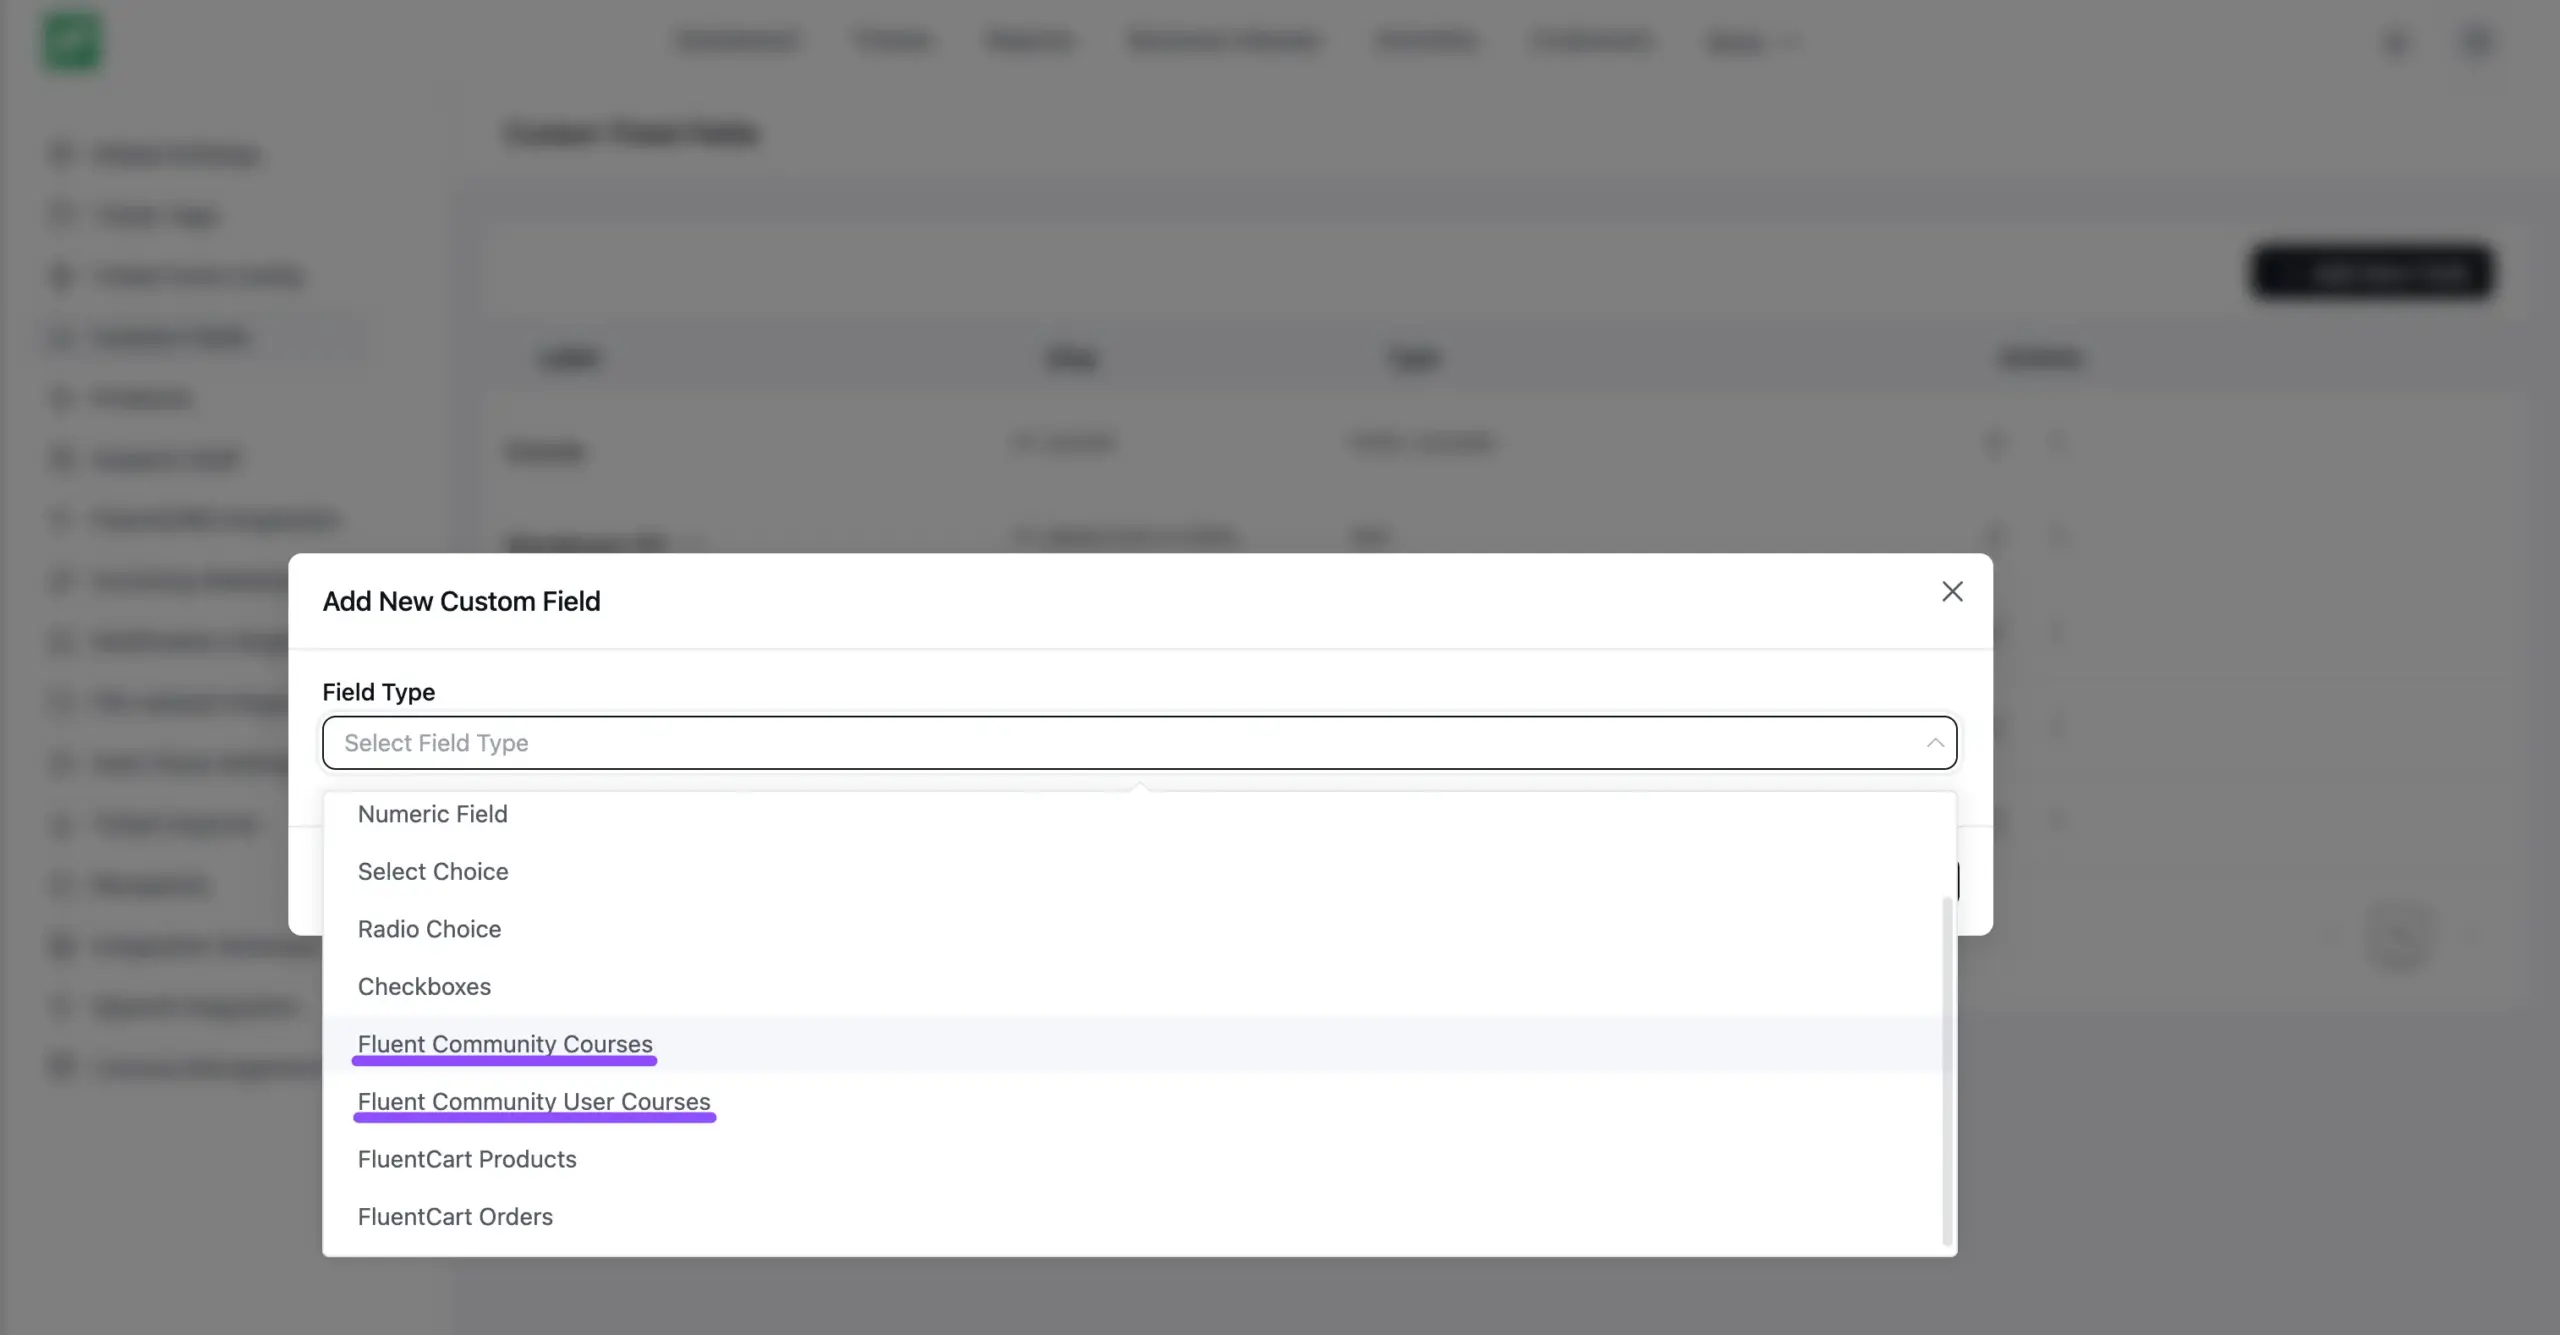
In your Fluent Support dashboard, go to Settings and choose Custom Fields from the side menu. Click the Add New Field button to open the settings modal. A window titled Add New Custom Field will appear.
Step 2: Configure the FluentCommunity Course Field
In the Field Type dropdown, select Fluent Community Courses (or Fluent Community User Courses).
Then fill in the details below:
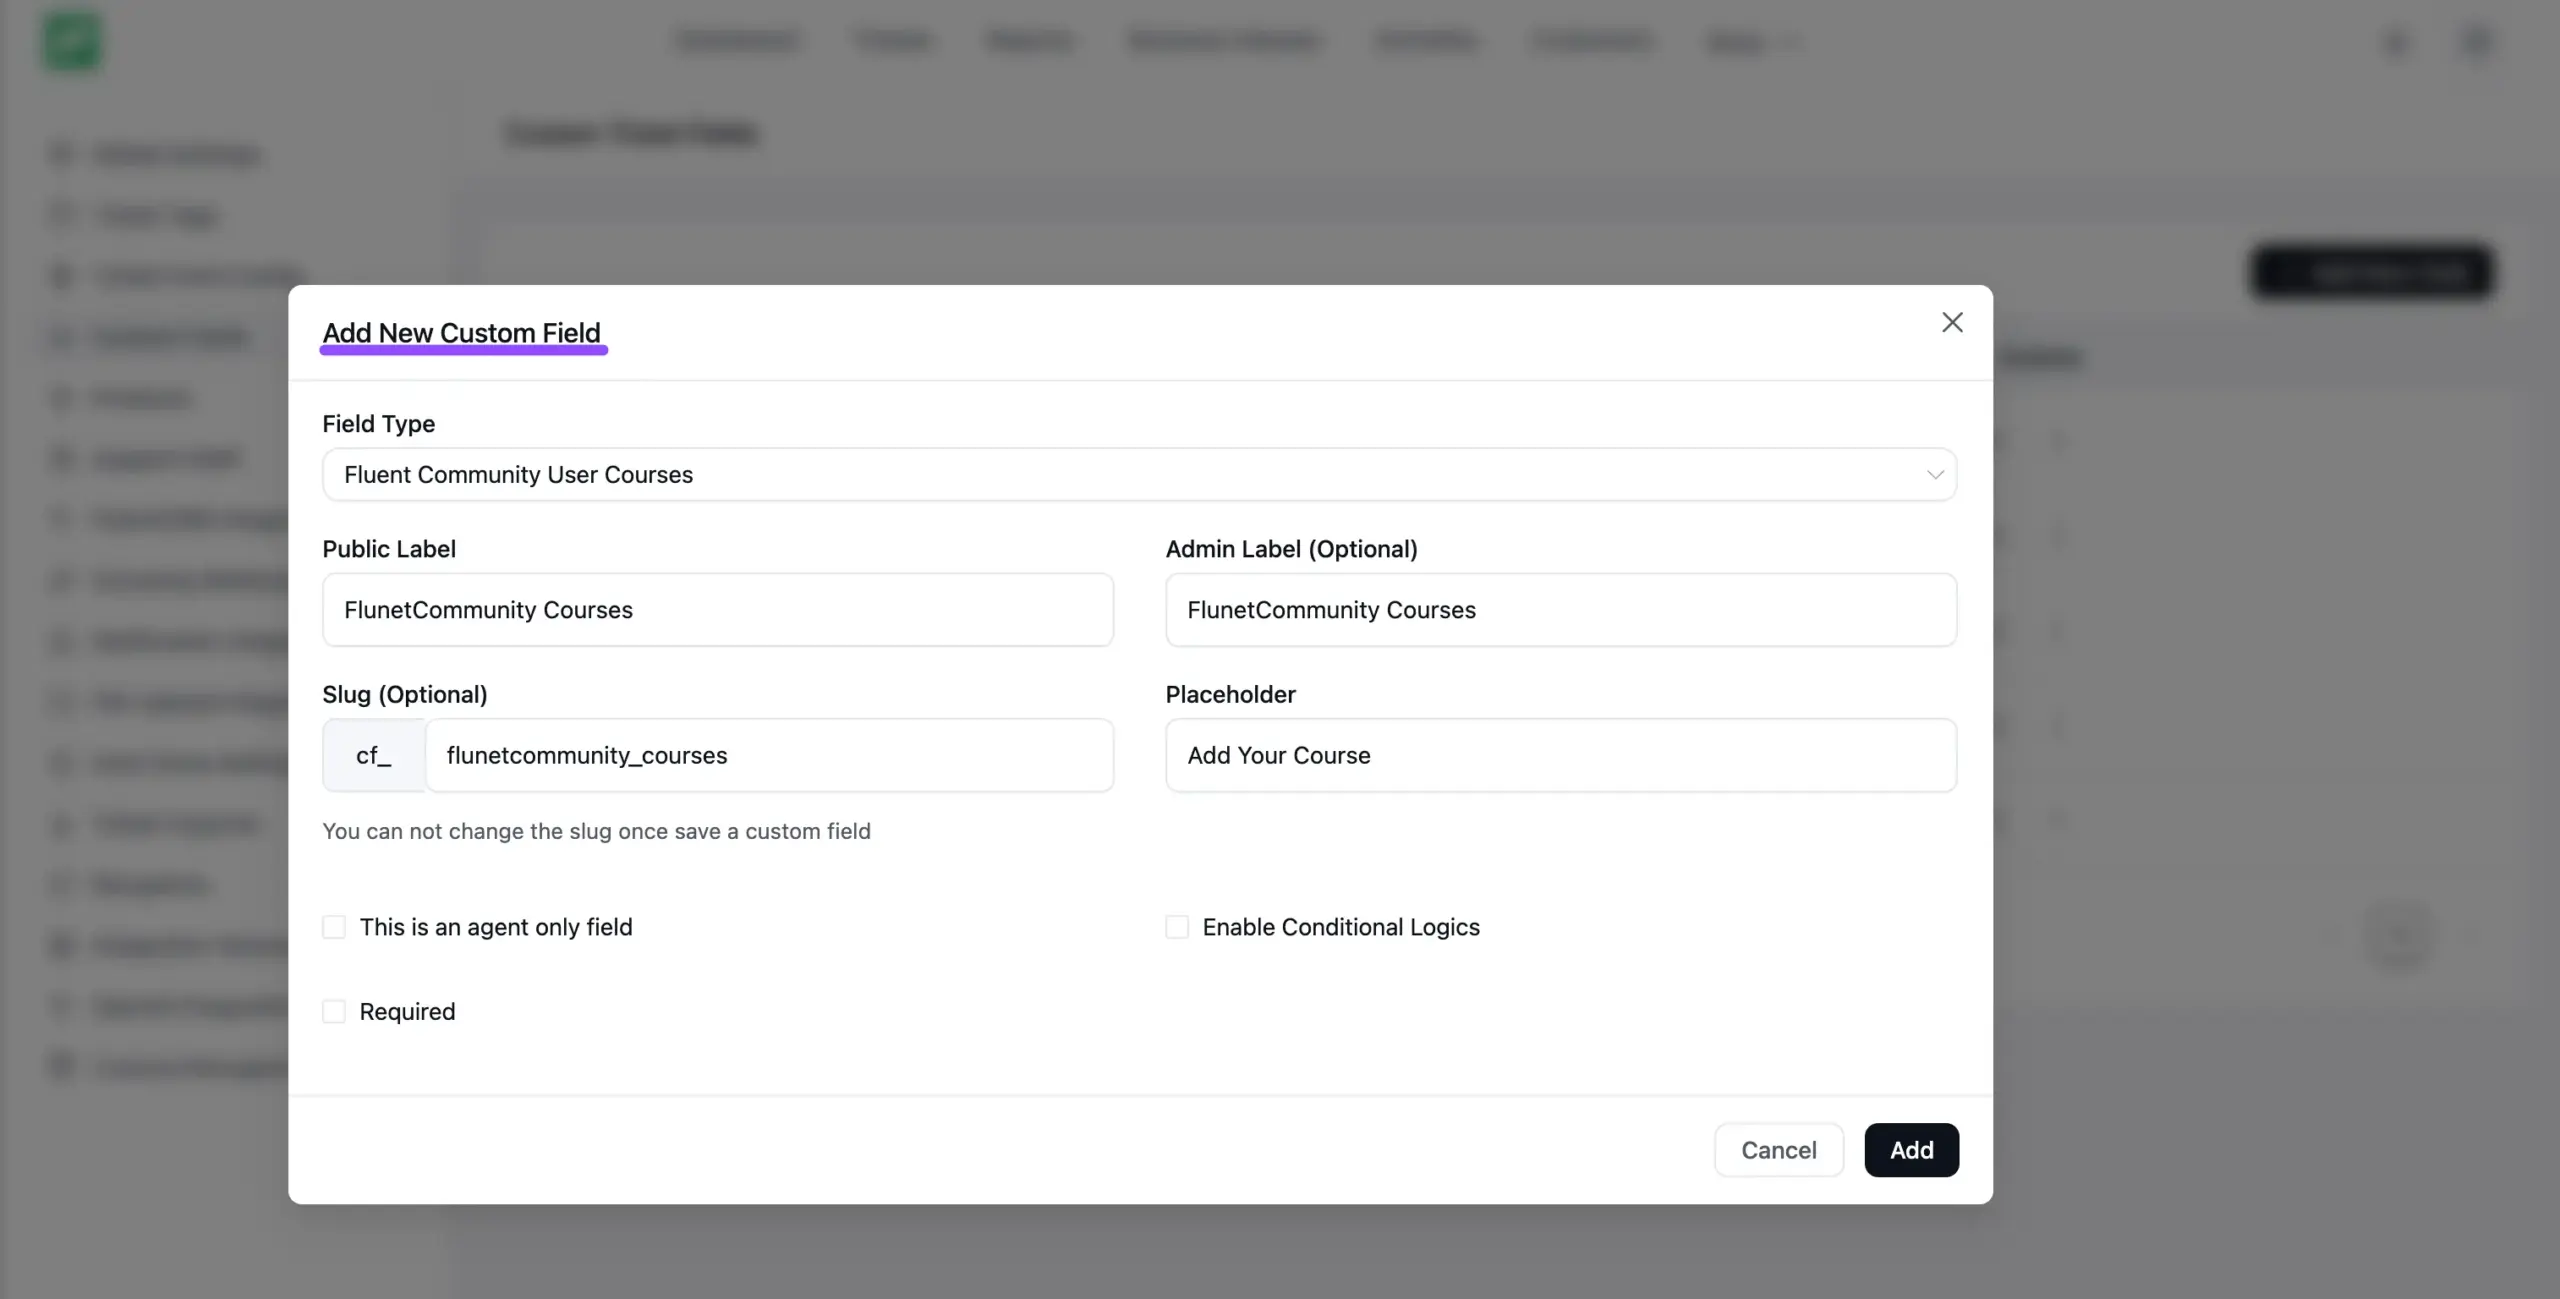
• Field Type: Choose the type of field to create — here, set it to Fluent Community Courses or Fluent Community User Courses.
• Public Label: The label your members see. Make it clear and descriptive (e.g., “Which course do you need help with?”).
• Admin Label (optional): A label visible only to admins and support agents.
• Slug (optional): A unique identifier for the field. It’s auto-prefixed with cf_ and cannot be changed once saved.
• Placeholder: Optional guide text inside the field (e.g., “Select your course here”).
• This is an agent-only field: Check this to show the field to support agents only, not to members.
• Enable Conditional Logics: Check this to control when the field appears based on other field values.
• Required: Check this box to make choosing a course mandatory.
When you’re done, click the Add button at the bottom to save and create the custom field.
Tip: Once you save the field, members will see a course dropdown on the ticket form and your agents will know exactly which course each ticket relates to.
Automate Ticket Routing with a Workflow #
With your new course field in place, you can build workflows that automatically take action based on the course a member selects like assigning the ticket to the right specialist.
Step 1: Open Workflows
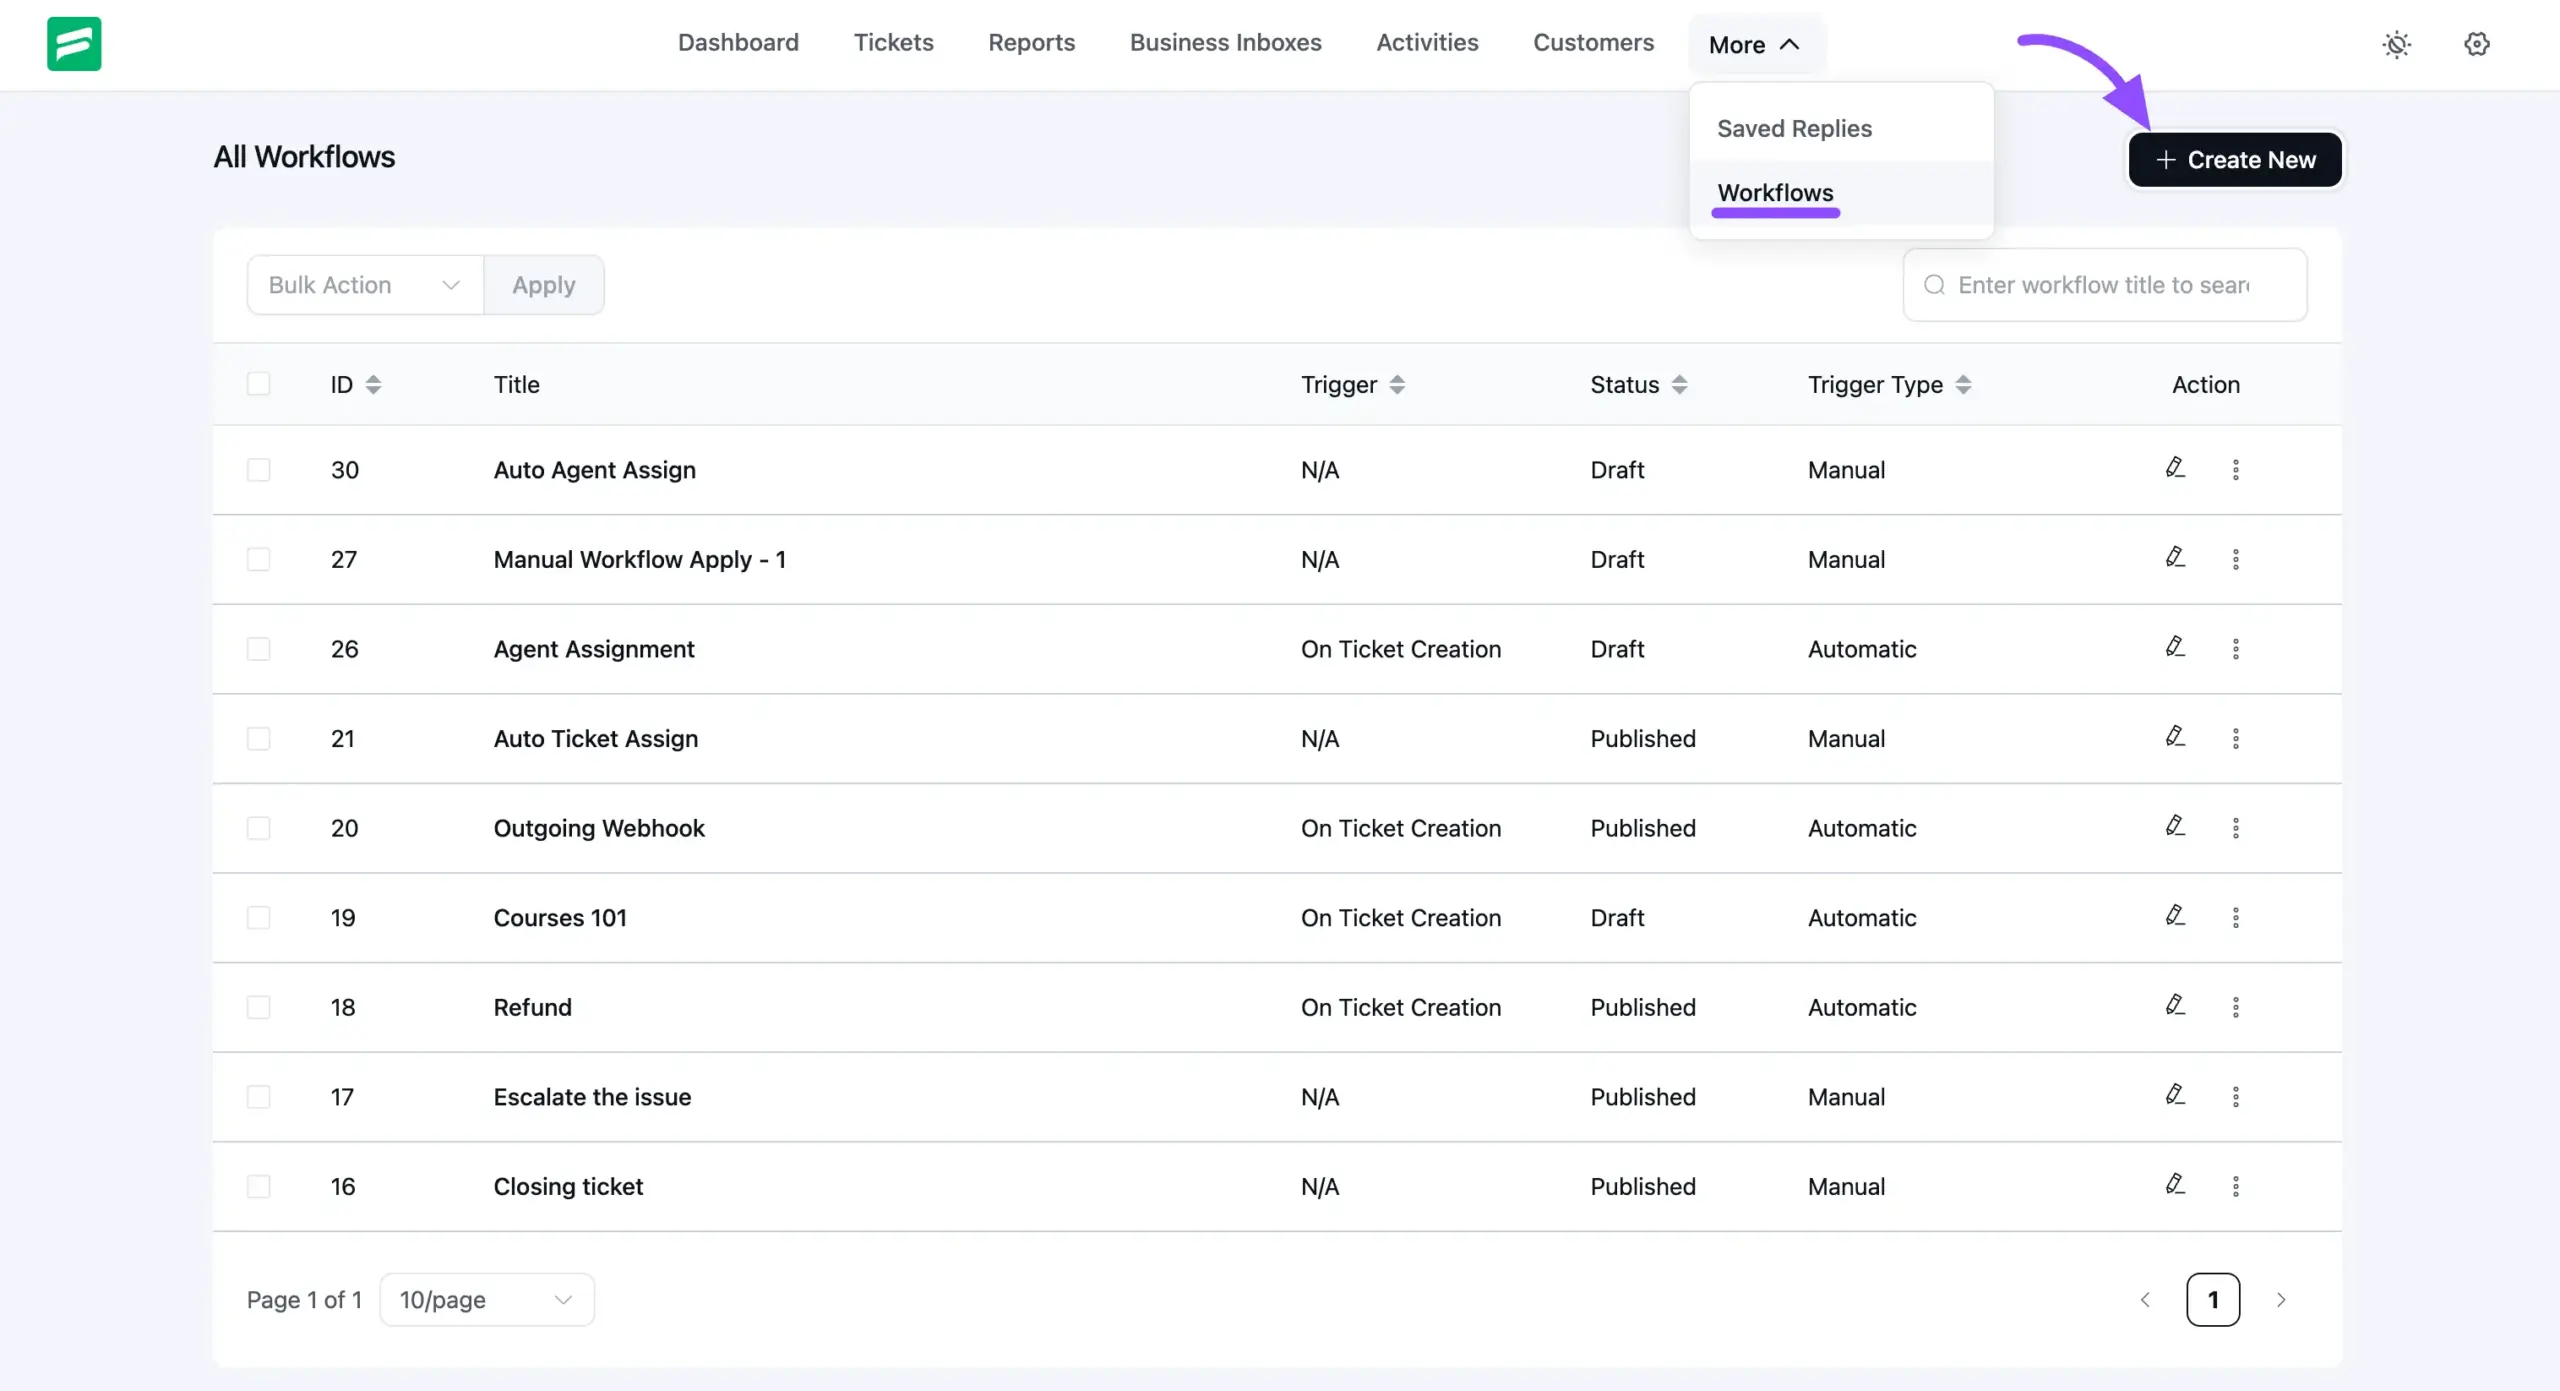
From your Fluent Support dashboard, go to the More menu and select Workflows. You’ll see all your existing workflows here. Click the Create New button to start a new one.
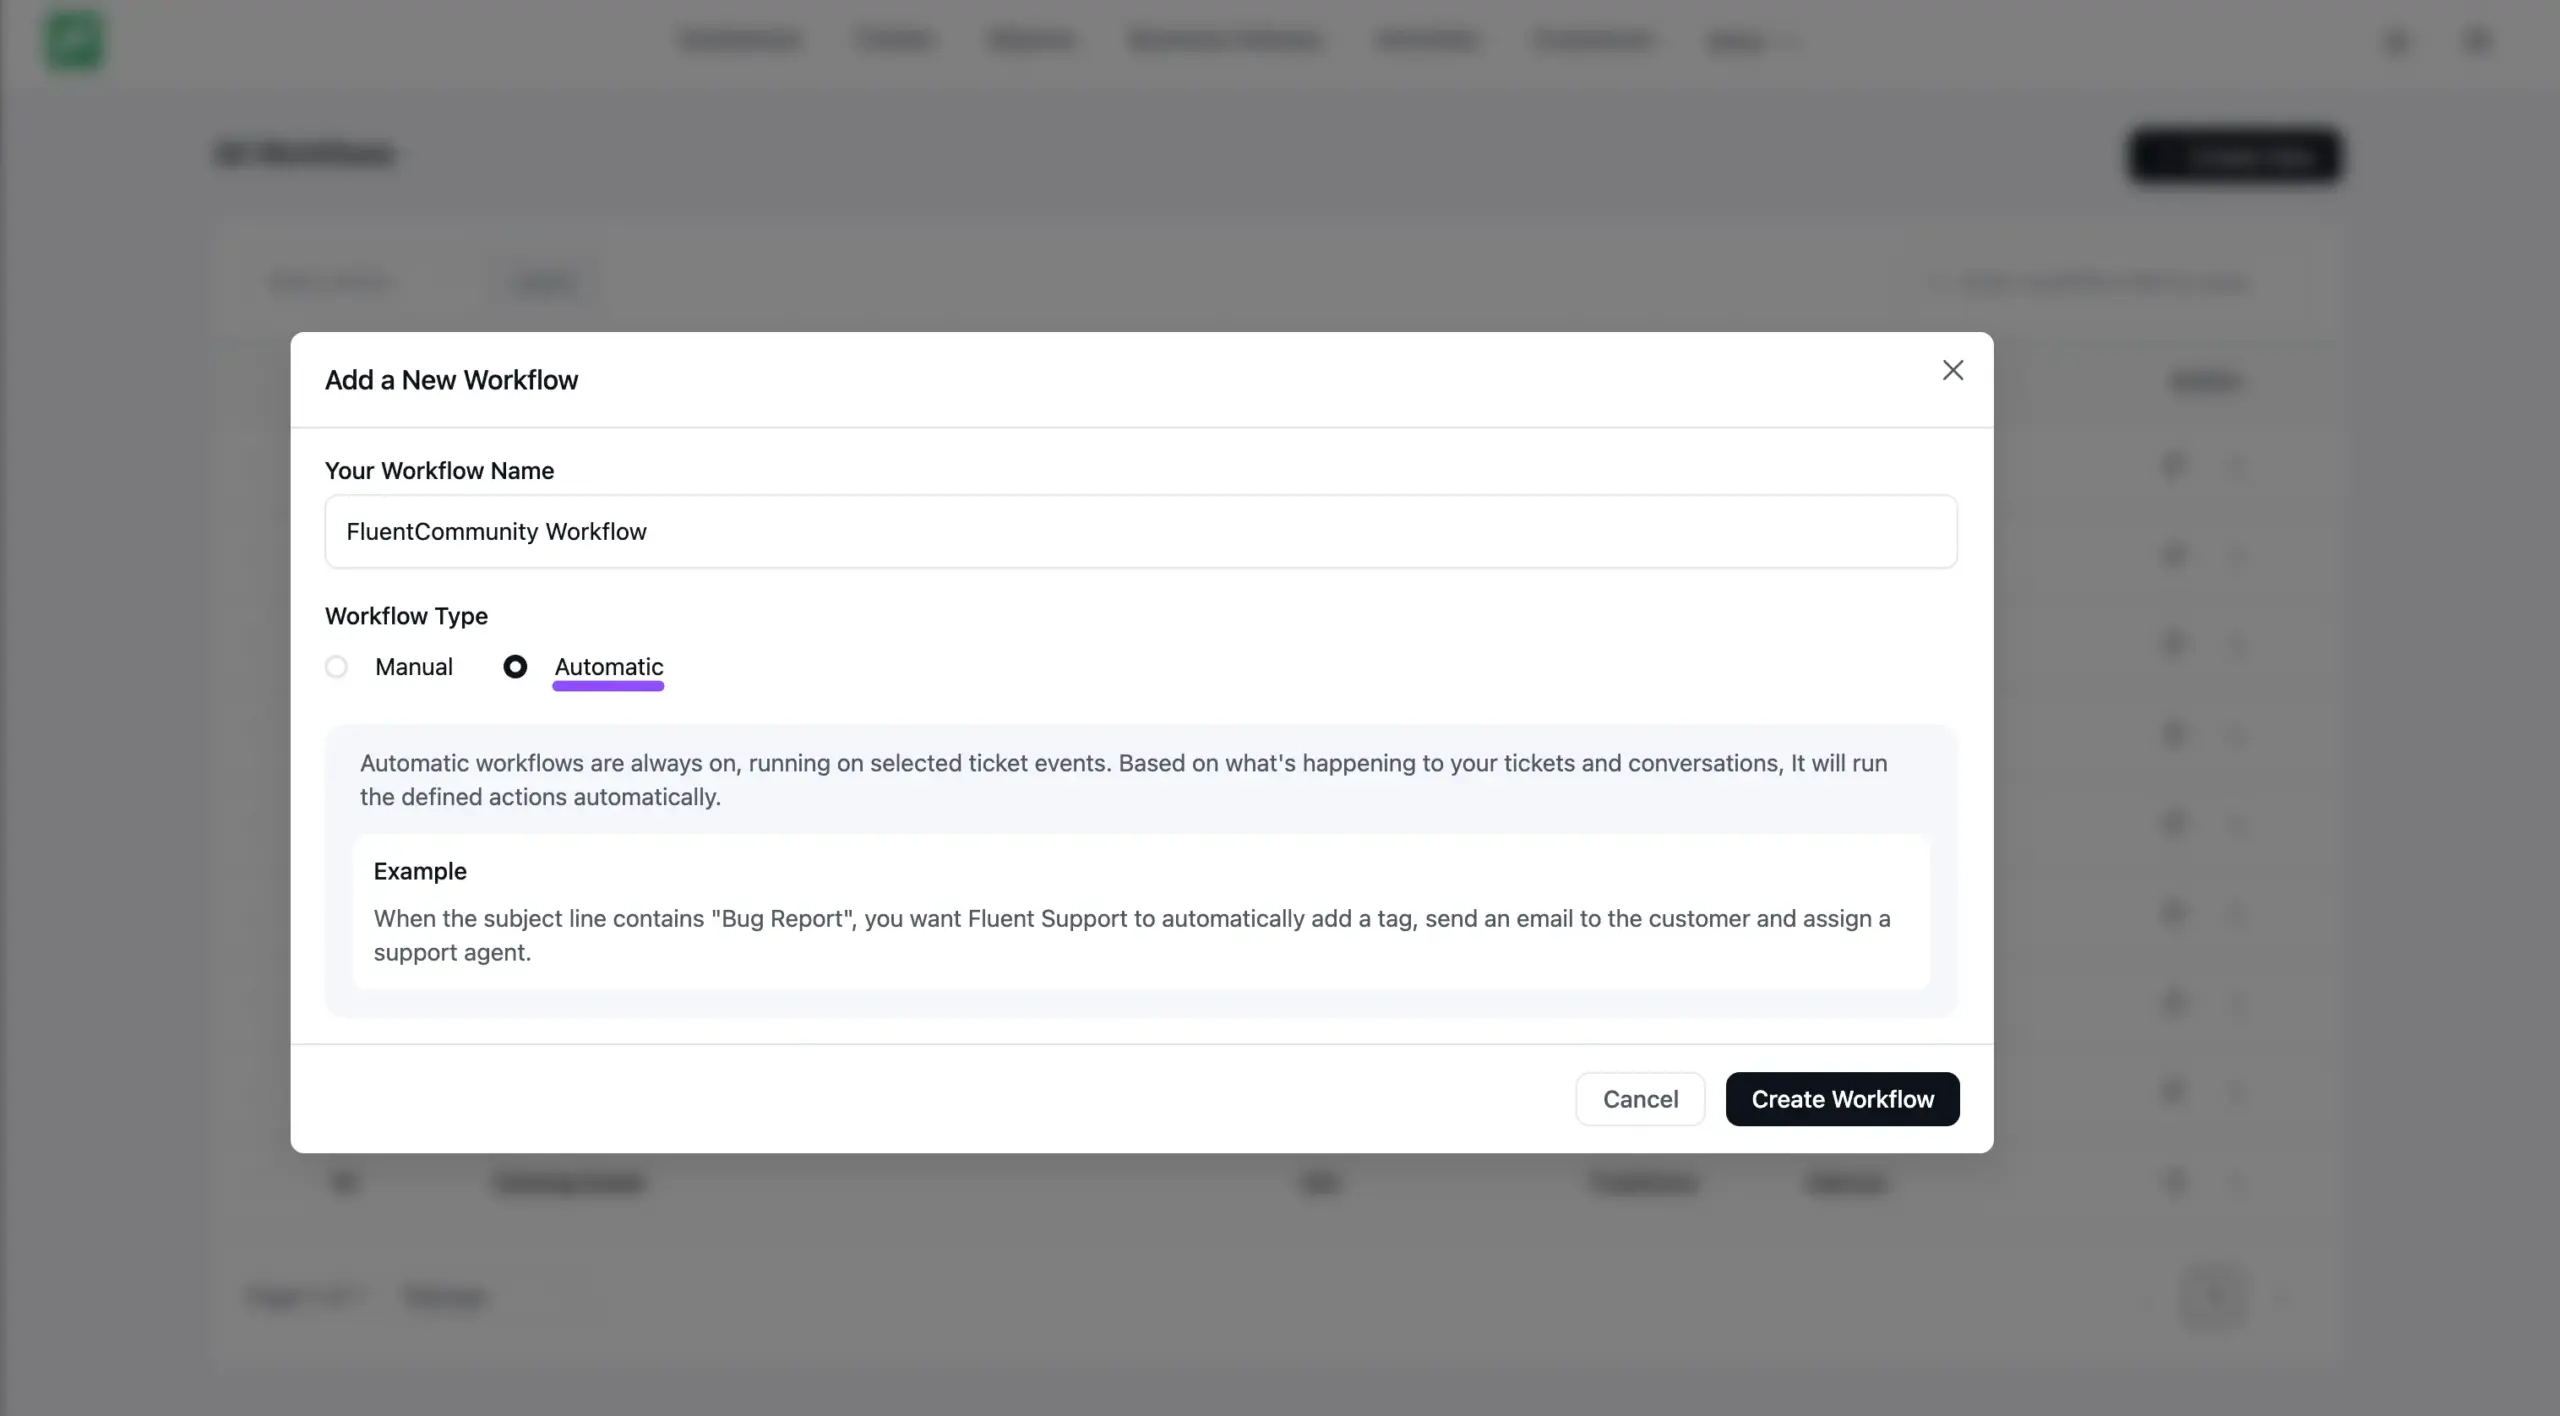
In the pop-up, provide a Workflow Name and select Automatic as the Workflow Type. Then click the Create Workflow button.
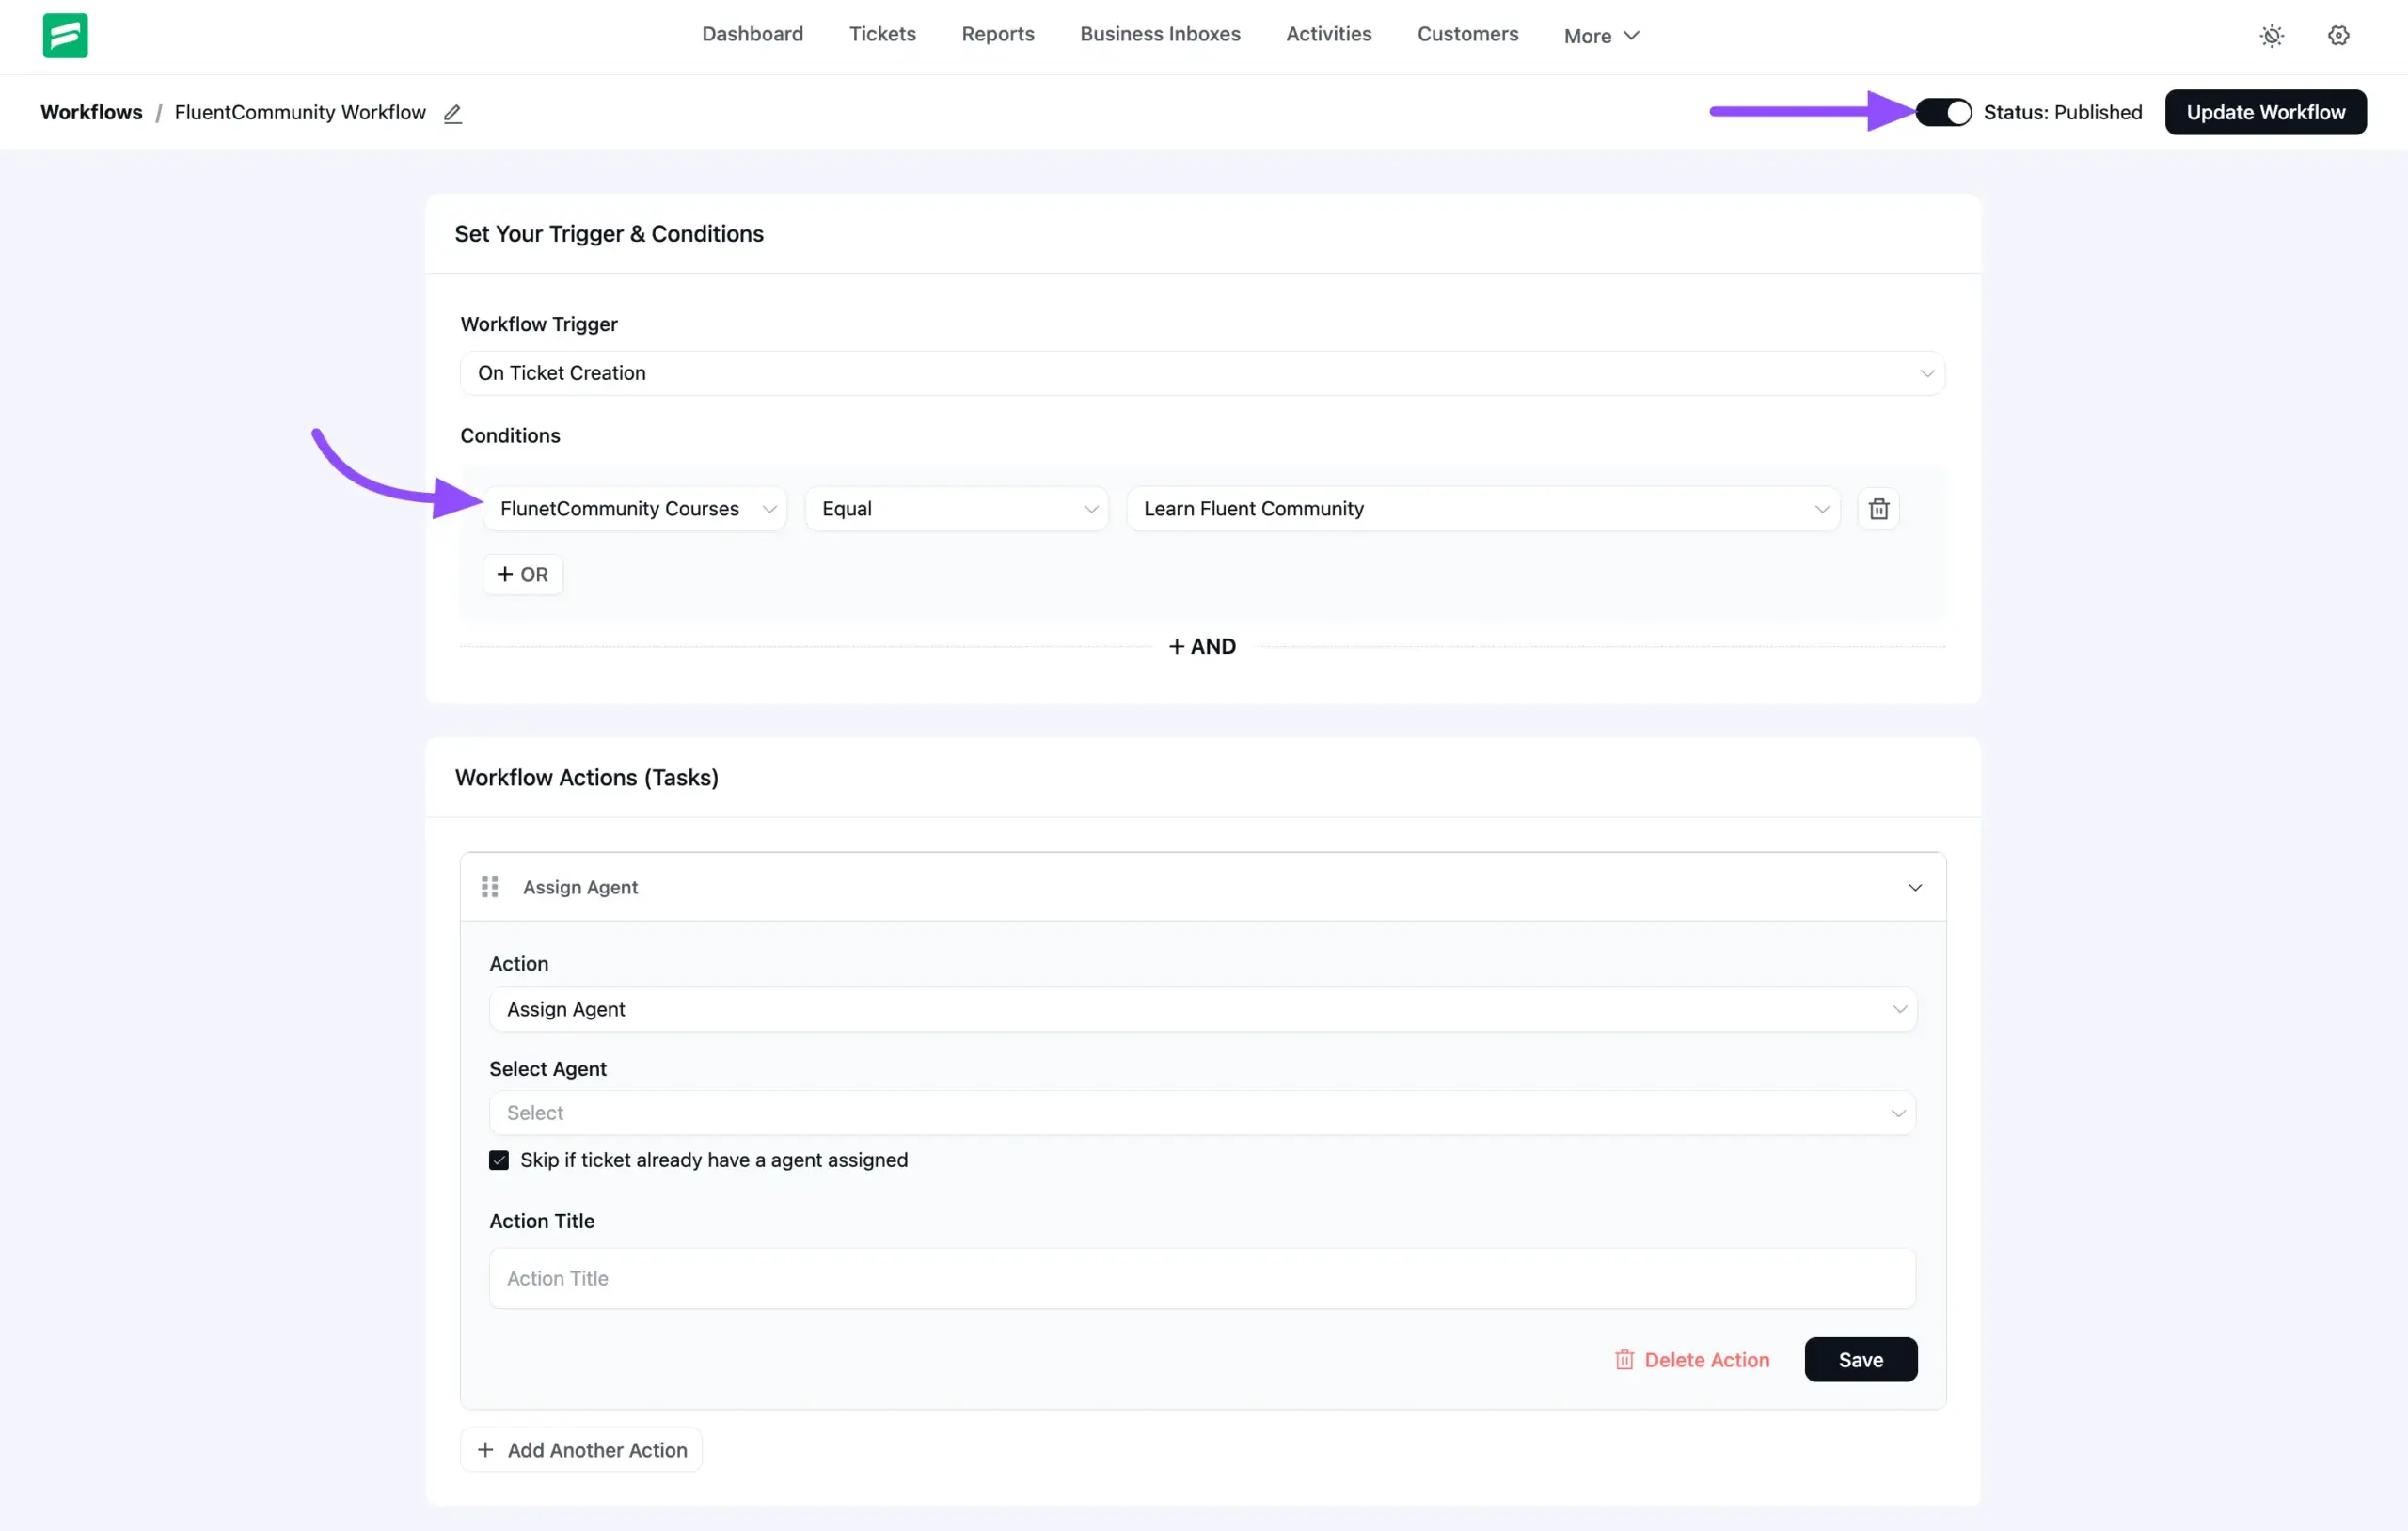
Step 2: Set Triggers, Conditions, and Actions
• Workflow Trigger: Choose the event that starts the workflow from the dropdown (for example, On Ticket Creation).
• Conditions: Refine when the workflow should run. Use the dropdowns to pick a condition — such as the Fluent Community Courses field — set it to Equal, and choose the target course. Combine conditions with + OR (for alternatives) or + AND (when all conditions must be true).
• Workflow Actions: Define what happens when the conditions are met — for example, Assign Agent to route the ticket to a specific specialist. Add more steps with the Add Another Action button.
Don’t forget: When you’re done, save the workflow and switch its status from Draft to Published — otherwise it won’t run.
FluentCommunity Widget in the Ticket View #
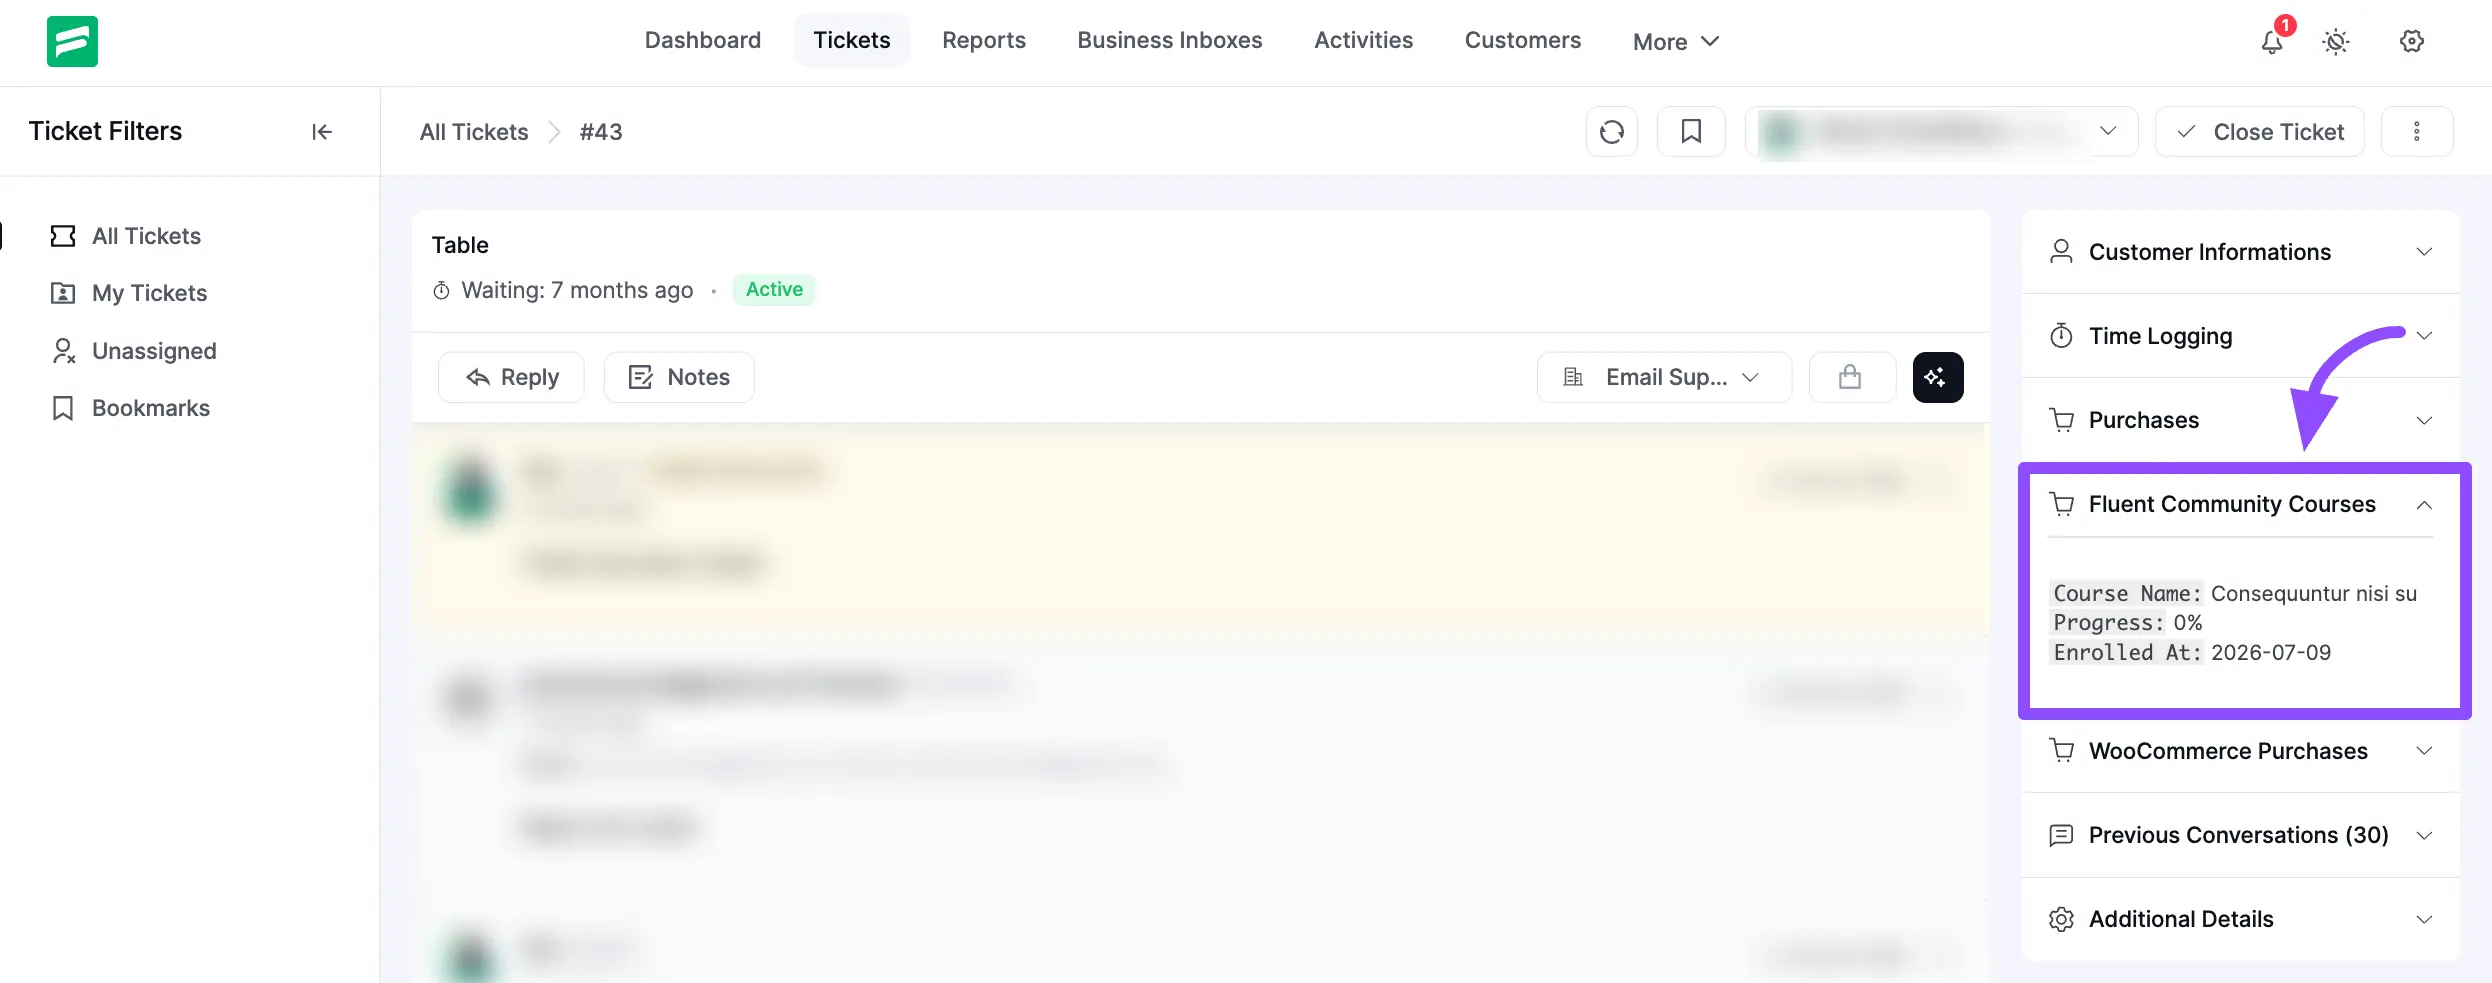
Once the integration is set up, a dedicated Fluent Community Courses widget appears for your agents inside each individual support ticket.
Where It Appears
When an agent opens a support ticket, the FluentCommunity widget shows up on the right-hand sidebar, giving them immediate context about the customer’s course enrollments.
What It Shows
The widget displays key details about the customer’s FluentCommunity activity, including:
• Course Name: The title of the enrolled course.
• Progress: How far the customer has progressed in the course.
• Enrolled At: The date the customer enrolled in the course.
The payoff: Your agents see exactly who they’re helping and where that member is in their learning journey — so every reply is faster, more personal, and more helpful.
You’re All Set
With FluentCommunity and Fluent Support working together, your community becomes a true support hub: members raise and track tickets without leaving the space, tickets route themselves to the right people, and your agents always have the full story.