

How to Monetize Spaces with FluentCommunity: A Complete Beginner’s Guide

Table of Content
Subscribe To Get
WordPress Guides, Tips, and Tutorials


In this AI era, online communities are more than just places to connect. They’re powerful spaces where creators, educators, and entrepreneurs can build deeper relationships and even generate income. Whether you’re a creator, coach, or business owner, you might be wondering, “Can I make money from my community?”
The good news is yes, and FluentCommunity makes this easier than ever. By turning your interactive community spaces into paid access areas, you can start earning from your audience while still building real engagement and connection.
However, monetizing your community shouldn’t feel technical or overwhelming, especially if you’re new to WordPress or online products. Fortunately, FluentCommunity’s monetization tools are designed to help anyone take control of their space’s earning potential without complex coding or expensive third-party systems. Moreover, this approach lets you stay centered on serving your audience with value, whether through courses, exclusive discussions, or premium content.
In this guide, we will walk you through step-by-step how to set up paid access, using tools like Fluent Forms and lock screens, so you can smoothly sell access to your online spaces. By the end, you’ll know not just why monetization matters, but how to do it confidently and effectively.
What does monetizing a space actually mean?
Before we give you the full tutorial, let’s clarify the concept. When you monetize a space, you’re essentially putting a paywall in front of part of your community. So only paying members or subscribers can enter. In other words, you give people exclusive access to special groups, lessons, or content in exchange for payment. While public spaces are open to all, paid spaces require people to pay before joining.
This model is powerful because:
- It creates recurring revenue from your community.
- It rewards people who want deeper access.
- It supports sustainable content creation.
All of this happens without taking people away from your WordPress site or community platform because FluentCommunity manages access within your own ecosystem. Now, let’s see how you can monetize your space step by step with FluentCommunity.
Set up your space for monetization
step-by-step walkthrough to help you quickly set up and launch your first paid space, even if you’re just getting started.
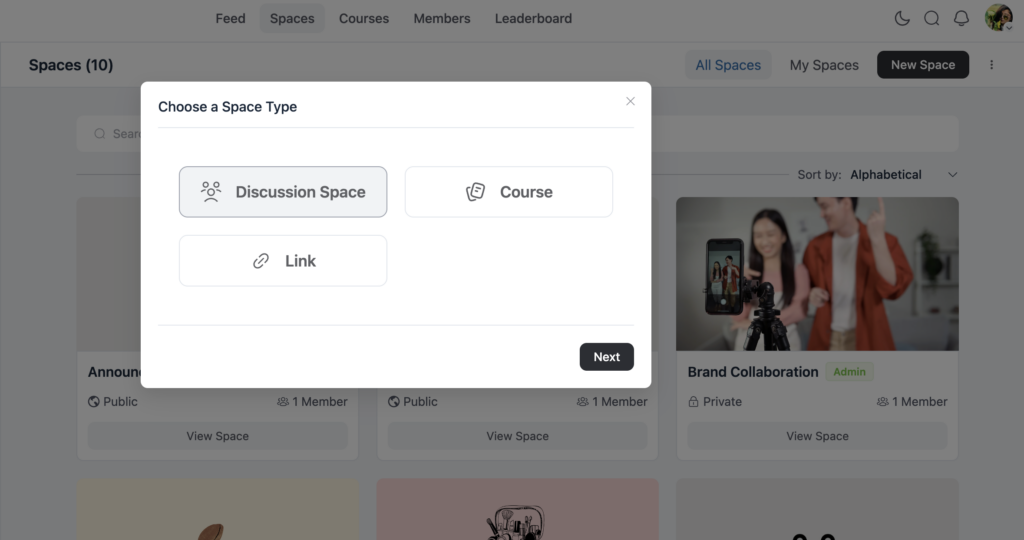
Create or use an existing space
First, decide which space you want to monetize:
- Do you already have a group of passionate members?
- Or are you starting something new?
You can either create a new space or choose an existing one that you want to make paid. FluentCommunity gives you complete control over this space’s functions, from privacy settings to access options.
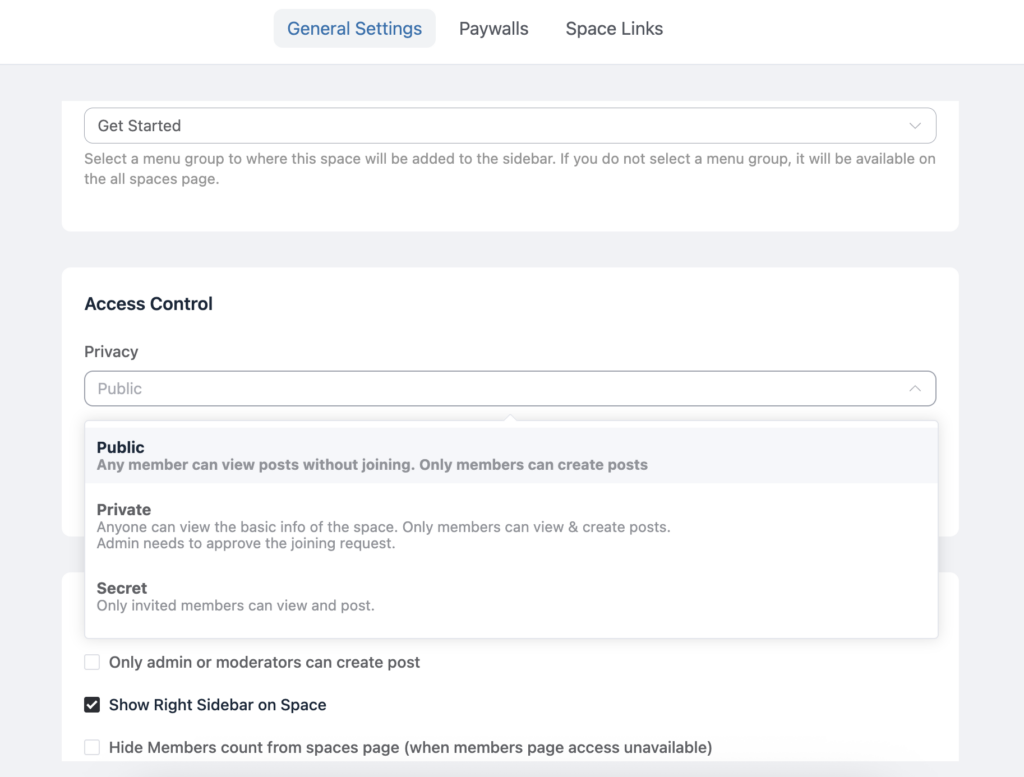
Set the space privacy to private
Now that your space is ready, it’s time to make it exclusive for paid members. First, go to the space settings by clicking the three-dot icon in the top-right corner and selecting Space Settings.
Next, under the Privacy section, choose Private. Then, select Custom Lock Screen, which allows you to display payment information before someone enters the space. As a result, once the space is set to private, only members who have purchased access will be able to view the content inside. Ultimately, this becomes the first and most important step toward successfully monetizing your space.
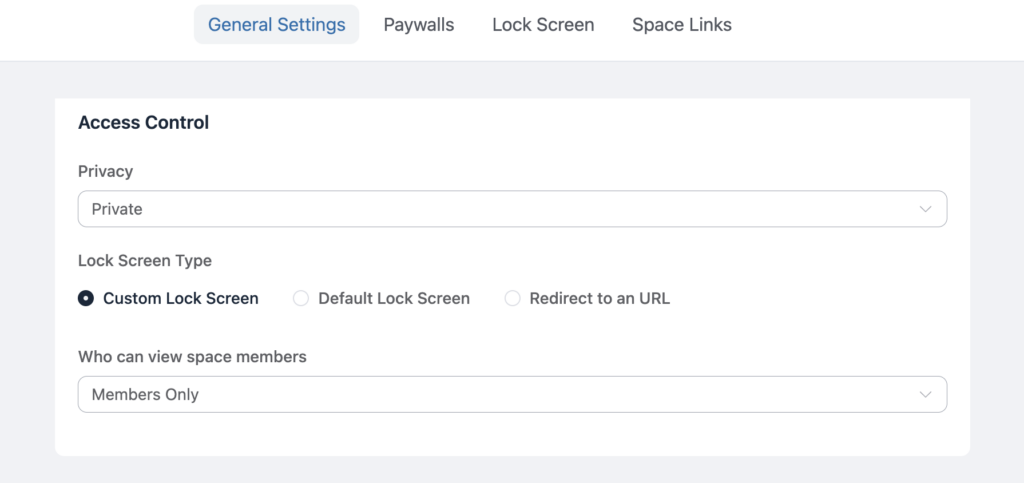
Customize the lock screen
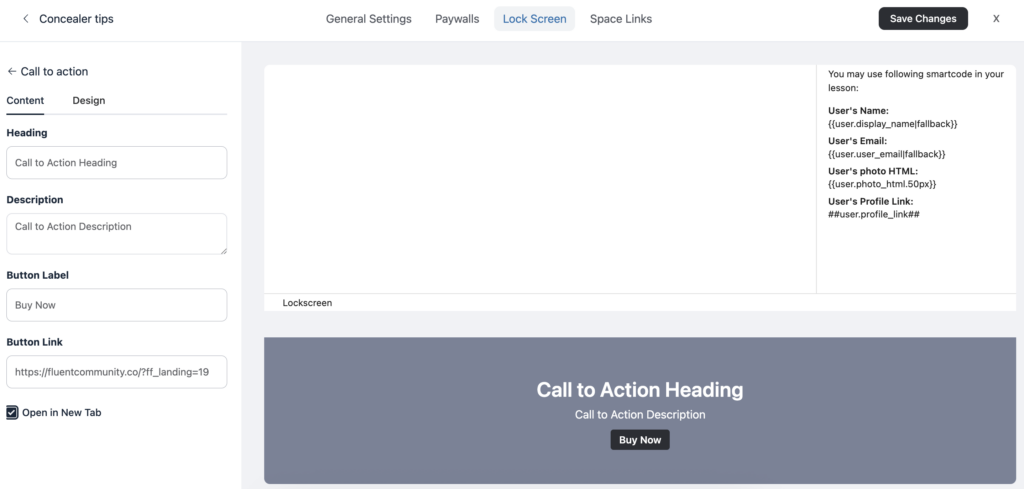
A lock screen is the page visitors see before joining your paid space, and it plays a key role in driving conversions. Typically, it includes a clear headline or brief pitch, a strong call-to-action (CTA), and a payment link or form.
To set this up, go to your space settings and click Lock Screen, then edit the Call-To-Action (CTA) section. Next, add a compelling button such as “Join Now” or “Buy Access.” As a result, this locked view guides visitors directly to your payment form and encourages them to take action.
Add a payment option with Fluent Forms
To collect payments, FluentCommunity works easily with Fluent Forms Pro, a powerful form builder for WordPress that supports payment fields.
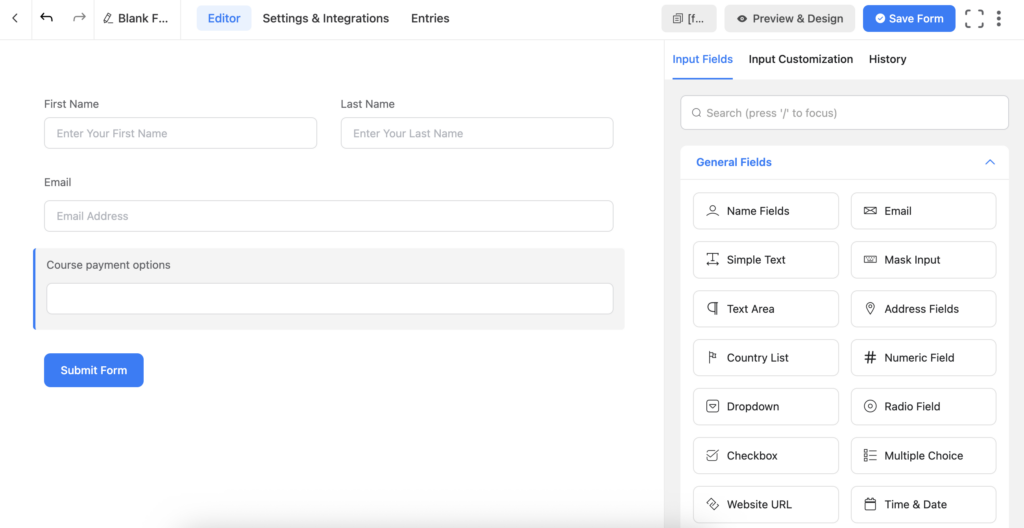
Create a payment form
To begin, open Fluent Forms from your WordPress dashboard and click Add New Form. Next, include the basic fields such as name, email, and payment amount to collect essential user details.
Then, add a Payment Field, which is responsible for collecting the actual payment. Finally, save your form. This form will serve as the payment gateway that people use to purchase access to your space.
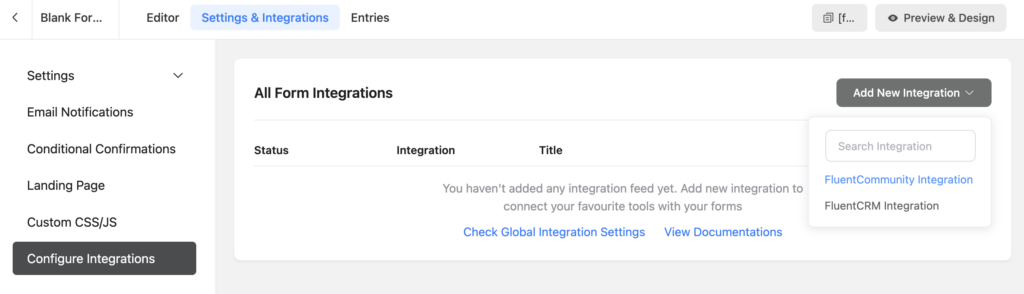
Integrate the form with FluentCommunity
After creating your payment form, the next step is to connect it with your community space. First, go to the form’s Settings & Integration panel and click Configure Integration. Then, select Add New Integration and choose the FluentCommunity Integration Feed.
At this stage, you’ll link the form fields to your space by selecting the space where members should be enrolled and mapping the Email Address field. Optionally, you can also map the Name and Password fields for new users.
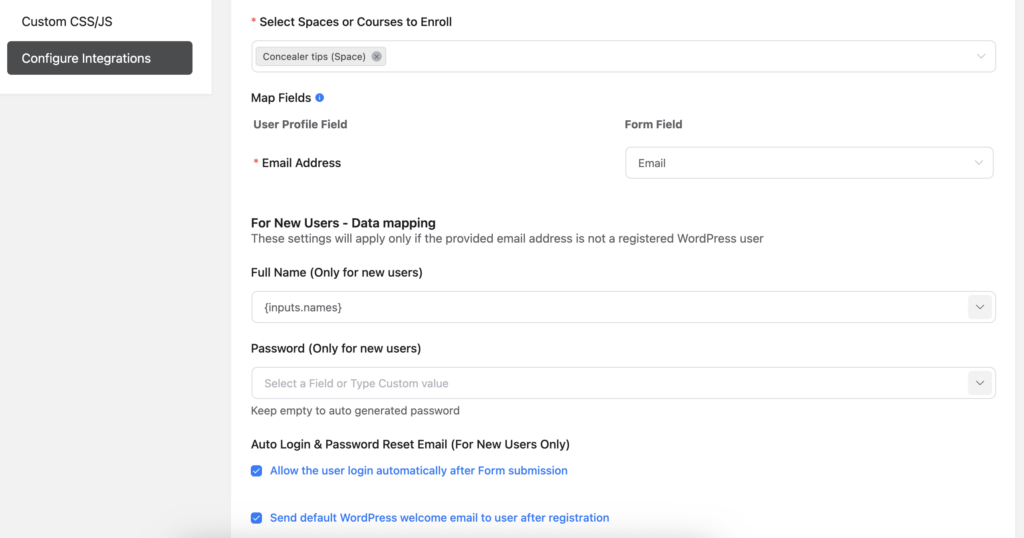
In addition, there are several extra settings you can enable, such as automatically logging users in after payment, sending welcome emails, and using conditional logic for more targeted user flows. Finally, once everything looks correct, click Save Feed to complete the setup.
Publish your monetization form
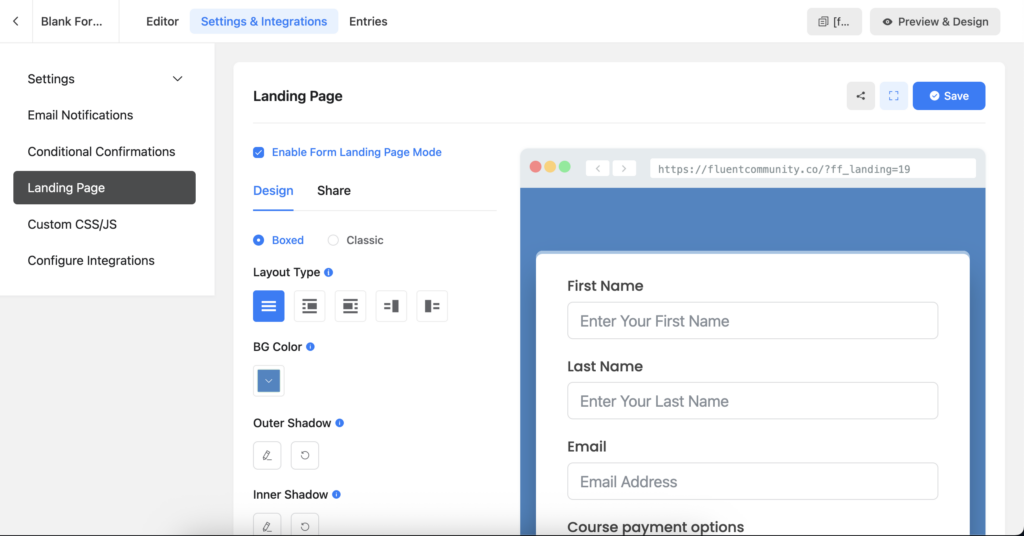
After your form is ready and fully connected, the next step is to create a dedicated payment page. First, go to the form’s Settings & Integration and select Landing Page. Then, enable Form Landing Page Mode and save your changes. Once saved, copy the landing page URL. This link will be connected to your space’s lock screen CTA button, so when visitors click “Join Now,” they are taken directly to the payment page you prepared.
Connect the payment form to the lock screen
Remember the lock screen you set up earlier? Now it’s time to connect it to your payment form to ensure a smooth experience for your visitors. First, return to the lock screen editor and locate the CTA button settings.
Once there, paste the URL of your payment form into the button link field. After confirming that everything is correct, make sure to save your changes. By doing this, anyone who clicks the CTA button on your lock screen will be directed straight to your payment form. This setup simplifies the process, making it easy for users to pay and join your community quickly and efficiently.
Now start selling your space!
With your privacy settings, lock screen, and payment form all connected, your space is now fully ready to be sold. From a visitor’s perspective, the process is simple and seamless. When a visitor lands on your space URL, they immediately see the lock screen since the space is set to private. After clicking the CTA button, they are taken directly to your payment form. Once the payment is completed, they gain access to the space. This setup ensures a smooth, professional, and user-friendly experience, allowing you to manage the entire process efficiently from your WordPress site.
Additional monetization options
FluentCommunity doesn’t just work with Fluent Forms, you have other flexible ways to monetize.
Paymattic payments
If you prefer more flexibility with payments, especially for recurring revenue, Paymattic is an excellent solution. Unlike a simple one-time payment form, Paymattic allows you to set up recurring payments or subscription-based access for your space or course. This means that instead of collecting a single payment, members can be automatically billed on a weekly, monthly, or yearly basis, providing a steady income stream.
Additionally, Paymattic offers advanced payment features, such as multiple payment gateways, automatic invoicing, and secure transaction handling. By integrating it with your space, you can manage memberships, offer trial periods, or even create tiered subscription plans, all directly from your WordPress site, making monetization more professional and scalable.
FluentCart integration
For complete e-commerce monetization, especially if you’re selling multiple products, memberships, or digital content, FluentCommunity, combined with FluentCart, offers a powerful solution. By integrating FluentCart with your community spaces, you can link individual products directly to specific spaces or courses. This means that whenever a new customer completes a purchase, they are automatically granted access to the corresponding space without any manual intervention. This integration is not only streamlines the user experience but also saves you time managing memberships.
Moreover, FluentCart provides a wide range of pricing flexibility. You can offer one-time purchases, subscription-based access, or even bundled packages that combine multiple products or memberships. This allows you to create customized pricing strategies that suit your audience, encourage repeat purchases, and maximize revenue, all while keeping everything managed efficiently from your WordPress dashboard. For the monetization process, you can check out the FluentCommunity version 2.0.0 release note.
Best practices for monetizing your space
Here are some smart tips to maximize your monetization and boost revenue. By following these strategies, you can optimize your pricing, streamline access, encourage subscriptions, and create a seamless experience for your users, ensuring your community or products generate consistent and sustainable income effectively.
Create value first
Before you start charging, ensure your space offers something valuable to your audience. This could be unique content, engaging community interactions, or meaningful learning experiences. Providing clear value builds trust, encourages participation, and motivates users to pay, making your space more attractive and successful in generating revenue.
Explain the benefits clearly
Your lock screen is a critical first impression and should clearly communicate why visitors should pay for access. Highlight the key benefits, unique features, and value your space provides. By showcasing what makes your community, content, or course special, you can capture interest, build trust, and motivate users to take action and complete the payment.
Test your payment flow
Before launching, always test your payment form and user access yourself to confirm everything works smoothly. This helps prevent any issues where users might get stuck or face errors during checkout. By verifying the entire process firsthand, you can provide a smooth experience, build trust, and ensure that members can access your space immediately after payment.
Track conversions
Leverage analytics and community metrics to understand which spaces drive the most conversions and why. By tracking engagement, user behavior, and payment patterns, you can identify what content, features, or strategies resonate best with your audience, allowing you to optimize your spaces for higher participation and increased revenue.
Promote it well
Promote your space by sharing its link across social media platforms, newsletters, and other relevant channels where your audience is active. By reaching potential members through multiple touchpoints, you increase visibility and engagement. Consistent promotion helps attract new members, grow your community, and drive more sign-ups, ensuring your space reaches the right people effectively.
Conclusion
Monetizing your FluentCommunity spaces is a powerful way to grow your online presence while generating real income, and the best part is, it’s easy and flexible. With a private space, custom lock screen, and a connected payment form, you can start earning from your most engaged followers without needing complicated setups or expensive tools. The process lets you control who gets access, how customers pay, and how content is delivered, all within your WordPress site.
Moreover, by combining tools like Fluent Forms, Paymattic, or FluentCart, you get advanced monetization options like subscriptions, bundles, and automated member onboarding. No matter if your niche is education, coaching, or exclusive groups. This workflow gives you a professional and scalable way to transform your community into a revenue stream.
Lastly, remember that monetization works best when paired with clear value and excellent communication. So go ahead, set up your paid space, test your process, and watch your community flourish both socially and financially.

Prema Anjum
My full name is Anzuman Ara Chowdhury. But people know me as Prema Anjum. I’m a Digital Marketer by profession, a WordPress community contributor, and a travel enthusiast by heart.


Leave a Reply