
How to Build an E-Learning Platform: Complete Guide for WordPress Users

Table of Content
Subscribe To Get
WordPress Guides, Tips, and Tutorials


Online education is booming, and there’s never been a better time to launch your own platform. The global e-learning market continues to grow rapidly, with millions of people choosing online courses over traditional classroom settings. While AI tools like ChatGPT and Claude have transformed how people find information, they can’t replace what a true e-learning platform offers: structured learning paths, community support, accountability, and expert-led instruction that guides students from beginner to mastery.
Whether you’re a course creator looking to monetize your expertise, a business owner wanting to train employees or customers, or an educator ready to reach students beyond your local area, building your own e-learning platform gives you complete control over your content, pricing, and student experience.
The challenge? Most people assume building a professional learning platform requires expensive developers, complex coding, or costly monthly subscriptions to hosted services. That’s simply not true anymore. With the right tools, you can create a fully-featured e-learning platform on WordPress without writing a single line of code.
This guide walks you through every step of the process, from choosing your tools to launching your first course. You’ll learn how to set up courses, build a student community, and accept payments using FluentCommunity and FluentCart. By the end, you’ll have a professional platform ready to welcome your first students.
What is an E-Learning Platform?
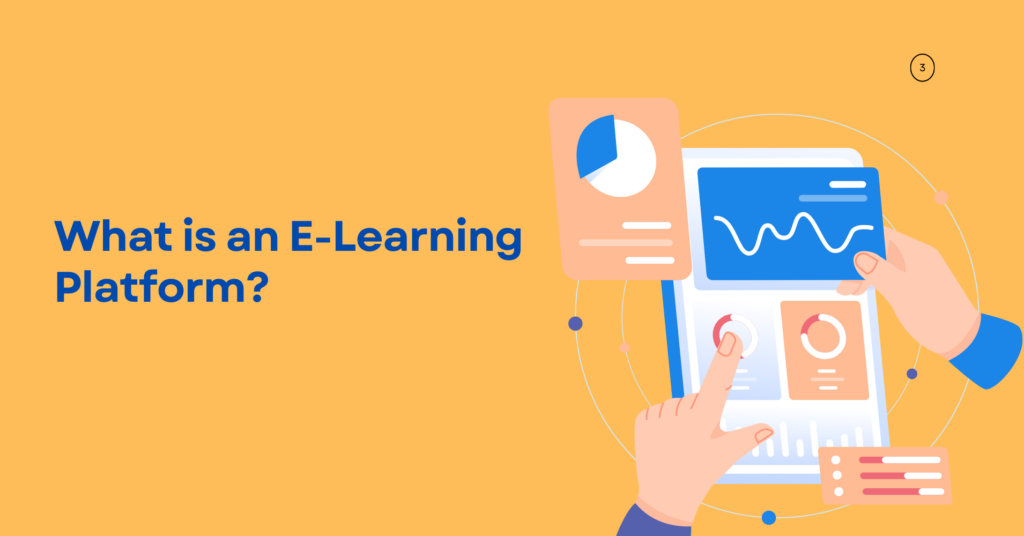
An e-learning platform is a digital space where educators deliver courses, training materials, and educational content to students online. Think of it as your own virtual school or training center that lives on the internet.
A complete e-learning platform brings together several essential features to create a seamless learning experience. First and foremost, you need course hosting capabilities, which means the ability to share video lessons, text content, and downloadable resources with your students. Equally important is student management, allowing you to handle enrollment, track progress, and issue certificates when learners complete your courses.
Beyond the basics, a strong platform also includes community features like discussion forums and Q&A sections where students can interact with each other and with you. Additionally, you’ll want payment processing to accept one-time purchases, subscriptions, or memberships. Finally, access control features let you drip content over time, create different membership levels, and set prerequisites for advanced courses.
Popular examples include platforms like Teachable, Thinkific, and Kajabi. However, these hosted solutions come with monthly fees, transaction cuts, and limited customization. The alternative? Build your own platform on WordPress.
Why Build Your Own E-Learning Platform?
Before exploring the process of making an online platform, let’s talk about why self-hosting makes sense for many creators. When you use a hosted platform like Teachable or Kajabi, you’re building your business on rented land. The platform sets the rules, takes a cut of your revenue, and can change terms whenever it wants. Self-hosting flips that equation entirely. You maintain full control over your business, your brand, and your relationship with students. While it requires a bit more initial setup, the long-term benefits far outweigh the upfront effort. Here’s what you gain when you build your own platform.
Full Ownership
With hosted platforms, you’re essentially renting space. The platform owners can change pricing, shut down their service, or modify features at any time without your input. When you build on WordPress, however, you own everything. Your content, your student data, and your entire platform belong to you.
No Transaction Fees
Platforms like Teachable take 7.5% of your revenue on lower tiers. To put that in perspective, on a $100,000/year course business, that’s $7,500 gone every year just in transaction fees. Self-hosted solutions like FluentCart, on the other hand, charge 0% transaction fees, meaning you keep what you earn.
Complete Customization
Want a specific feature that other platforms don’t offer? Need custom branding to match your unique style? Hosted platforms limit what you can do with rigid templates and restricted options. WordPress, by contrast, gives you unlimited flexibility through themes, plugins, and custom code when needed.
Community Integration
Most course platforms treat community as an afterthought, often bolting on basic forum features as an add-on. Building on WordPress lets you create a true learning community where courses and discussions live together seamlessly, creating a more engaging experience for your students.
Cost Efficiency at Scale
Hosted platforms typically charge per student or by revenue, which means as your course business grows, your costs balloon right along with it. Self-hosted platforms, however, have fixed costs regardless of how many students you enroll. Whether you have 100 students or 10,000, your platform costs stay predictable.
E-Learning Platform vs. AI Search: Understanding the Landscape

With AI tools like ChatGPT and Claude becoming increasingly popular, some wonder if traditional e-learning platforms are still relevant. The short answer is yes, and here’s why.
AI search tools are excellent at providing instant answers to questions. They’re perfect for quick information lookups and can explain concepts on demand. However, they lack several crucial elements that make learning truly effective.
For instance, AI tools don’t offer structured learning paths that guide you from beginner to advanced. They can’t provide accountability or track your progress over time. Perhaps most importantly, they’re missing the human connection and community that keeps learners motivated, and they can’t offer the personalized feedback from experts that helps students truly master a skill.
E-learning platforms, in contrast, excel at providing guided education experiences. They’re designed to take learners from beginner to advanced levels systematically, building skills through practice and assignments along the way. Platforms create cohorts and peer accountability, which research shows dramatically improves completion rates. They also provide expert instruction and mentorship, along with recognized credentials that students can showcase.
The good news is that these two aren’t competitors. Instead, they’re complementary. Smart course creators are using AI to enhance their platforms while focusing on what AI can’t replace: community, accountability, and human expertise.
Choosing the Right Tools for Your Platform
Before building, you need to choose your tech stack. Let’s look at how the popular options compare so you can make an informed decision.
Hosted Platforms
When it comes to hosted solutions, you have several choices, each with its own strengths and limitations.
Skool has gained popularity for its simple gamification features that keep students engaged. At $99 per month flat (that’s $1,188 per year), it offers basic course tools with a strong community focus. It’s a good middle-ground option, though it may feel limiting as your course business grows.
Circle takes a different approach with its clean, modern interface that’s easy to use right out of the box. However, it starts at $89 per month, which adds up to $1,068 per year. The platform is better suited for community building than course delivery, as its course features are somewhat limited.
Self-Hosted WordPress Solution
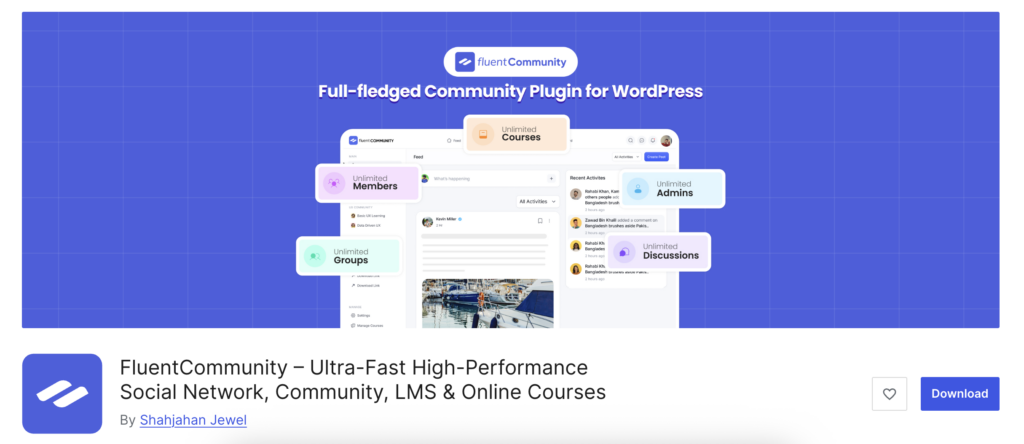
For WordPress users who want ownership and flexibility, FluentCommunity, paired with FluentCart, offers the most cost-effective path to a professional e-learning platform. Unlike the hosted options above, this is a one-time purchase that you own forever. It includes full course and community features built right in, with 0% transaction fees eating into your revenue. Because it’s native to WordPress, you get complete customization control and access to the entire WordPress ecosystem of themes and plugins.
Create an E-Learning Platform with FluentCommunity (Step-by-Step)
Now let’s build your platform. This guide assumes you have WordPress installed and running on your hosting account.
Step 1: Install FluentCommunity
Getting started is straightforward. Begin by purchasing FluentCommunity from the official website or WordPress.org. Then download the plugin zip file from your account dashboard. Next, log into your WordPress site and navigate to Plugins, then Add New, and finally Upload Plugin. From there, upload the zip file you downloaded and click Install Now. Once the installation completes, activate the plugin, and you’ll see a new FluentCommunity menu item appear in your WordPress dashboard.
Step 2: Configure Basic Settings
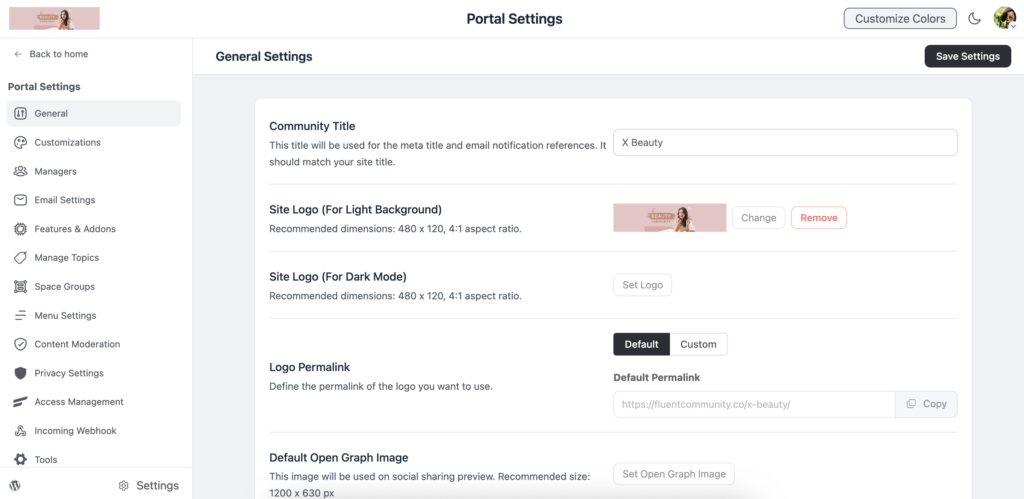
With the plugin activated, it’s time to set up the basics. Head over to FluentCommunity and then Portal Settings to access the configuration options. Start by setting your community name and description, which will appear throughout your platform. Then upload your logo and customize the colors to match your brand identity. Take a moment to configure email notifications, so students receive important updates, and finally, set up your community URL slug to create a clean, memorable web address for your learning platform.
Step 3: Create Your Course Space
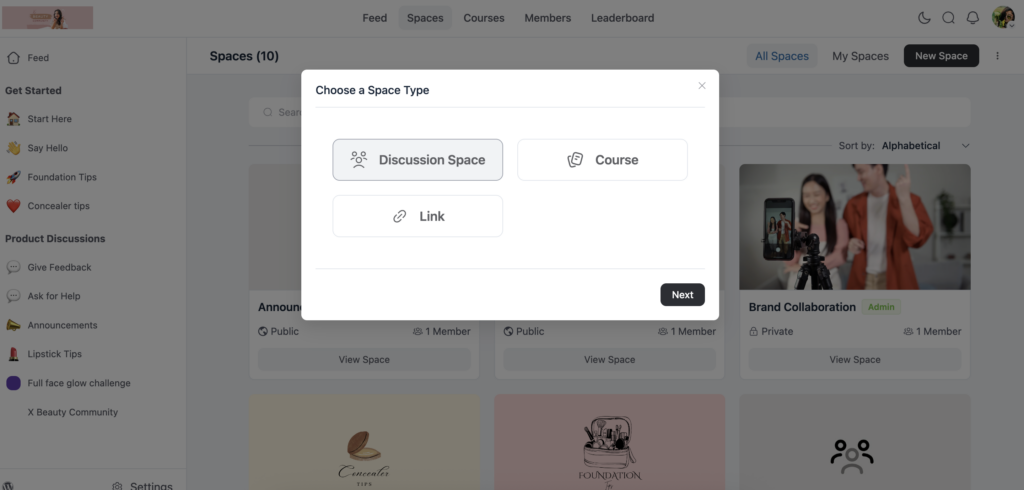
FluentCommunity uses “Spaces” to organize content, so you’ll want to create a dedicated space for your course. Navigate to FluentCommunity and then Spaces, and click New Space to get started.
Give it a name that matches your course, such as “Photography Masterclass” or whatever fits your topic. When selecting the space type, choose Course to unlock all the learning-specific features.
Add a compelling description and an eye-catching cover image to draw students in, and set the access permissions to control who can view the content. Don’t worry about connecting payments just yet. We’ll cover that in a later step.
Step 4: Build Your Course
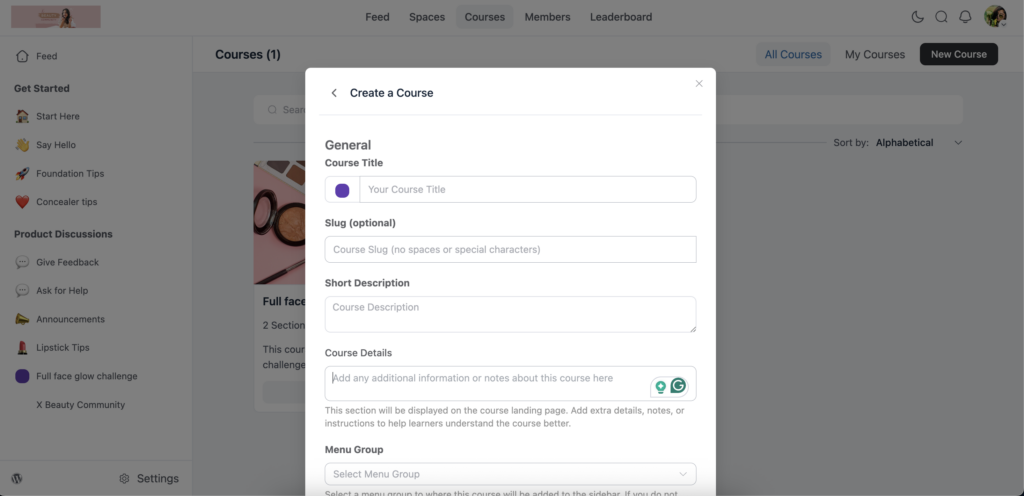
Now, it’s time to build out your course curriculum for the space. Go to the Courses section, and click to New Course button to create your first course. Give Course Title, Slug, Course Details, and Menu Group from the Spaces.
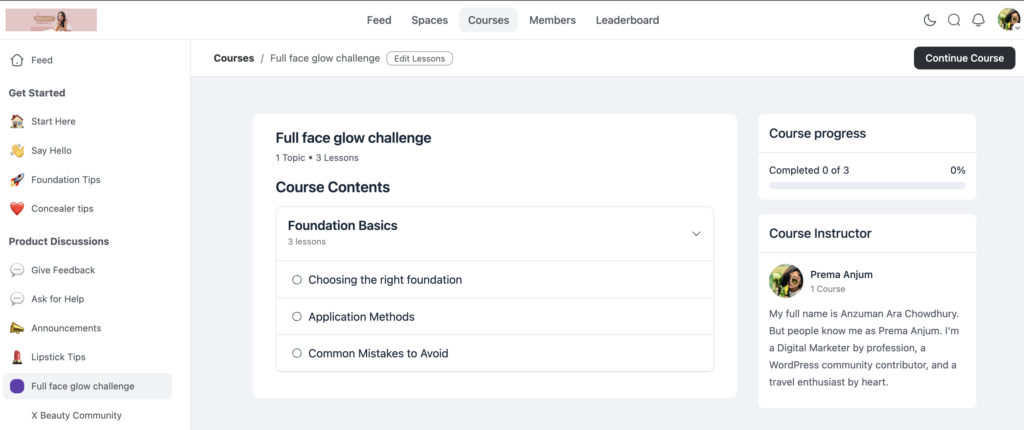
After creating the course, start drafting your course content. Then prepare the lessons for the specific course. Lessons are like chapters in a book, helping organize your content into logical chunks. Within each lesson, you can add various types of sections.
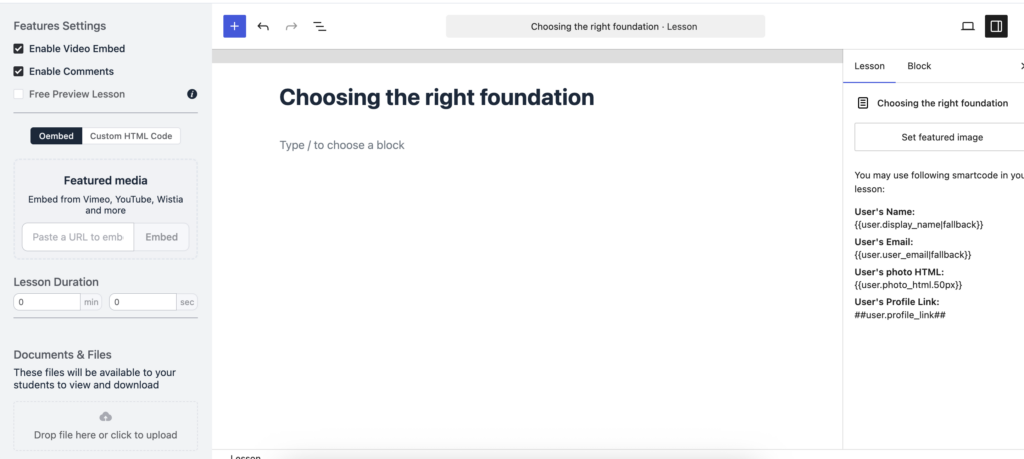
Video lessons can be uploaded directly or embedded from platforms like YouTube or Vimeo with the Gutenberg editor. Text lessons support rich formatting for written content. You can also attach downloadable resources such as PDFs and worksheets, and include quizzes and assessments to test student understanding.
Here’s a helpful tip as you structure your course: aim for 5-7 lessons with 3-5 sections each. This creates clear progress milestones for students and prevents them from feeling overwhelmed by too much content at once.
Step 5: Set Up Your Community Features
E-learning works best when students have community support, so take time to configure these engagement features. Start by enabling discussion boards, which allow comments on lessons for questions and answers. Then create a community feed. A general discussion space where students can interact beyond specific lessons.
Consider enabling direct messaging so students can connect one-on-one with peers who share their interests. A member directory helps students find and connect with others in the community, while leaderboards add gamification elements that boost engagement and friendly competition.
Step 6: Choose Your Enrollment Type (Optional)
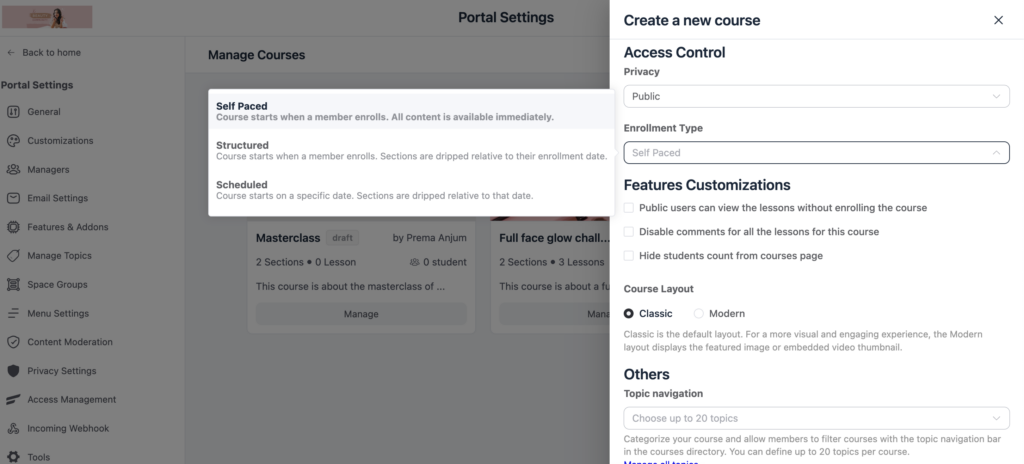
If you want to release content over time rather than all at once, FluentCommunity offers flexible enrollment types to control how students access your lessons. Releasing content gradually helps prevent overwhelm and has been shown to boost course completion rates.
To set this up, go to your course settings while creating a course, and look for the Enrollment Type option under Access Control. You’ll find three choices to pick from. Self-paced learning allows students to access all course content right away, which works well for evergreen courses where learners want to move at their own speed.
Structured releases content slowly based on when each student enrolls, so every learner gets a personalized drip schedule starting from their enrollment date. Scheduled is ideal for cohort-based courses where everyone starts on a set date and new lessons are released on a fixed timeline that all students follow together. Choose the option that best fits your teaching style and the type of course you’re creating.
Step 7: Design Your Course Landing Page
Finally, create a compelling sales page that converts visitors into students. Edit your course space and customize the public-facing landing page that non-enrolled visitors will see. Your landing page should include a clear course overview that explains what students will learn and the benefits they’ll gain. List out the curriculum outline, so prospects know exactly what they’re getting.
Add an instructor bio to build trust and credibility, and include student testimonials if you have them to provide social proof. Don’t forget to display your pricing information clearly so visitors can make an informed decision.
Collect Payment with FluentCart
Now let’s connect payments so students can purchase access to your course, and you can start earning revenue.
Step 1: Install FluentCart
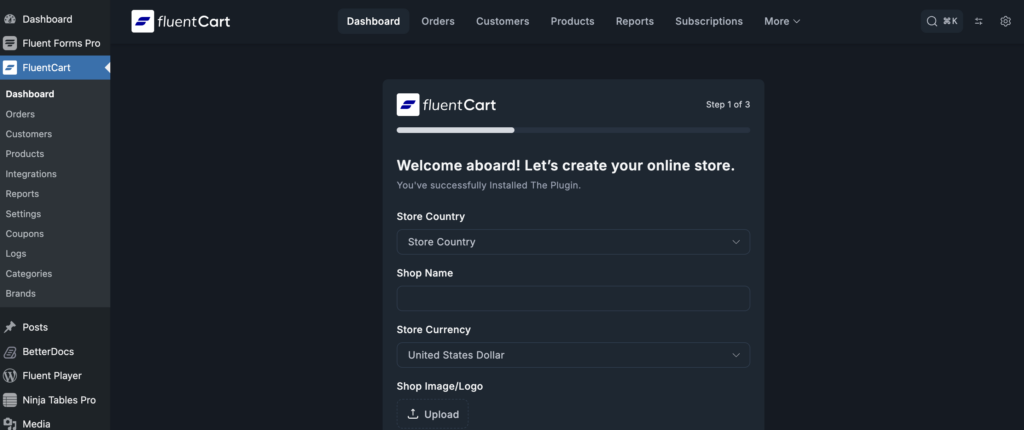
The installation process mirrors what you did with FluentCommunity. Purchase FluentCart from the official website, then install and activate it just like you did before. Once activated, FluentCart adds its own dashboard section where you’ll manage products, orders, and settings.
Step 2: Connect Payment Gateways
FluentCart supports multiple payment processors to meet your students wherever they are. Go to FluentCart, then Settings, then Payments to access your options. From there, connect your preferred gateway based on your needs. Stripe is an excellent choice for credit cards, Apple Pay, and Google Pay, offering a smooth checkout experience.
PayPal provides global coverage and is familiar to many online shoppers. For creators focused on the Indian market, Razorpay is a strong option, while Mollie handles European payments beautifully. Simply enter your API credentials for your chosen gateway, then test with a small transaction to make sure everything works correctly before going live.
Step 3: Create Your Course Product
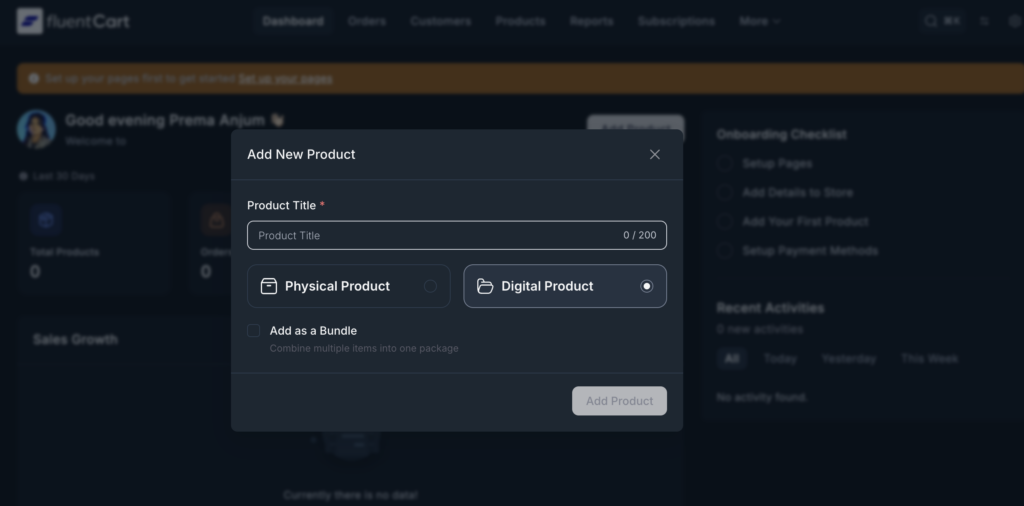
With payments connected, it’s time to create your course product. Navigate to FluentCart and then Products, and click Add New Product. Select the product type that matches your business model: one-time purchase for a single payment with lifetime access, subscription for recurring monthly or yearly payments, or payment plan to split the cost into installments for higher-priced courses. Set your price, then add a compelling product description and attractive images that showcase the value students will receive.
Step 4: Connect Product to FluentCommunity
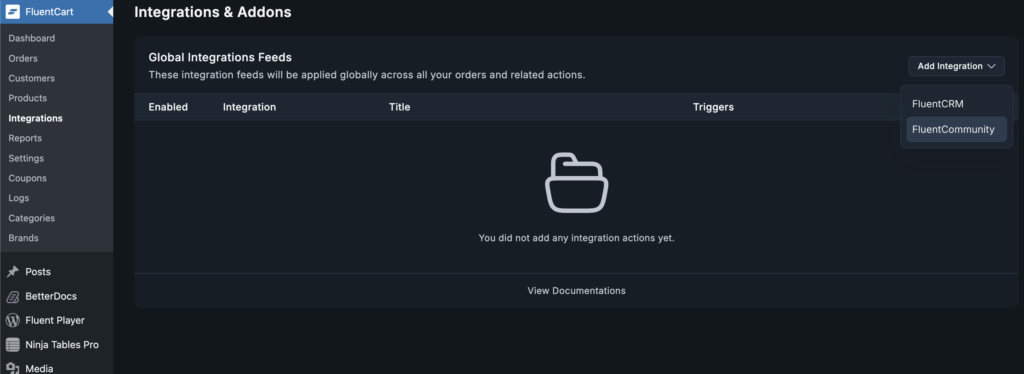
This step is where everything comes together. In your product editor, click the Integrations tab, then click Add Integration and select FluentCommunity Feed. Here, you can select which spaces and courses this product should unlock using the Add to Spaces and Add to Courses options. Choose your Event Trigger to specify when access is granted; it is typically set to Order Paid, so students get immediate access after purchase.
You can also enable the option to automatically remove access if a refund is processed or a subscription expires. Save your integration feed, and the automation handles the rest: when someone purchases, they’re immediately enrolled in your course without any manual work on your end.
Step 5: Set Up Your Checkout
FluentCart offers complete design flexibility for your checkout experience. Go to FluentCart Pro, then Settings, then Store Settings, and select Cart & Checkout to access these options. You can build and customize your checkout page using Gutenberg, Elementor, or Bricks to match your brand perfectly. If you want to increase your average order value, enable the Order Bump feature under the More menu, which lets you present complementary product offers directly on the checkout page. You can also customize your thank-you page with payment instructions and clear next steps so new students know exactly what to do after purchasing.
Step 6: Create Coupons and Promotions
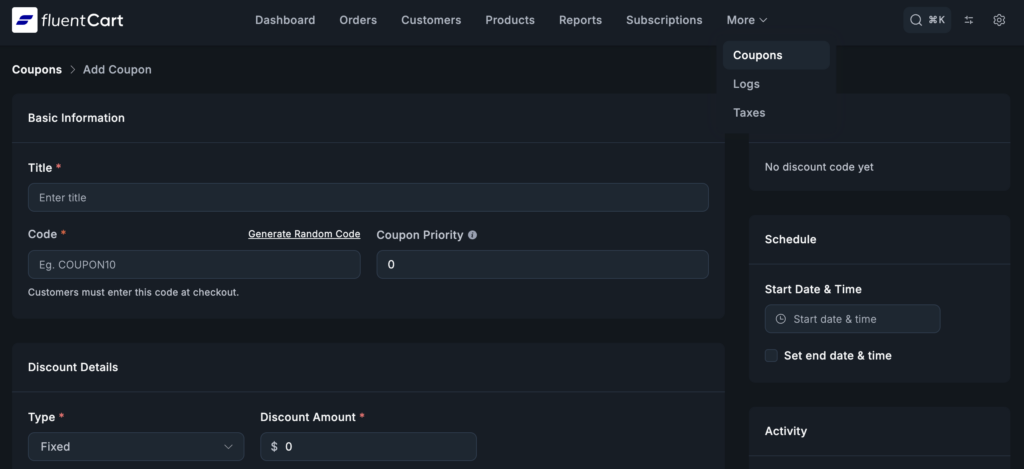
Driving sales often requires strategic discounts, and FluentCart makes this easy. Go to FluentCart and then Coupons to create your discount codes. You can offer percentage-off discounts like 20% OFF, fixed amount discounts like $50 OFF, or even free trial periods to let students sample your content. For each coupon, you can set expiration dates to create urgency and usage limits to control how many times a code can be redeemed.
Launch Checklist
Before opening enrollment to the public, take time to verify everything works correctly. Test the complete purchase flow yourself by going through checkout as if you were a student. After purchasing, verify that the course access grants correctly, and you can view all the content. Check that all videos play properly without buffering or quality issues, and test on mobile devices since many students will access your course from their phones.
Also, confirm that email notifications are sent correctly for purchases and course updates. Review your refund policy and terms to make sure they’re clearly displayed. Set up Google Analytics tracking so you can monitor traffic and conversions, and create a backup of your site before launch in case anything goes wrong.
Growing Your E-Learning Platform
Once you’ve launched, the real work of growing your course business begins. Here are proven strategies to expand your reach and impact.
Build Your Email List
Email marketing remains one of the most effective ways to sell courses, so start building your list early. Offer a free mini-course or valuable resource to capture leads from your website visitors. FluentCRM pairs perfectly with FluentCommunity for email marketing automation, allowing you to nurture leads and convert them into paying students over time.
Leverage Your Community
Happy students are your best marketers, so create opportunities for them to spread the word. Encourage them to share their wins and transformations in the community, which provides social proof for prospective students. Ask satisfied learners to leave testimonials that you can feature on your sales page, and consider setting up an affiliate program to reward students who refer their friends.
Create a Content Ladder
Building multiple offerings at different price points creates a natural path for students to follow. Start with free content on your blog or YouTube channel to build awareness and attract new audiences. Then offer a low-ticket product in the $27-97 range to build trust and give people a taste of your teaching style.
Your signature course in the $297-997 range becomes your main revenue driver, while high-ticket programs at $2,000 or more serve your most dedicated students who want premium access and personalized support.
Continuously Improve
Use FluentCommunity’s built-in analytics to track how your course is performing and identify areas for improvement. Monitor your course completion rates to see if students are finishing what they start. Check lesson engagement to identify which content resonates most and which sections might need work.
Track community activity to gauge how engaged your students are beyond the lessons, and pay close attention to student feedback in comments and discussions. Most importantly, iterate based on data rather than assumptions. Let your students’ behavior guide your improvements.
Conclusion
Building an e-learning platform doesn’t require a massive budget or technical expertise. With WordPress, FluentCommunity, and FluentCart, you can create a professional platform that rivals expensive hosted solutions while keeping full control of your business.
The key advantages of this approach are clear. You get full ownership of your content and student data, with no third party able to pull the rug out from under you. You keep 100% of your revenue with zero transaction fees eating into your profits. Your courses and community live together in an integrated environment that boosts engagement and completion. And with a one-time cost instead of ongoing monthly fees, your platform becomes more cost-effective as you grow.
Start with a single course and focus on helping your students get real results. Let your community grow organically through word of mouth and student success stories. Remember, the best e-learning platforms aren’t built overnight—they evolve with your students’ needs and your growing expertise as a course creator.
Ready to build your platform? Install FluentCommunity and FluentCart, follow this guide, and launch your first course this week.

Prema Anjum
My full name is Anzuman Ara Chowdhury. But people know me as Prema Anjum. I’m a Digital Marketer by profession, a WordPress community contributor, and a travel enthusiast by heart.


Leave a Reply